Pages

Wednesday, June 28, 2017

Awesome Zen Crests

I sometimes like to add Zentangle onto a card, and these simple patterns are not hard to do. This post also appears on the Magenta Blog today.


I started with a piece of watercolor cardstock and placed masks from Crests 02 and the small Temari mask onto my panel. I sprinkled some Nuance powder onto the cardstock and spritzed lightly with water. Since some of the powder landed onto my masks, I flipped them over onto the cardstock to make a mirror image.

I added some background with Memento Gray Flannel ink through the Waves stencil, using a finger dauber. I then added some Zentangle to two of the images with a Micron black 01 pen. I added the sentiment with Versafine Onyx Black ink.

I die cut the panel to 5.25" x 4" using the Stitched Rectangle die from Die-namics MFT463 Blueprints 13, and mounted it onto a piece of So Silk Glamour Green cardstock.

Magenta Products Used:
(If you are local, please look for products at Art 'n Soul. If you are not local and wish to find Magenta products, you can click on the link in the stamp or product name below each image, or you can visit the Magenta online store here).
Crests 02

MC28 Temari Small

TM156 Waves

07.966.D You are Awesome!

MNU001 Turquoise Nuance

MNU007 Raspberry

MNU013 Royal Blue

Other Products used:
Memento ink Gray Flannel
Black 01 Micron Pen
Die-namics MFT-463 Blueprints 13 die set
So Silk Glamour Green cardstock
Watercolor cardstock

Tuesday, June 27, 2017

Abandoned Art

Have you ever heard of Abandoned Art? You make a piece of art and leave it in a public place with the idea that a person who likes it will find it and take it home. It's such a great idea! I recently found out that someone I know - a friend of a friend - Gabriele Dunbar, has been stamping rocks with the small Zen Sunflower Bird stamp that I designed for Magenta, and then painting them. She has been leaving these in parks as Abandoned Art, and she sent one to me.

by Gabriele Dunbar
Isn't it the cutest thing? I felt so honored to have my image used in this way, and Gabriele does such a great job with them. Thank you Gabriele, and I love, love, love this!

This is so cool that it makes me want to do some Abandoned Art as well. If you try, be sure that whatever medium you use will be able to withstand the elements where you leave your art!

44.021.H Zen Sunflower Bird Small

Saturday, June 24, 2017

Amazing Triangles

This new Triangles stencil makes a great background in full or in part. It would also make a great "guy" card. This post is on the Magenta blog today.


I placed the Triangles stencil on a panel of white cardstock cut with the largest die in the Lawn Fawn Small Stitched Rectangle Stackables die set. I applied Distress Oxide inks, Wilted Violet, Spiced Marmalade, and Cracked Pistachio, using a blending tool and spritzed water lightly across the panel. When the panel was dry, I stamped the sentiment with Versafine Onyx Black ink and added a few sequins.

Magenta Products Used:
(If you are local, please look for products at Art 'n Soul. If you are not local and wish to find Magenta products, you can click on the link in the stamp or product name below each image, or you can visit the Magenta online store here).

TM220 Triangles
07.968.H You are Amazing
Other Products used:
Distress Oxide: Wilted Violet, Cracked Pistachio, Spice Marmalade
Onyx Black Versafine
So Silk Black cardstock
Various sequins

Thursday, June 22, 2017

Technique of the Week: Double Embossing

As you all may know, there are two main kinds of embossing that we do. One is "dry embossing", where you emboss the paper with either a stencil or embossing folder, using a die cut machine or an embossing stylus. The other is heat embossing, where you apply powder to ink on your paper and heat it until it melts. For this technique, we are doing both kinds!


RUBBER MAT
Before I get into the technique, I want to talk about rubber mats. To emboss a stencil or die using your die cut machine (Big Shot or Cuttlebug) you need a rubber mat. In this technique I used a regular rubber mat (Spellbinders tan mat) and had to shim with 5 pieces of cardstock to get it to make an adequate impression. Lynell Harlow, who pioneered this technique, developed a thicker mat to use, that works much better. Art 'n Soul is going to try to obtain some of these mats from Stampendous. Lynell has said that Stampendous has some in stock, but it's uncertain whether they will continue to carry it. We plan to try to get them in before Lynell's classes in August (which you should not miss; please scroll down for details) Please order one of these mats from Art 'n Soul if you want one, because they may not be available indefinitely.

Now for this technique: I should say that I learned this from Lynell Harlow, and it's not only beautiful, but it's fun to do. My way is slightly different from Lynell's, but both work.


I chose the Magenta Triangles stencil (TM-221) for this technique. I cut a panel of 80# Neenah Solar White cardstock to 3.75" x 5", using the Lawn Fawn LF-768 Small Stitched Rectangle Stackables die. 


I taped the panel to the back of the stencil and embossed it in my Big Shot machine.


Every machine is different, and you may have to figure out the appropriate sandwich for your machine. For mine, I opened Tab 1 (you should set up your machine the way you would to emboss with an embossing folder) and I put down a metal shim, my rubber mat, 5 pieces of shim cardstock, my stencil with the panel taped to it, and both cutting plates.


Once my panel was dry embossed, I added color using a mini blender and Distress Oxide inks in Wilted Violet, Broken China, and Cracked Pistachio. (The panel was still taped to the stencil at this point).


If you move quickly with this process, you can remove the stencil and add your embossing powder to your panel, since Oxide inks are a fusion of dye and pigment inks and can be heat embossed. Unfortunately, since I did not move quickly enough, the bottom of my panel had dried. I replaced the stencil and added Versamark ink with a mini blending tool and added clear embossing powder over the panel. 


Once the panel was heat set, I decided to add another coat of clear embossing, so I placed the stencil again and added more Versamark ink, then more clear embossing powder. 


Placing the stencil is very easy at this point, because the triangles and squares have become raised up by the double embossing.


Once I had the second layer of embossing done, I absolutely loved the look of the shiny and bright triangles and squares!


I cut a strip of the panel, matted it in So Silk Glamour Green cardstock, and adhered it to my base card of Neenah Solar White 110# cardstock.


I then die cut "Thank You" out of glossy black cardstock, using the Hero Arts Fancy Thank You die DI080.

I sprinkled a few sequins at the end, and I still have half a panel to make another card. I hope you try this beautiful technique! Come in and see the card at the shop, it is so cool in real life. If this technique appeals to you, please check out Lynell Harlow's 4 new incredible stencil classes.

Magenta Products Used:
(If you are local, please look for products at Art 'n Soul. If you are not local and wish to find Magenta products, you can click on the link in the stamp or product name below each image, or you can visit the Magenta online store here).

TM221 Triangles
Other Products Used:
Distress Oxide inks: Wilted Violet,
Broken China, Cracked Pistachio
Versamark ink
JudiKins clear detail embossing powder
Lawn Fawn LF768 Small Stitched Rectangle Stackables
Hero Arts DI080 Fancy Thank You
Glossy black cardstock
So Silk Glamour Green cardstock
Neenah Solar White 80# & 110# cardstock

Kensington Thank You


This is the last of the samples I made for my Alcohol Ink Mini class, and it's one of my favorites. I helped design the Magenta sentiment stamp that I used here, and it's close to my heart. All of the languages used here mean a lot to me, especially the second one, "Takk fyrir", which is Thank You in Icelandic.


The strip of alcohol ink covered Yupo paper is just a piece of a larger panel that I made. Yupo paper is plastic and can be tough, but it can be cut and die-cut.

I mounted the colored Yupo paper onto a strip of Stardream Emerald cardstock. I die cut the Memory Box Kensington Border out of Opal White cardstock and attached it to the colored Yupo paper at the left with Scor tape. To attach something to Yupo, it's best that you use very sticky adhesive like Scor tape. I trimmed the die cut off at the bottom. I didn't bother to stick down the rest of the die cut because I like it  partially unattached like that. If you want to stick the whole thing down, I recommend that you cut it out using Stick-it adhesive on the back.

I stamped the sentiment with Versafine Onyx Black ink at the right of the card. This sentiment is nice because of the size. It's just right to add to a card where you have your main image as a strip on one side of the card. I added a bit of Purple Rain Nuvo drops to the left side of the die cut, and scattered a few sequins to the right of the card.

I hope you enjoyed seeing these samples as much as I enjoyed making them!

Products Used:

Magenta Stamp
07.882.I Multilingual Thank You
Memory Box die 98743 Kensington Border
Alcohol inks: Flamingo, Limeade, Amethyst, Turquoise
Yupo Paper
Stardream Emerald cardstock
Purple Rain Nuvo drops
Neenah Solar White 110#


Wednesday, June 21, 2017

Amazing Freida Curve

I created this Yupo panel with alcohol ink the same way I have done the previous ones, but this one did not have to have color on the back.


I mounted the Yupo panel onto a piece of Shocking Green So Silk cardstock, and then mounted the die-cut Freida Curve onto the top. I scattered a few sequins and put a little stickles onto the center of each one.

I added a Magenta sentiment to the bottom using Versafine Onyx Black ink. Using alcohol ink on Yupo paper, and adding die cuts make fast, easy, and beautiful cards.

Products used:

Magenta stamp
07.968.H you are Amazing
Poppy Die 1784 Freida Curve
Ranger Alcohol Inks: Raspberry, Turquoise, Botanical
Yupo Paper
Shocking Green So Silk cardstock
Versafine Onyx Black ink
Neenah Solar White 110#
Stardust Stickles
Various sequins


Tuesday, June 20, 2017

Fly High Butterfly

For this alcohol ink card I thought I would try a different color of cardstock for the die-cut than just white. I like it, but I do think the white die-cuts are a beautiful contrast.


On Yupo paper, I dripped drops of alcohol ink and pounced with a blending tool covered with felt. If you continue this until the ink starts to dry, you get smaller mottling. I covered both sides of the paper with color, because when the Yupo paper is mounted to the card, the back will show from the inside.


You can do something completely different on the other side if you wish. This side will show on the inside of the card.

I die cut the front of the base card using the MFT846 Inside/Outside Ovals.  I mounted the colored Yupo paper to the inside of the front cover of the base card.

I die-cut the Poppy Bellina Butterfly out of gold foil cardstock, with Stick-it adhesive on the back. I mounted the Bellina Butterfly die-cut onto the front of the card, tucking the bottom of the stem into the bottom of the oval opening.

I stamped the Magenta sentiment using Versafine Onyx Black ink and scattered a few sequins.

Products Used:

Magenta Stamp:
07.514.G May life always allow you to fly high
Poppy 1391 Bellina Butterfly die
Die-namics MFT-846 Inside/Outside Stitched Ovals
Ranger Alcohol inks: Amethyst, Limeade,
Patina, Valencia, Turquoise
Versafine Onyx Black ink
Yupo paper
Neenah Solar White 110#
Gold Foil paper
Various sequins


Monday, June 19, 2017

Give Wings to Your Passion

Here's another alcohol ink sample I made. The Memory Box and Poppy dies make it easy.


I cut this die out of the Yupo paper and used it on a graduation card for a neighbor. I then cut it out of silver foil paper and inserted it into the space left to make this card. The whole thing is mounted onto Black So Silk cardstock.

This card also shows how well Archival ink works stamped onto Yupo. In this case I used black, but because it works on Yupo, I have acquired a lot of the mini Archival pads in different colors. We do carry the new mini Archival pads at Art 'n Soul.

I chose a sentiment from Magenta that is perfect for bird images.

Products used:
Magenta 07.835.G Give wings
Poppy die 1529 Swirly Bird Ribbon
Ranger alcohol ink: Amethyst, Turquoise, Limeade
Black Archival ink
Silver foil cardstock
Black So Silk cardstock
various sequins

Sunday, June 18, 2017

Have a Beautiful Day!

Another card that I made when I was preparing for the alcohol ink mini class. I love this sentiment from Magenta, and this can apply to all of those Father's out there today! Happy Father's Day and Have a Beautiful Day!!


I cut a circle out of my base card using the Die-namics Inside/Outside Stitched Circles die set. I applied alcohol ink onto the front and back of a panel of Yupo paper so that the back will show on the inside of the card.


I die cut the Honeyblossom Sprig from white cardstock with Stick-it adhesive on the back  stamped the sentiment and scattered a few sequins.

Products used:

Magenta Stamp
07.969.F Have a Beautiful day!
Die-namics MFT-849 Inside/Outside Stitched Circles die set
Memory Box 98333 Honeyblossom Sprig die
Ranger Alcohol ink
Yupo paper
Versafine Onyx Black ink
Neenah Solar White 110# card stock
Various sequins

Friday, June 16, 2017

Technique of the Week: Simply Foil

We have had a lot of requests for a technique on how to use foil without having to use a laminator. We still think that the best foiling is done with a laminator, and if you decide to go that way, they are not expensive.

But there are also lots of other ways to incorporate foil into your cards, and this technique shows one way using Scor Tape. If you use adhesive with foil, for the most part the end result is more textured than if you use heat such as a laminator. It's hard to photograph also, but still really pretty in real life.


I made three cards, and the one pictured above was the first. I chose Poppy dies 1641 Bow and String, and 1248 Fancy Celebrate for this card.


I started by taking a 6" x 6" sheet of Scor Tape adhesive and stuck it to a piece of white cardstock. 


I die cut each die from the adhesive covered cardstock.


I embossed a piece of Jupiter Stardream cardstock, 4" x 5.25" using a WRMK embossing folder Geometric 662688. The two die cuts were adhered to the embossed cardstock using spray adhesive on the white cardstock, and with the Scor-Tape side up.


I decided to use two colors of foil on this card, and cut pieces of Deco foil in gold and silver star. I brushed the area around the die cuts with a powder tool to be sure that they were not sticky since I didn't want foil to stick anywhere but on the die cuts.

I removed the release paper from the bow and string and pressed the foil to the adhesive with the silver star side up. 

I rubbed the foil to press it into the adhesive. 


When I peeled up the foil, it stuck to the adhesive on the die cut.


I repeated the process on the Fancy Celebrate die using gold foil.


I added gold and silver sequins using Ranger Multi Medium Matte adhesive, and mounted the panel to gold mirricard.
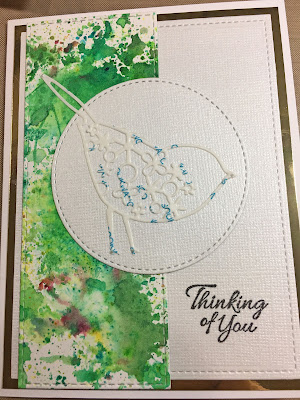
This card was easy and fun to make, so I made two more cards. On the next card I used the Memory Box die 99442 Elodee Bird. 
Since this is a detailed die, I thought I would try to cut it directly out of sheet Scor Tape without the cardstock. I liked the effect because you can see through the lacy bird to the background I used. However, it was harder to do with this delicate die.
For the background, I searched around in my stash for some green backgrounds I had previously made with Nuance (Spring Green and Jade). I cut a strip of one for the left side of my card, using the Die-namics MFT 482 Vertical Stitched Strips. I then cut a stitched circle to put the bird onto out of white linen cardstock, using the Die-namics MFT-849 Inside/Outside Stitched Circles.
I laid the pieces out as shown, and mounted them to a base card with a Gold Mirricard mat. I stamped Thinking of You in the right lower corner using Magenta stamp 07.869.D. I laid the bird out facing left, but unfortunately, the way the release paper peeled off of the die cut, I had to place it facing right.

Once the die cut bird was stuck down to the card, I peeled the release paper off the top of the Scor Tape and applied Rainbow Deco foil to the exposed adhesive.


Here's my finished card


For the third card I used the Memory Box die 99599, Birdhouse Trio, and 98527 Resting Birds. I also put a strip of Scor Tape toward the bottom of the card for a strip of foil. This can be a nice touch on any card, even if nothing else is foiled.


I die cut both dies out of the adhesive covered cardstock, and applied it all over a background made with a Magenta stencil (TM221 Triangles).


I mounted the panel to a mat of Stardream Copper cardstock and onto a base card of Neenah Solar White 110#.


One of the things I really liked about the Birdhouse Trio die is that the roof is made up of two parts. That means that the second strip of adhesive came off separately and I was apple to apply a different color of foil to that part. I chose the Opal foil and the effect is like snow on the roofs of the birdhouses. I can see that you could use this die to make a very pretty Christmas card. Just add a few red berries!

I hope you will try this technique. It's easy and it's fun!

Card #1 Products Used:
Poppy Dies: 
1641 Bow and String
1248 Fancy Celebrate
Deco Foil: Silver Star; Gold
WRMK Next Level embossing folder Geometric 662688
Stardream Jupiter card stock
Gold Mirricard card stock
Gold & Silver sequins
Scor Tape

Card #2 Products Used:

Magenta Stamp 07.869.D Thinking of you

Magenta Nuance MNU019 Spring Green
Magenta Nuance MNU004 Jade
Memory Box die 99442 Elodee Bird
Lawn Fawn LF768 Small Stitched Rectangle Stackables
Die-namics MFT-849 Inside/Outside Stitched Circles
Die-Namics MFT-482 Vertical Stitched Strips
Deco Foil: Rainbow
Scor Tape
Gold Mirricard card stock

Card #3 Products used:
Magenta stamp 07.969.F Have a Beautiful day!
Magenta Stencil TM221 Triangles
Memory Box Dies:
99599 Birdhouse Trio
98527 Resting Birds
Distress Oxide inks: Broken China;
Fossilized Amber; Cracked Pistachio
Deco Foil: Pumpkin, Teal, Green, Opal
Scor Tape
Stardream Copper card stock