Pages

Friday, July 1, 2022

Super Saturday at Magenta: Sandpiper's Reflection

 This post is also at Magenta today. You can see that here.

When I saw the new Magenta stamp with the Sandpiper and his reflection, I thought he looked like he thought his reflection was a friend there in the water.


After die-cutting the panel with the Dainty Dashes Stackers frame from Penny Black, I lightly added some Distress ink using the ink that was already on my brushes. I feel pretty sure looking at the brushes that it was Mowed Lawn and Peacock Feathers. I blended the colors through the stencil TM286.


I stamped the image using Versafine Clair Acorn ink. Since it is a pigment ink I was able to sprinkle gold embossing powder on the reflection part of the image. I colored the bird's belly with colored pencils. I'm pretty sure there are no sandpipers with blue coloring, but I liked how it looked. At the end, I stamped the sentiment and embossed with gold and matted the panel and added it to a base card.


Magenta Products used:

TM286 Wavy Lines Stencil


Other Products used:
Penny Black 51-636 Dainty Dashes Stackers
Distress Ink: Mowed Lawn; Peacock Feathers
Versafine Clair ink: Acorn
Ranger Gold embossing powder
Prismacolor Pencils: PC105 Cobalt Turquoise,
Scholar 344 Terra Cotta
So Silk Glamour Green cardstock
Neenah Solar White 80# & 110# cardstock

Tuesday, June 14, 2022

Graduation 2022

I don't have a graduation card to do every year, but this year the son of a neighbor of ours is graduating from High School. His school's colors are purple and white.


 I stamped this great Confetti Borders stamp from The Ton at the top and bottom of my panel that was die cut with the Greetery Crimped Frame die. I chose the congratulations die from the Avery Elle Sentimental Dies collection, and added the date made from the Greetery Bold Numbers dies. I love these numbers, and they go well with the Crimped Frame.


For dimension, I cut the numbers 4 times and stacked them together. I matted the panel with the same cardstock as the die cuts.

Products used:
The Ton Confetti Borders stamp
Avery Elle D-16-01 Sentimental dies
The Greetery GD-M-016 Crimped Frame die set
The Greetery GD-M-082 Bold Numbers die set
Catherine Pooler Grape Crush ink
So Silk Passion Purple cardstock
Neenah Solar White 80# & 110# cardstock

Friday, June 10, 2022

Super Saturday at Magenta - Distress Ink Blending and Lifting

 I got this adorable new stamp from Magenta of a crow sitting on a wire, and he looks like he is blowing bubbles. I decided for his background to try and blend some Distress Inks and do some ink lifting. You can see my post on the Magenta blog here.


I love how it turned out! I die-cut a panel of white 80# cardstock with Spellbinders Hemstitch Rectangles. Then I blended Distress Inks in Twisted Citron, Peacock Feathers and Wilted Violet onto my panel


You can see my blending is not perfect. It's not necessary for it to be perfect to work well for this technique, but it's best to lay down a lot of color.

I placed the stencil "Fantasy" onto the blended panel and pressed a baby wipe onto it. This is a new to me technique for ink lifting and there is a lot less control with it. You just have to like what you get, and I did. The result looked like a suggestion of leaves and rain to me.

I stamped the bird stamp in black and added the sentiment. I then matted the panel onto a slightly larger piece of So Silk Glamour Green and adhered it to a base card.


Here is most of what I used to make this card, details below.

Magenta Products used:

TM169 Fantasy Stencil

Other Products used:
Distress Ink: Twisted Citron,
Peacock Feathers, Wilted Violet
Versafine Onyx Black ink
Spellbinders S5-308 Hemstitch Rectangles
80# & 110# Neenah Solar White Cardstock
So Silk Glamour Green Cardstock

Thursday, May 26, 2022

Happy Birthday Wildflower Stems

I needed to make a couple of birthday cards and I pulled out a Sizzix by Tim Holtz die set that I have been meaning to use: Wildflower Stems #1. 


 I used one of the 5 dies from this set and cut it out of a panel of white cardstock. I had already cut the panel with the Greetery Crimped Frame die. I mounted it onto a panel on which I had blended Distress Inks in Squeezed Lemonade, Carved Pumpkin, and Saltwater Taffy.


I stamped the front panel with one of my favorite birthday sentiments from Poppy Stamps, and I flicked gold watercolor paint onto the panel at the end.

I took the flower that I had cut out of the first panel and used it on another card for a friend who likes classic black and white. I send her a black and white card every year. I adhered the flower onto a piece of textured black cardstock and embossed the sentiment with white embossing powder.

These cards were just a really simple use of this die, but I loved how they turned out. I plan to do more with this die set in the future.


Products Used:
Sizzix 664163 Wildflower Stems #1 Die Set
The Greetery GD-M-016 Crimped Frame Die
Poppy Stamps CL490 Greeting Basics
Distress Inks: Squeezed Lemonade, 
Carved Pumpkin, Saltwater Taffy
JudiKins Opaque White embossing powder
Sakura Poster Color Gold Paint
Neenah Solar White 80# & 110# cardstock
Paper Accents Black Textured cardstock


Monday, May 23, 2022

Used Papercraft Products Sale in Olympia WA!

Save the Date!! Saturday May 28!! For those of you local to Olympia Washington and the South Puget Sound area:
Save the Date!! Saturday May 28!! 
There will be another big used paper craft sale on Saturday May 28. You have been asking, and it will be here this coming Saturday!


Disclaimer: This photo was taken when I was getting ready for the last sale I participated in. However I am bringing a lot of the same sorts of things. There will be stamps, dies, paper, tools, containers, stamp platforms and more! And I am just one of the many who will be there selling off gently used papercraft products.

Time: 9:00 a.m. - 3:00 p.m.
Place: VFW Post 318, 2902 Martin Way E, Olympia, WA
There will be LOTS of fabulous used craft supplies, including stamps, dies, inks, paper, tools and so much more!

Please bring cash and plan to spend some time shopping. It's been so long since we've seen you guys, and can't wait to see you again! Debbie Gaetz, Dianne Johnson, and Susie Mahoney formerly from Art "n Soul will be there, plus many more. Hope to see you there!

Wednesday, May 18, 2022

Happy Birthday Zack! Love You a Cha-Million!

Our oldest grandson Zack is 21 years old today! How in the world did that happen? The world rolls by so fast these days. Nevertheless, we are so proud of Zack - he is a senior honors student at his university, and works in the biology lab there where a very cute chameleon has imprinted on him!


I stamped and colored this panel 5 times. This was mostly because I am so out of practice using my Copics. I had forgotten that the best ink to stamp an image that will be colored with alcohol ink markers is Memento. I actually tried a couple of others first, but they ran when I colored over them. Then my Memento Tuxedo pad is apparently old and tiny pieces of the pad were sticking to the stamp and making ink clumps on the image. Do you ever have days like that? I finally found a mini Memento pad that worked fine. These are the Copic colors I used.


I used an embossing folder from Simon Says Stamp, and to prevent embossing the main image, I used an embossing diffuser. I had an old one from Cropstop that has a rectangle opening. 


I checked and it is still available. There are also embossing diffusers available from Tim Holtz by Sizzix. The way you use them is to use the diffuser in place of a cutting plate when you run it through your die cutter. Place the opening of the diffuser over the part of your panel that you do not want embossed. Otherwise the sandwich should be the same as when you are dry embossing normally.


Here is our handsome grandson and his adorable Chameleon buddy. Happy Birthday Zack!

Products used:
Darcie's Heart & Home POL520 One in a Cha-Million
CropStop Embossing Diffuser
SSS SF220 Leaf Bundle Embossing Folder
The Greetery Crimped Frame Dies
Memento Tuxedo Black Ink
Copic Markers: RV55 Hollyhock,
RV52 Cotton Candy, R20 Blush,
YG21 Anise, YG23 New Leaf,
YG61 Pale Moss, YG63 Pea Green,
BG11 Moon White, E71 Champagne,
E23 Hazelnut
Neenah Solar White 80# & 110# cardstock
Stardream Fuse Fairway cardstock

Friday, May 13, 2022

Super Saturday at Magenta: Floral Wreath Stencil

I'm over at Magenta with this post, and you can see it here.

 I have been having a lot of fun with stencils lately and I especially love a nice wreath. This Floral Wreath from Magenta is lovely and you can use the center to stamp a lot of different sentiments.

I cut a panel from white 80# cardstock using the Penny Black Zig-Zag stacker die. Then using brushes I blended Distress inks through the stencil

This is everything I used to make this card. It was so quick and easy and I think it turned out beautifully.

Magenta Products used:

Other Products used:
Distress inks: Wilted Violet, Peacock Feathers,
Twisted Citron, Mowed Lawn
Small blending brushes
Penny Black 51-714 Zig-Zag Stackers
Versafine Onyx Black ink
So Silk Glamour Green cardstock
Neenah Solar White 80# & 110# cardstock

Monday, May 2, 2022

Glimmer Hot Foil Birthday Cards

 Ok, confession time. I bought a Glimmer hot foil machine a couple of years ago (yes, years) and never used it until now. In my defense, a few things have happened in the last couple of years. Also, I have watched every YouTube video about it, and collected a lot of Glimmer plates and Glimmer foil (different from toner foil) to use with it. I finally told myself that I am not allowed to buy any more Glimmer plates until I actually use this machine. I also found some of the right kind of Hammermill cardstock at Amazon recently, so here are my first two cards.

This first one is for my son-in-law's Dad. His birthday is 6 days before my Son-in Law's, so I usually make their cards close to the same time. The really strange thing about this one is that the foil I used mostly looks gold in person. The color is Aura and it can have a rainbow look to it depending on the light and the angle you are looking at it. This is how it looked when I snapped the photo. Here's another shot that I think shows the gold a little better, but still shows some rainbow hues.


This was done with a Spellbinders Glimmer plate called "Birthday Hugs and wishes." I had a really nice leftover piece after I did this panel, so I decided to do a second card with it.


I recently got this solid round Glimmer plate from Spellbinders. This is why I had to use my Glimmer machine - I broke my promise of not buying any more plates until I used it. But I had to have this solid round one. I can see using it a lot, especially in using a leftover piece of foil like this one. Spellbinders also makes solid oval, solid square and solid rectangle plates. Pinkfresh Studio makes a large solid plate as well.

By the way, I get confused about the order for layering on the Glimmer machine sometimes because I also like to do toner foiling and it's different. If you do it wrong, you can foil your hot foil plates (which doesn't damage them, but is discouraging). If you have the same issue, here is the correct layering order (sandwich) for the Glimmer machine:
    foiling plate, front side up
    Glimmer foil, pretty side down (against the plate)
    cardstock
    2 Glimmer machine plastic plates
There are a LOT of videos on YouTube on how to use this machine. Some of the best ones are by Jennifer McGuire. Sometimes you might need a shim. I didn't need one for these examples.


Once I had the round plate and leftover foil positioned properly with my cardstock, I heated it up and ran it through my BigShot, and this is what I got! I love that even though I didn't use the special Hammermill cardstock on this panel (this was Neenah Solar White 80#, with Distress Ink on it) it still worked perfectly.


And yes, this gold circle on this left panel is the exact same piece of foil that is in the Happy Birthday sentiment on the panel to the right.


This is my Son-in Law's card. 

I'm so pleased that things turned out so well in my first foray using the Glimmer machine. After watching numerous videos I was afraid it would be much harder to get good results. I shouldn't have waited!


Products Used:
Spellbinders Glimmer machine
Spellbinders GLP-144 Birthday Hugs & Wishes hot foil plate
Spellbinders GLP-317 Solid Circle hot foil plate
Spellbinders Glimer Foil GLF-027 Aura
Distress Inks: Wilted Violet, Peacock Feathers,
Twisted Citron
Poppy 1263 Boddington Tree Border (discontinued)
The Greetery Crimped Frame die set
Hammermill Premium Cover Copy Color 100# cardstock
Neenah Solar White 80# cardstock
Stardream Fuse Fairway 105# cardstock
So Silk Glamour Green Cardstock
Memory Box Self Adhesive Fairy Jewels


Friday, April 15, 2022

Super Saturday at Magenta: Masking Stencil Distress Blending

 Hi everyone! I'm over at the Magenta blog with this post today and if you like, you can see it here.

I used just the outside or frame part of the Magenta MC48 Duo Texture mask set to blend Distress ink into a very cool design.

I put the stencil onto a panel of 80# cardstock and started blending. I added a circle mask that I punched out of masking paper using a 1 1/4" circle punch. I placed it to the right of the image to represent a rising sun, and continued to blend the ink, trying to keep it relatively light.


I stamped the Magenta Miscanthus image with Versamark ink and embossed in gold. The sentiment was added last in Onyx Black Versafine ink, and the panel was cut using The Greetery Crimped Frame die. Finally the panel was matted with So Silk Beauty Pink cardstock.

Magenta Products used:

07.969.F have a Beautiful day!

Other Products used:
Distress ink: Picked Raspberry
Versamark ink
Onyx Black Versafine ink
Ranger Gold Embossing powder
The Greetery GD-M-016 Crimped Frame Die
Neenah Solar White 80# cardstock
So Silk Beauty Pink cardstock


Monday, April 11, 2022

Happy Birthday Layering Stencils

I have become fascinated with layering stencils, and I have posted some of my projects here and here. This is my favorite one so far, and I used a set from Pinkfresh Studio called Cosmos Bunch. I hope to do much more with this set, since it comes with stamps, a die and layering stencils. For these cards I only used the  stamp and stencils.


I honestly wasn't sure which card to post first, since I love them all. They are all the same design, but with different colors, and most of them went to my friend Pam's Church charity.


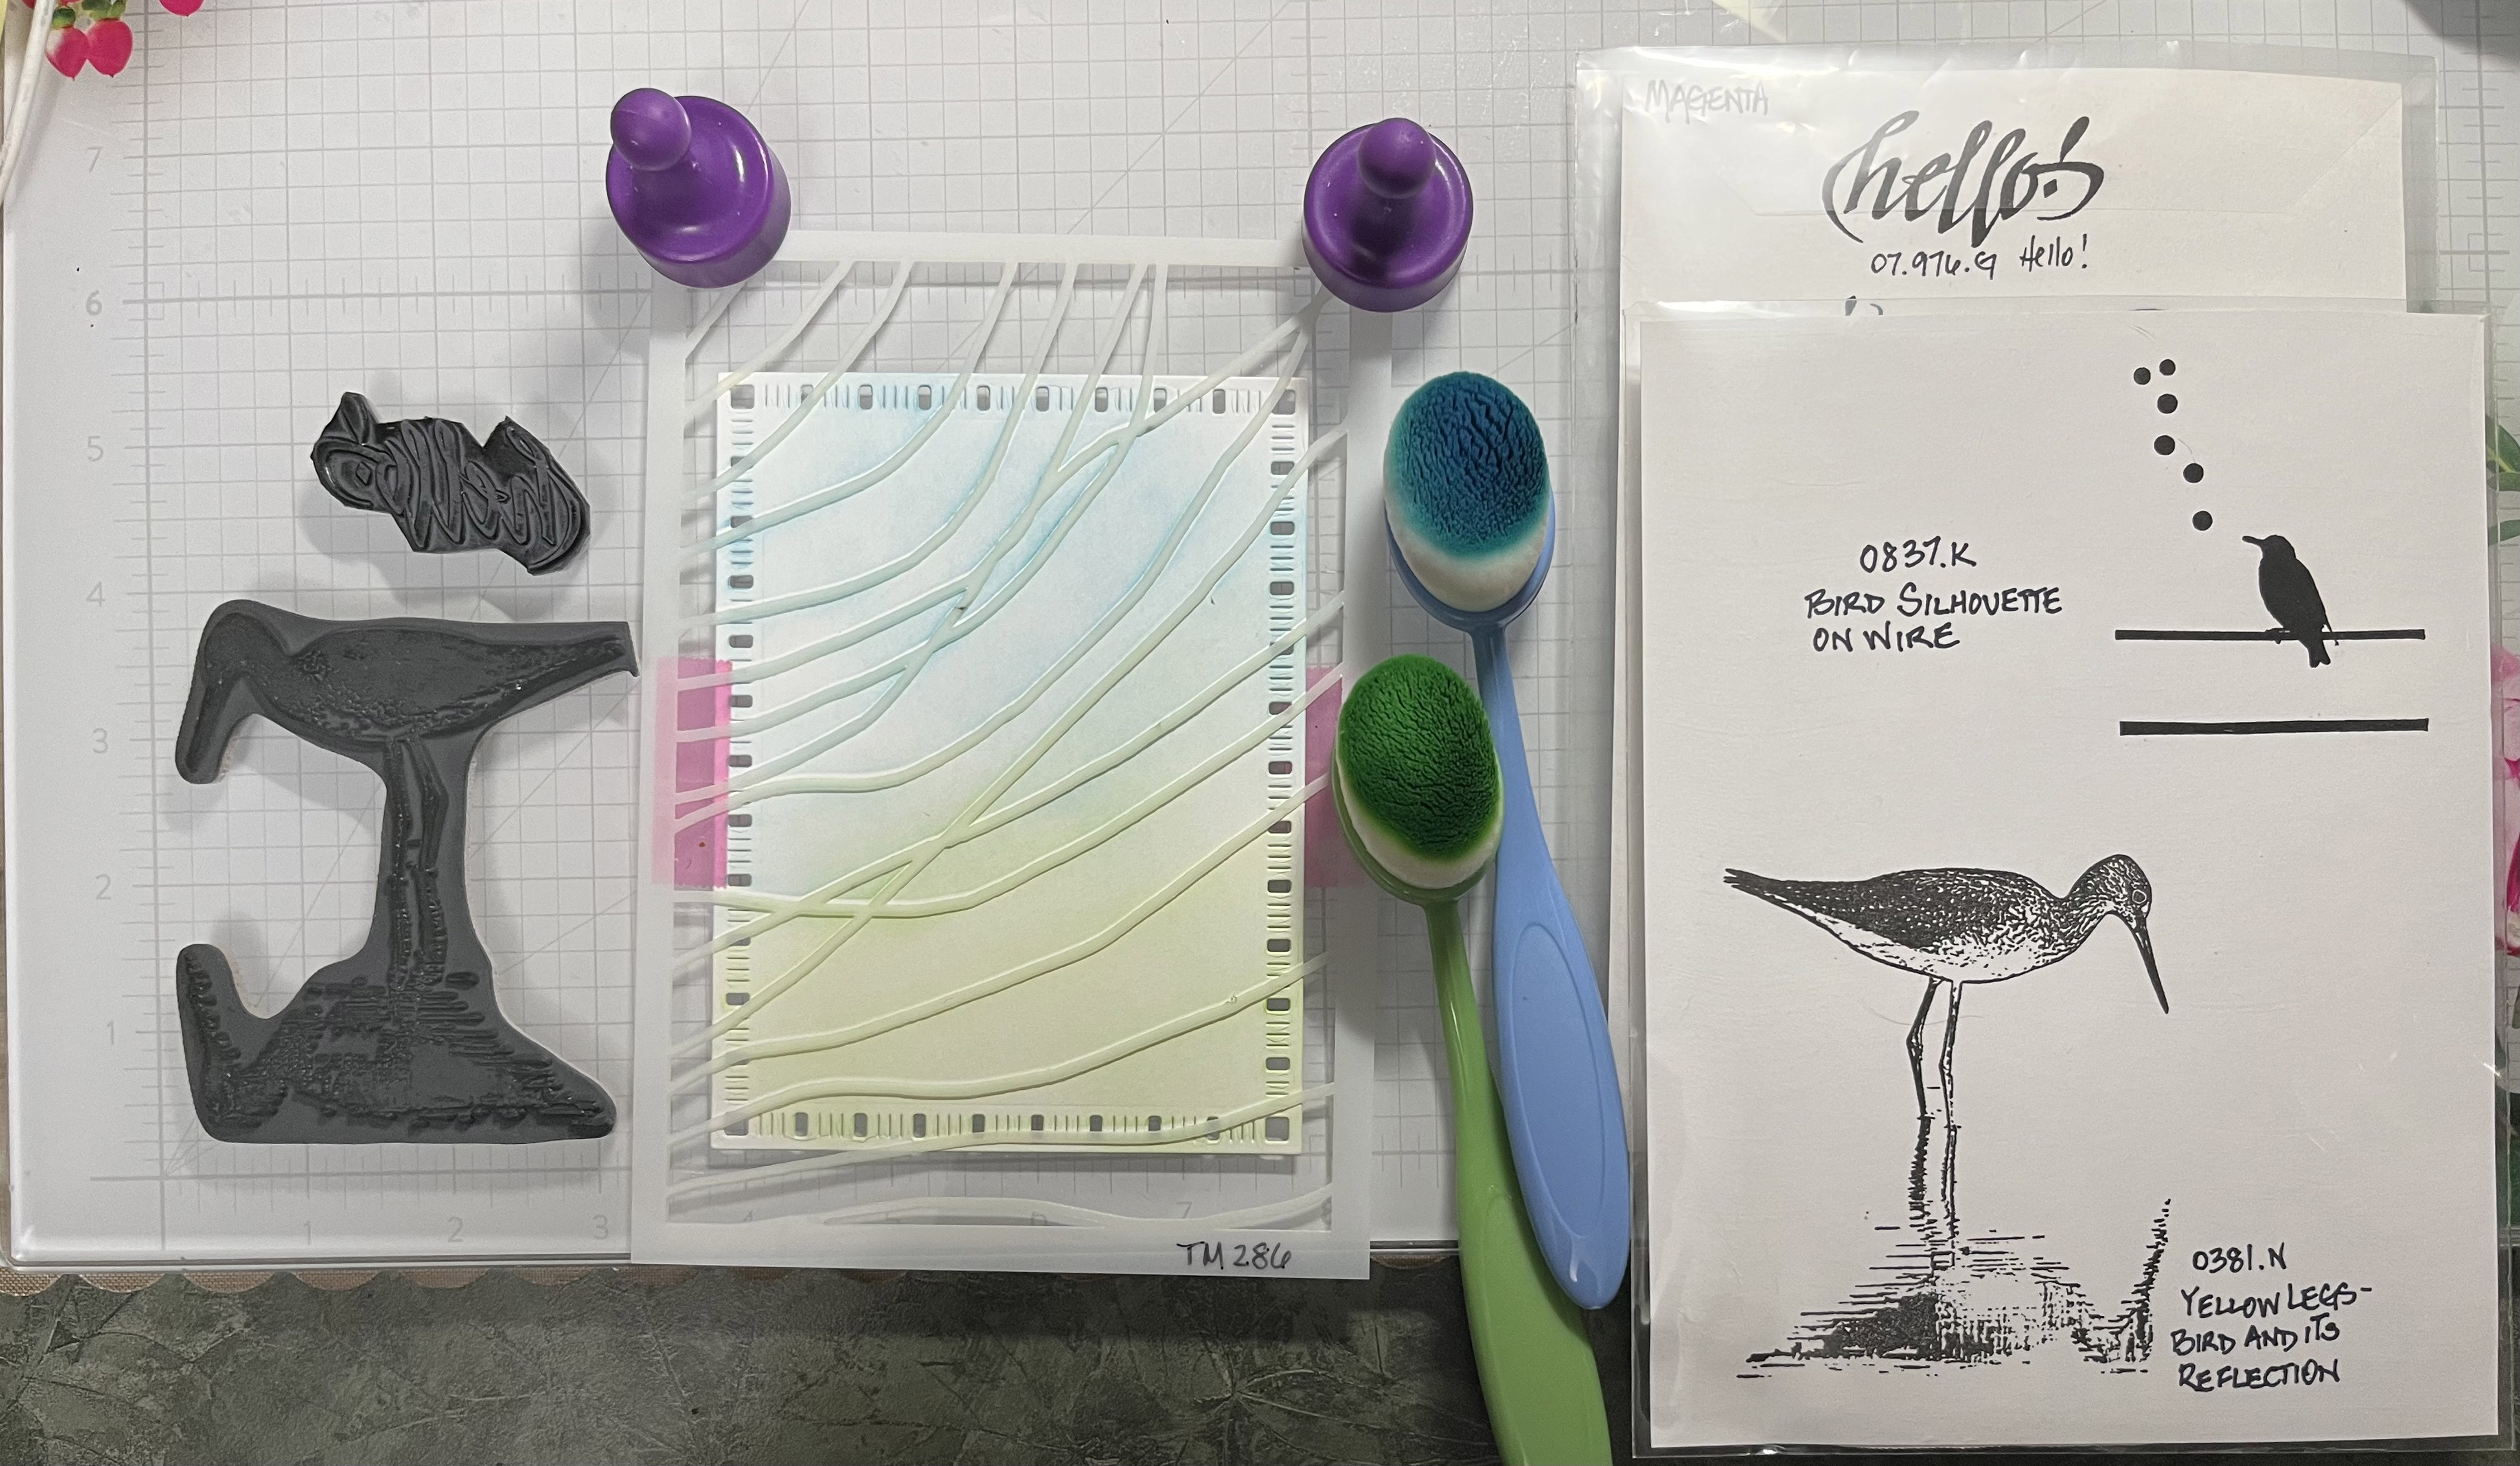
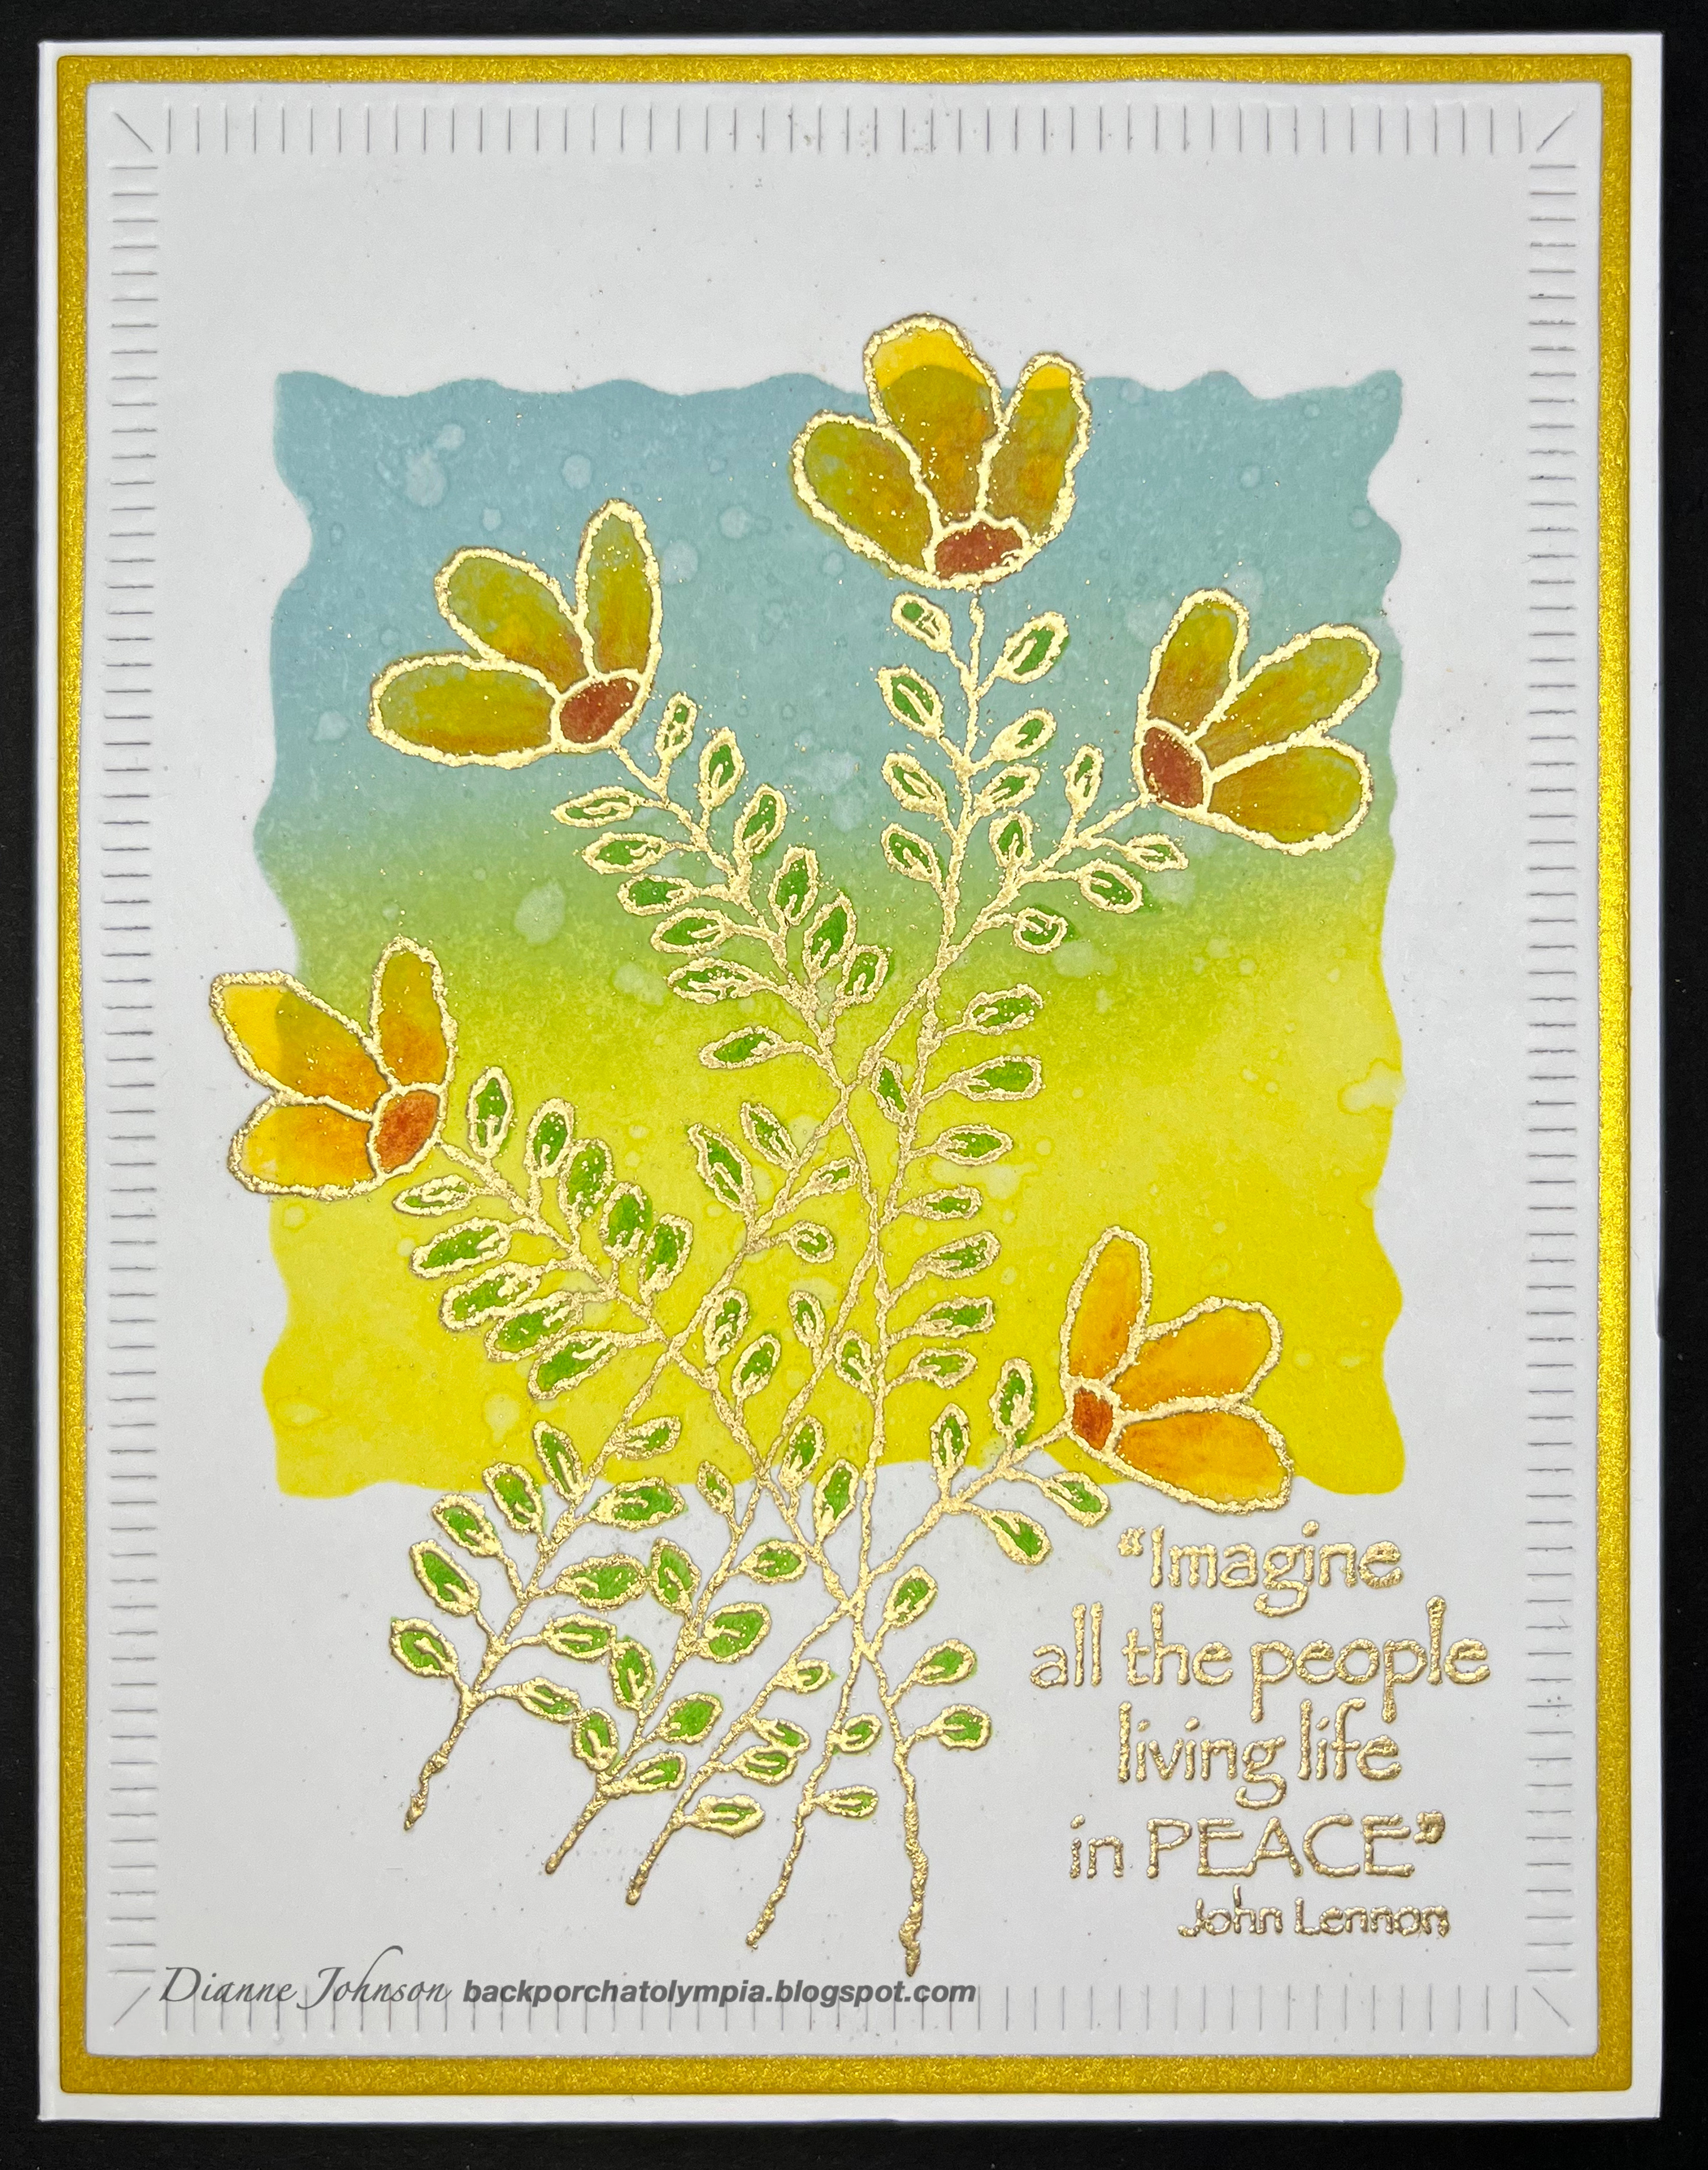
I stamped each panel with a light color of ink. It really doesn't matter what color you use for this step because it will eventually be covered with gold embossing. There are 5 stencils: 3 for the blossoms and 2 for the leaves. I used my small iCrafter brushes to blend the inks. I like to smooth out some of the blending with colored pencils. A complete list of the colors used is below.


I made 2 or 3 cards with each color family. It's easy to make multiples while you have everything out.


After I stamped each panel I left the stamp in the stamp platform. Once they were all colored I stamped them with Versamark ink and embossed with gold embossing powder.


I very much enjoyed coloring all of these, both by blending the inks and then adding touches with colored pencils.


I used blends of orange, red, purple and pinks with accents of blue


I die-cut each panel using my favorite edge finishing die, The Greetery Crimped Frame die. I then cut the sentiment out for each panel from black cardstock.


I chose mats for each color family and put everything together. I hope you like these, I really think they're pretty and they were fun to make.

Products used all cards:
Pinkfresh Studio Cosmos Bunch Stamp Set 132721
Pinkfresh Studio Cosmos Bunch Layering Stencils 132921
Simon Says Stamp CZ Design Happy Birthday Die czd82
Versamark ink
Ranger gold embossing powder
Neenah Solar White 80# & 110# cardstock

Products for orange cards:
Distress inks: Wild Honey, 
Spiced Marmalade, Prize Ribbon,
Peacock Feathers, Twisted Citron,
Mowed Lawn
Prismacolor Pencils: 
PC1032 Pumpkin Orange, PC1003 Spanish Orange 
PC912 Apple Green, PC905 Aquamarine
Stampin Up Cajun Craze cardstock

Products for red cards:
Distress inks: Aged Mahogany,
Festive Berries, Prize Ribbon,
Peacock Feathers, Twisted Citron,
Mowed Lawn
Prismacolor Pencils:
PC924 Crimson Red, PC994 Process Red,
PC905 Aquamarine, PC912 Apple Green
Malmero Pearl Red Cardstock

Products for purple cards:
Distress inks: Wilted Violet, 
Villainous Potion, Peacock Feathers, 
Twisted Citron, Mowed Lawn
Prismacolor Pencils:
PC1008 Parma Violet, PC956 Lilac,
PC905 Aquamarine, PC912 Apple Green
PTI Plum Pudding Cardstock

Products for pink cards:
Distress inks: Kitsch Flamingo,
Picked Raspberry, Peacock Feathers,
Twisted Citron, Mowed Lawn
Prismacolor Pencils: 
PC928 Blush Pink, PC994 Process Red,
PC905 Aquamarine, PC912 Apple Green
PTI Hibiscus Burst Cardstock

Friday, March 25, 2022

Super Saturday at Magenta: Card Exchange and Distress Blending

 Hi Everyone! I'm over at the Magenta blog today with this post, and you can see it here.

I want to take a few minutes to talk to you about the Magenta Card Exchange. It's hosted by DT member Mariëtte van Leeuwen on the FaceBook page Magenta Style - Passion Studio. It's a page for people who are passionate about Magenta, and a place to share and view cards made with Magenta products. Here is my exchange card this month


The Card Exchange will be taking a brief hiatus for the Summer (as usual) but will start back up in the Fall. I really hope you will join us. It's an amazing way to meet fellow card-makers all over the world. You send a card to the name and address you are given, and you will also receive one from someone completely different. I have had several really enjoyable conversations over FaceBook Messenger with card-makers who have received my cards. It's so rewarding to discover how much we all are alike. I have met the most remarkable people through this craft.


I was very much thinking of the Ukrainian people when I made this card. They are in my heart. I have followed a card maker from Ukraine, Yana Smakula, for many years, and I cried when I read her first post after Ukraine was invaded. She still posts on her blog and Instagram, and most of her posts start with "We are still ok." or "we are safe." I hope she and her husband and mother remain so.

To make this card, I used the Magenta TM277 stencil and blended Distress Ink into the square. I stamped the Magenta Graceful Tri-Petals stamp (one of my favorites) and used Prismacolors to color in the petals and leaves. I stamped the image once more onto my panel and embossed in gold; then added the Peace sentiment and embossed that in gold as well. I die cut the panel with the Greetery Crimped Frame die.

Magenta Products Used:
TM277 Square Silhouette

Other Products Used:
Distress Ink: Mustard Seed, Speckled Egg
Prismacolor Pencils: PC1032 Pumpkin Orange,
PC1003 Spanish Orange, PC912 Apple Green
Ranger Gold Embossing Powder
Versamark Ink
The Greetery GD-M-016 Crimped Frame Die
Neenah Solar White 80# & 110# cardstock
Curious Metallics Super Gold cardstock