Pages

Tuesday, December 31, 2019

Happy New Year!


A very Happy and Healthy New Year to you all! I have a card for you, but first I wanted to tell you why I feel that I have so much to be thankful for in the past year.

Our beautiful, healthy, sweet and happy grandson Asa was born, and will be a year old on the 5th of January. We  adore him so much, and he is a bright light in our lives. His parents are raising him in Iceland, and that is such a beautiful place to grow up.


I am also grateful that our son Austin is doing well. He was hit by a car, while riding his bicycle on the evening of last September 6th. I am grateful that he is alive and is healing so well. We have every expectation that he will get back to 100%. He is so strong, and he is working hard to be completely recovered. That story could have had such a different ending. Please everyone look out for the bicycle riders and drive very carefully around them.


Everyone else in the family is doing well also, and I'm grateful and happy about that. I hope you all had a wonderful year last year, and will have an even better one this year. Hold your loved ones close, kiss them, cherish them, and then let them go where they will. Their happiness will be your happiness too.

Here's my New Year's card, I hope you like it! I love these sweet Magenta birds with shoes, designed by Nathalie.
Happy New Year!


Check out this post at Magenta, where members of the Design Team wish you a Happy New Year.


Magenta Products used:

03.124.J Love Birds

07.1016.E Happy new Year!

MC84 Mandala 5 Small

Other Products used:
Broken China Distress ink
Prismacolor Pencils: PC905 Aquamarine,
PC924 Crimson Red, PC938 White
Versafine Onyx Black ink
So Silk Black Cardstock
Neenah Solar White Cardstock 80# & 110#
Lawn Fawn LF768 die
Imagine Crafts Sparkle Shimmer Spritz


Tuesday, December 24, 2019

Merry Christmas and Happy Holidays - Non-traditional colors this year!

Merry Christmas and Happy Holidays to you and yours!


Please check out this Christmas greeting from Magenta and the Design team to you!
All the best!
From Dianne Johnson

Magenta Products used:

02.321.P Noel Birds

Other Products used:
Picked Raspberry Distress ink
Prismacolor Pencils: PC930 Magenta;
PC909 Grass Green, PC949 Metallic Silver;
PC905 Aquamarine; PC938 White
Versamark ink
JudiKins White Detail embosing powder

Friday, December 20, 2019

Magenta Super Saturday: Berry Chickadee - Embossing and Prismacolor Coloring

Hi I'm over at the Magenta Blog today. I'm a huge fan of Nathalie's designs for Magenta, and I love all the bird stamps she has made for this latest collection. The Berry Chickadee is no exception, and it doesn't just have to be used for Christmas. Imagine the berries colored in blue.


I stamped the Berry Chickadee in green, and then colored the bird and the berries with Prismacolor pencils. I cut the image out with an oval die, and then inked the edges with Versafine ink. I dipped the inked oval into gold embossing powder, and embossed. The shine is subtle in the picture, but very pretty in real life. 

I stamped the sentiment with the same green ink (Distress Pine Needles), and then stamped the Bursts stamp twice, using Versamark ink and embossed in gold. I adhered the oval Berry Chickadee  panel to the larger white panel, and added some gold gems in the centers of the Bursts. To finish the card, I matted the panel with Red Palmero Pearl cardstock and mounted it to a base card.


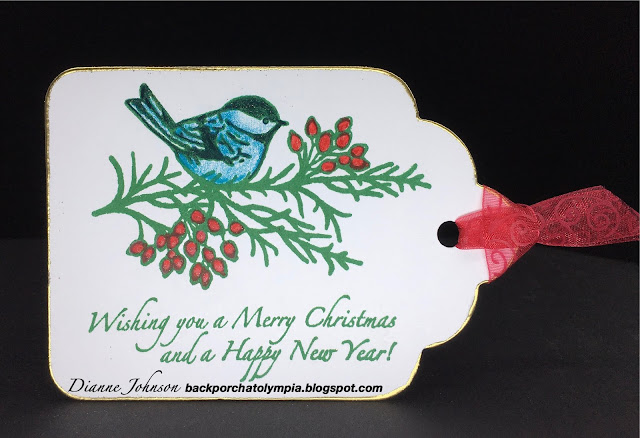
I liked it so much that I thought I would make a simpler version as a tag. The entire tag is rimmed with gold embossing powder, and I chose a different sentiment and added a red ribbon.

I hoped you enjoyed! I have some more tag posts to come, stay tuned!

Magenta Products used:

02.123.K Berry Chickadee

0770.P Bursts

07.1018.H Let Your Heart be Light

07.1022.I Wishing you a Merry Christmas


Other Products used:

Prismacolor Pencils: PC901 Indigo Blue,
PC924 Crimson Red, PC905 Aquamarine,
PC938 White
Versamark ink
Distress ink: Pine Needles
Ranger Gold embossing powder
Hero Arts Infinity Nesting Ovals DI 337
Sizzix Super Scallop Tag die (discontinued)
Red Malmero Pearl Cardstock
Neenah Solar White Cardstock 80# & 110#


Friday, December 13, 2019

Mini Masterpiece Gnome Tags

I don't have a card for you today, but I have some adorable gnomes that I'm going to use as tags. These would also make great cards, and there are lots of samples online using them.

Simon Says Stamp Large Gnome die
sssd112037

I made them with this adorable new die that I got from Simon Says Stamp. It's the cutest gnome, and the set has 2 dies: an outline and a detailed die. This is what he looks like, and there is a little one too, for those of you who have to have both (which I did); and there is a stencil as well.


I went looking for patterned paper to cut out this cutie, and then I realized that I have patterned paper that I made myself. The Mini Masterpiece master sheets! For those of you who haven't seen my previous posts about Mini Masterpieces, which is a creative technique from Sally Penley, you can see my previous posts here, here , here, here and here and there are more posts using them. The possibilities are endless with this technique of creating a master sheet using acrylic paints and markers. To learn more about Sally, and possibly take her class on this technique, go here to her website. You can contact her via her email about available classes.


Here are some of the first ones I made, and I just love them! I could decorate them further, and put pearls or gems on them, but I just really like them just as they are.


This is the first batch. I cut the detailed die from both white and Mini Masterpiece cardstock, and also cut white outlines to assemble the detailed pieces onto. For most of the noses, I used a nose cut from white cardstock, and colored them with an E11 Copic, with a little touch of white gel pen at the top. The exception is the one in the middle at the bottom. He has a blue nose, and it came from the Mini Masterpiece detail cut. I couldn't resist.

The more I looked at them, the more I wanted to use the beards that came from the Mini Masterpiece cut too. You know how some guys with beards decorate them for the holidays? I thought these gnomes could do the same. But I wanted the hat and robe to have less color, so the beards would stand out a little.


Here are some of the gnomes with the wildly colored beards! I love these too!

I used hats and robes from the white cardstock cut of the detailed die, and I colored them with Distress ink and blending brushes. I chose Distress inks that would most closely match the acrylic colors on the Mini Masterpieces. In blending the colors, I made them darker at the edges away from their beards, and faded the blending to white. I also thought I might add more decoration to these gnomes, like stamping or gems on their hats, but I really just like them as they are.


I made a dozen of each: the fancy beards and the white beards, but I have sent some away already. These are also super cute using Christmas patterned paper, and/or velvet paper (Pam Nelson's idea).

I hope you enjoy these, they were so much fun to make!


Products used:

Simon Says Stamp Large Gnome die sssd112037
Mini Masterpiece sheets made using acrylic paints,
Sharpie markers, foil & Stickles
Copic marker E11
White gel pen
Distress inks: Mowed Lawn, Festive Berries,
Salty Ocean, Peacock Feathers
Neenah Solar White 80# cardstock
Connect glue


Friday, November 22, 2019

Magenta Super Saturday: Making Multiples of an Easy and Beautiful Christmas Card

Hi, I am over at the Magenta blog today with this beauty. We are deep into Christmas card making season now. Last year I had them all done by this time, and all our tags too. That is definitely the way to go! That was not to be this year, so I'm just going to do my best to get as many made as possible.

Fast does not have to mean that they will not be beautiful though, and Magenta stamps make that easy. If you want to see a few tips on mass producing your cards, hang in with me to the end of this post.


I adore this pinecone branch stamp, and also the beautiful Wishing you Peace Love Joy stamp, both designed by Nathalie. When I got the new stamp images to look at, I immediately circled these two. I knew I would make a card with them together.

If you are going to make multiples of the same card, it really helps to have at least one stamp platform. After aligning the stamp exactly where I want it, I leave the it in the stamp platform until I'm very sure I'm finished making as many of that card I want.


I stamped the pinecone branch image onto pieces of dark blue cardstock with Versamark ink. Through years of making many multiples of Christmas cards, I have learned that if you apply the embossing powder right away, you can wait to heat it while you stamp and powder several pieces. I usually do at least 4 or 5, and have done more before heating. I have never had any trouble with doing this.


The embossing powder I used was JudiKins Detail Silver.


I heated each batch, and stamped and powdered some more. If you are making multiples of a card, it's best to  make all you need of each component before moving on to the next.


After stamping all of the pinecones, I cut them all out with a 3" circle die from the Hero Arts Infinity Circle die set. I tried to get more light on these so you can see how pretty the silver embossing is. I'm not sure I succeeded though. These are very pretty in real life.


I used the next larger circle in the set to cut circles out of silver glitter paper. Since I'm cheap, er..thrifty, I cut the centers out of all of the glitter circles. I can use those in another project. I made sure that the glitter frames I made have a wide enough surface area for my purposes, as these will go behind the blue circles to mat them.


Next, I cut out panels from white cardstock (using the Lawn Fawn stitched rectangle die that cuts to 3.75" x 5") and positioned my sentiment toward the bottom center. Once I had it set up, it was easy to stamp as many as I needed. Last, I cut out the mats for the white panels, and I used the same dark blue cardstock as I used to stamp the Pinecone Branch.


Here's everything ready to be put together. I made a dozen of these cards. I was lucky enough to get to put these together while chatting with friends. Sometimes I use this time to listen to podcasts or music. 

I used to make 80 of all the same design, but I would hate the card when I was finished. It's just too much to make 80 of the same anything, so I started making about 7 or 8 different designs each year. This also gives me a chance to use other beautiful Christmas stamps and dies.

Magenta Products used:

09.261.K Pinecone Branch

07.1019.F Wishing you Peace Love Joy

Other Products used:
Versamark ink
Versafine Clair Blue Belle
JudiKins Detail Silver embossing powder
Papertrey Ink Enchanted Evening cardstock
Neenah Solar White 80# & 110# cardstock
DCWV Silver Glitter paper
Hero Arts DI 100 Infinity Nesting die set
Lawn Fawn LF 768 Small Stitched Rectangle Stackables


Friday, November 1, 2019

Magenta Super Saturday: Large Maple Stencil and Distress Ink Blending

Hi everyone, I'm over at the Magenta blog today! I love all of the new stencils from Magenta's 2019 Fall/Winter collection. If you have not had a chance to look through them, you can see them all here; and you can see the new stamps here.

I especially like the new large Maple stencil because you can stamp inside of it, and there are loads of possibilities. I have two cards for you today.


I love this first card for its simplicity and for its message. I cut a panel to 4" x 5.25" from Neenah Solar White 80# cardstock, using the stitched rectangle die from the DieNamics MFT463 Blueprints 13 die set.. I taped the Large Maple stencil to the panel, and blended 4 colors of Distress ink into the opening. For blending, I used the makeup brushes I have shown you before. I use these so much, and they blend like a dream (see photo below).

I stamped this beautiful sentiment onto the leaf using Versafine Onyx Black ink, and then flicked Peerless transparent gold watercolor all over (really, all over everything).

To finish the card, I mounted the panel onto a mat of Stardream Copper cardstock, and then onto a base card of Neenah Solar White 110# cardstock. This card literally took minutes to make, and you could stamp lots of messages and/or images onto this large Maple leaf.

I have a very dear Dutch friend who has a birthday in early November, and I thought this would make a great Fall birthday card.


I did the Distress ink blending the same way, and this time I stamped this beautiful Bold Leaf Flourish stamp (not part of the newest collection, but always available) with Versamark ink, and embossed it with gold embossing powder. If you do this, just make sure that the ink is dry before you stamp and emboss. You can test it first, by sprinkling embossing powder onto your inked panel. I did this and it wasn't dry, so I brushed off all of the powder, and dried it with a heat tool. I then tested it again; then stamped it with Versamark and embossed. This extra step will save you heartache.

For the sentiment, I used the Multilingual Happy Birthday stamp. I love this stamp, and I have used it quite often with all of the languages on it (you can see some of them here and here scroll down), but I also like to use them separately, so I bought an extra cling stamp and cut it apart. I use the cut apart one SO often.

I stamped the sentiment with Versafine Clair Summertime ink, and embossed it with clear embossing powder. 

To finish the card, I mounted the panel onto a mat of Stardream Flame cardstock, and then onto a base card of Neenah Solar White 110# cardstock. I added a few enamel dots.


Here are the brushes and inks I used to blend the color through the stencil. With a blending tool, it takes much longer because you have to start light so you don't have dark spots where you don't want them. With these brushes you do not have to do that. They blend even regular Distress like a dream.

This same card design would work very well in the Spring or Summer also; just use different colors of inks.

I hope you enjoyed these cards, and will give them a try!

Magenta Products used:
If you click on the links they will take you to these products in the Magenta online shop

TM323 Large Maple

07.1036 Good friends help you

14.661.L old Leaf Flourish

07.907.L Multilingual Happy Birthday

Other Products used:
Versafine Onyx Black ink
Distress inks: Mustard Seed,
Carved Pumpkin, Rusty Hinge, Barn Door
PPeerless Transparent Metallics Liquid Gold watercolor
Die-namics MFT463 Blueprints 13 die set
Stardream Copper cardstock
Neenah Solar White 80# & 110# cardstock
Versamark ink
Versafine Clair Summertime ink
JudiKins Detail embossing powder: Clear & Gold
Stardream Flame cardstock
Enamel dots


Thursday, October 31, 2019

Magenta Pumpkin Trio: Happy Fall!

When the Fall weather starts to make the mornings crisp, I always think of pumpkins. I love the colors, the variety, and just everything about them. I begged Nathalie to design a new pumpkin image for us this year, and she certainly delivered! I love this beautiful little trio, and am excited to add it to my collection.


I cut a panel of dark blue cardstock with the Lawn Fawn LF768 Small Stitched Rectange Stackables. The large die of this set cuts a panel to 3.75" x 5". I stamped the Pumpkin Trio image and the Delicate Leaves image with Hero Arts White Unicorn ink, using a MISTI stamp platform. I then colored the leaves and pumpkins with prismacolor pencils.

Once I had finished coloring, I put the panel back into the MISTI and stamped the pumpkins again with Versamark ink. I also stamped the sentiment Happy Fall with Versamark. I embossed the images with gold embossing powder.

To finish the card, I added orange gems to the leaves, and matted the panel with Curious Metallics super gold cardstock.

Magenta Products used:

09.262.M Pumpkin Trio

0784.Q Delicate Leaves

07.1040.E Happy Fall

Other Products used:
Prismacolor pencils: PC912 Apple Green, 
PC1004 Yellow Chartreuse, PC1002 Yellowed Orange
PC1003 Spanish Orange, PC944 Terra Cotta
Hero Arts Unicorn White ink
Versamark ink
Ranger Gold embossing powder
The Super Cut Deep Blue cardstock
Curious Metallics Super Gold cardstock
Neenah Solar White 110# cardstock


Tuesday, October 29, 2019

Wishing you a Merry Christmas - The Quest for Fast but Beautiful Christmas Cards

Since I did not have the opportunity to make Christmas cards early this year, I am trying to come up with cards that can be made quickly, can be made in multiples, and yet are still beautiful.

I got this great "Merry" stamp at Impress this summer, and it was on a very simple card, so knowing that I would need stamps like that, I bought it. It was on a wood base, which I quickly fixed by turning it into a cling. I have done this with all of my wood stamps, and consider it a must if you are doing multiples of one card.


Granted, I could have made this easier if I only used one embossing powder. There was the added complication that only the "Merry" stamp was rubber, and the others were clear.

I cut panels from red cardstock using the stitched rectangle die from Die-Namics MFT-463 Blueprints 13 die set. That die cuts a panel that is 4" x 5.25", and has a nice stitched edge.

I set up two stamp positioners to make it easier to make these by assembly line. I first stamped and embossed the "Merry" stamp; then I stamped and embossed the other text. The "Christmas" is from a Concord & 9th set, and the sentiments "wishing you a" & "and happy new year" are from a Simon Says Stamp set. The poinsettia is from the same Concord & 9th set that the "Christmas" sentiment is from. Unfortunately, I had to wait and stamp the poinsettia last. This is because I decided that I wanted to color the leaves green. 

I initially stamped the poinsettia image with white ink and left the stamp in the positioner. I then quickly colored the leaves with Prismacolor pencils. Since the stamp was still in place, I was then able to stamp the Poinsettia image again, right over the colored image (always use a powder bag or some sort of anti-static embossing tool first) using Versamark ink. I then embossed the flower in gold.


The above photo was taken before embossing the flower in gold. After embossing, I colored the petals with a Wink of Stella clear glitter pen. Actually, I had wanted to bleach out the petals, but not all cardstock can be bleached, and Hopsack Red is one of those.

To keep it simple, I elected not to mat my panel and mounted it straight onto a base card.

While I had all of these materials out, I decided to make tags as well. The "Christmas" sentiment would not fit on the size tag I chose, so I found a suitable one in a clear set that I got at Impress.


The white embossing powder I used on these is JudiKins White Diamond, and these are so sparkly in real life!

I hope you enjoyed! I would encourage you to look through the stamps you have, and put together a simple card or tags with different stamp sets.

Products used:

Impress 5716E Striped Merry
Impress Modern Sentiment Holiday clear set (for tag)
Concord & 9th Christmas Florals Stamp set (for card)
Simon Says Stamp Holiday Greetings Mix 1 (for card)
Versamark ink
JudiKins White Diamond embossing powder
Ranger Gold embossing powder
Prismacolor Pencils: PC1005 Limepeel, PC907 Peacock Green
Wink of Stella Clear Glitter pen
Hero Arts DI 197 Infinity Nesting Tag dies
The Paper Cut Hopsack Red cardstock
Neenah Solar White 110# cardstock


Sunday, October 27, 2019

Magenta 2019 Fall/Winter Collection: Home for the Holidays

I'm kind of a sucker for birds and birdhouses, and so when Nathalie designed a birdhouse in the pines, I knew I had to have it.


I have a story about how this card was made. I had in my mind to try stencil stamping with this one, and there are some amazing Mandala stencils with this new collection. You can see other posts where I have done stencil stamping here, here and here. If you want to see others, you can search for stencil stamping on my blog; there are a lot of posts.

I have been doing this technique for some time, and lately I have seen others also doing this, and they may call it something different. It's a technique where you ink up a panel liberally with dye ink (I always use Distress ink because it's so highly reactive with water). You then take a stencil (preferably one that has about the same plastic or metal to open areas) and spray the stencil well with water (I use water that has Perfect Pearl powder added to it for a little extra shine).  You then place the wet stencil onto your inked cardstock, and cover it with a paper towel and press down. When you take off the paper towel and stencil, you have an image of your stencil in the ink.


To start, I used a piece of Neenah Solar White 80# cardstock, and brushed on Distress ink in Broken China and Shabby Shutters. The ink needs to be added pretty heavily, so I brushed on a lot. When I used to demo this technique at Art 'n Soul, I would use the mini inkpads and rub the ink on direct to paper. The more ink you put on your paper, the better the image will show up.

I wanted to experiment, so I decided to use a piece of Tim Holtz watercolor cardstock as well, just to see which one worked better.


The Neenah cardstock is on the right, and the watercolor cardstock is on the left. The thing about watercolor cardstock is that it isn't absorbent. It's supposed to be that way so that your watercolor will move around on the paper. It was hard to get a lot of color down, and then when I put the wet stencil on it, the color...well, moved around, as it's supposed to. This is a fun look, and the watercolor panel is the one I used for the card above with the birds and birdhouse.

The Neenah panel on the right turned out so pretty that I couldn't stamp over it. I just loved how perfectly the stencil image showed up on it.

So I made this card with the Neenah panel. I added a sentiment and some gems, and called it done.


The birdhouse image in the first card was stamped with Versamark ink. An important tip is to BE SURE your panel is dry before you try to put embossing powder on it. Since this was non-absorbent watercolor paper, the ink on it did not sink into the paper. It took some time for it to dry, using a heat tool. I kept testing whether it was dry by putting embossing powder on it (before I stamped the image). When the powder would stick, I brushed it off and kept drying it until no powder stuck to the card. Only then did I use a powder tool and then stamped the images with Versamark ink.

I love the Happy Holidays from our house to yours sentiment with the birds and birdhouse image. I used JudiKins Diamond White embossing powder for the stamping. Both cards were matted with Malmero Pearl Dark Blue cardstock.

Magenta Products used:

03.122.N Home for the Holidays

07.1015.H Happy Holidays

07.1022.I Wishing You a Merry Christmas

MC84 Mandala 5 Small

Other Products used:
Distress ink: Broken China, Shabby Shutters
Versamark ink
Perfect pearls powder
JudiKins White Diamond embossing powder
Tim Holtz watercolor cardstock
Neenah Solar White 80# & 110# cardstock
Malmero Pearl Dark Blue cardstock
Lawn Fawn LF768 Small Stitched Rectangle die set