Pages

Saturday, December 21, 2013

Two More Tags

As promised, here are two more tags I have made for our Twelve Tags of Christmas at Art 'n Soul.  These two are up on the Magenta blog today!


Magenta Christmas Stocking and Tag stamp 02.303.N
Sizzix Tag Super Scallop die 38-0946
Tombow Markers 565, 245, 815, 847
Versamark Ink
JudikinsGold Embossing powder
Speckled with Artquest mica watercolor in Metallic

I cut the tag out of watercolor paper, stamped the image in Versamark ink, and heat embossed with gold embossing powder.  All coloring was done with Tombow markers and blended with a wet brush.  The leaves were colored with Tombow 245; the berries with Tombow 815; the bow with Tombow 847; and the stocking with Tombow 565.  Apply the color in the areas you want to be darker, and pull the color over to lighter areas with a lightly wet brush, shading well.  The stocking was done by coloring every other row of diamond shapes and drawing the color to the next row with a brush.  The tag was lightly shaded using some of the stocking color.  At the end, a small amount of mica watercolor was flicked on the entire tag.


Magenta Cedar stamp 0654.I
Magenta Merry Christmas and Happy New Year stamp 07.798.G
Sizzix Tag Super Scallop die 38-0946
Faded Jeans Distress Ink with Ranger ink blending tool and finger dauber
Memento Nautical Blue ink
Memento Tuxedo Black ink
Elizabeth Craft Cool Highlights microfine glitter
Blue fuzzy twine
3/4" circle punch
Stampendous White Embossing Enamel


I die cut the tag from white card stock, and stamped the sentiment at the top of the tag with Tuxedo Black Ink.  I punched a 3/4" circle out of tape sheet and applied it to the tag to mask the moon area, and put down Faded Jeans distress ink all around the tag with an ink blending tool.  I cut a piece of tape sheet for the bottom of the tag in a curved shape simulating a snow drift, and applied it to the bottom of the tag.  I left the release paper on the tape to use as a mask, inked the Cedar tree stamp with Memento Nautical Blue ink, and stamped twice without reinking.  I inked the stamp again and stamped twice more.  When stamping, I moved the stamp up and down on the tag to make different sized trees.  I removed the release paper from the moon and snow drift, and added some Cool Highlights glitter, burnishing well with my finger.  I used a finger dauber and more Faded Jeans distress ink to add more shadowing, including on the moon.  I used the release paper from the tape sheet snow drift as a mask to add the hill behind the trees, applying ink very lightly with a finger dauber.  As a last step, the white embossing enamel was sprinkled on, and heated from underneath to simulate snow falling.  Happy Solstice everyone,  Happy Holidays, and a Very Merry Christmas!

Friday, December 20, 2013

Christmas Tags

We have been doing 12 tags of Christmas at Art 'n Soul, and I made these two for today, day 9.  If you are local, I will have these available for make and takes, today only, along with a free Washi tape demonstration by Marj Marion, with lots of tips and inspiration.


Magenta stamp 02.307.L  Holly and Berry Flourish
Memory Box stamp B1953  Merry Christmas Flourish
Versamark Ink
Judikins Gold Embossing Powder
Gold washi tape
Cuttlebug Holly Ribbons Embossing folder 37-1927

For the first tag, I just used a shipping tag, available at any office supply store.  I stamped the Holly and Berry Flourish and the Merry Christmas Flourish in Versamark, and embossed with Judikins Gold Detail embossing powder.  I added a piece of gold washi tape, and embossed just the bottom with the Cuttlebug Holly Ribbons embossing folder.  I added a small piece of gold ribbon.  I wish you could see how shiny and glittery this is in real life.  My photo doesn't do it justice.


For this one I used:
Magenta stamp 02.307.L  Holly and Berry Flourish
Versamark Ink
Judikins Gold Embossing Powder
Tombow marker 245 (for the green); Tombow marker 847 (for the red)
Red Wink of Stella Brush pen
Gold washi tape, and Christmas washi tape
Elizabeth Craft peel-offs (red glitter dots)
Fiskars Holly Punch
Sizzix Super Scallop Tag Die 38-0946

I stamped the Holly and Berry Flourish with Versamark Ink and embossed it with Judikins gold embossing powder.  The holly was colored with Tombow marker 245, and the berries with Tombow marker 847.  I went over the berries with a red Wink of Stella brush pen.  I added washi tape, and punched out the holly.  I glued the gold holly leaves back onto the tag and added some red glitter peel off dots from Elizabeth Craft for the berries.

These tags were easy and fun to do, and I plan to make a lot more for my family's presents.  I have a couple more tags to share with you, and I will post them in the next day or two.

Wednesday, December 4, 2013

December 2013 Magenta Challenge


December 2013 Magenta Challenge:  Simply Christmas

Create a card, a layout, or even an altered object.  Just make it Christmassy, and use at least one Magenta product - papers, stamps, peel off, embellishment, chipboard, etc.
Since the Holidays are such a busy time, you have until January 15th to enter!

You could win this Magenta prize:


Just click here, and use the link at the bottom of the post to enter.

Here's my card:


This is a one layer card, and was not hard to create.  I used two pieces of card stock, and on the first one, I embossed an oval, using Sizzix ovals dies.  On the second, I cut the oval out and used it as a mask over the embossed piece (later discarding the mask).  I taped both pieces down, with the mask on top, and cut a piece of scrap paper to create the snow hills.  Masking off with the scrap paper, I used a blending tool to add the blue in the sky.  Continuing with the scrap paper mask, I used a finger sponge dauber to create shadows to simulate snow drifts.  I then stamped the tree with the bird, and stamped the deer family.  I made the star in the sky using a white Gelly Roll pen, and I colored over the bird with a red Wink of Stella pen.  The sentiment was stamped last, using a stamp positioner.  I matted the card with red mirracard.

Magenta stamps used:  
Spruce Tree & Bird 0653.P; Small Deer Family 1 42.186.E; Merry Christmas 07.779.G
Other materials used:  
Distress Inks:  Faded Jeans & Stormy Sky
Memento Inks:  Bamboo Leaves & Rich Cocoa
Sizzix Framelits Ovals Dies 657563
Wink of Stella glitter pen - red; Sakura White Gelly Roll

You definitely should enter the challenge - just use any Magenta product.  You can send your creation to some special person afterwards!


Wednesday, November 27, 2013

Decorative Christmas Tree

Here's my latest post for Magenta, and you can see it on the Magenta blog today also.  I really like how this card turned out.  I seem to gravitate toward blues this time of year.  This lovely Decorative Christmas Tree stamp from Magenta makes such an effortless and beautiful card; it does all the work for you!


I inked the background with distress inks, using a blending tool, and dried it with a heat tool.  The tree and sentiment were both stamped with Versamark, and embossed with White Diamond embossing powder from Judikins.  After mixing some Perfect Pearl powder with water, I flicked that onto the card to simulate snow.  I used some Waterfall Stickles in a few areas to add even more sparkle.  In my photo, I could not really capture how sparkly this card is in real life.

Stamps all by Magenta:  Decorative Christmas Tree 42.170.O; Joyeux Noel 07.780.G (English version of Merry Christmas is available, and would also work here 07.779.G)


Other Materials used:
Versamark Ink
White Diamond embossing powder by Judikins
Distress Inks:  Chipped Sapphire; Faded Jeans; Stormy Sky
Perfect Pearls - Pearl
Waterfall Stickles

Enjoy, and Happy Thanksgiving to all of my American readers!!

Friday, November 15, 2013

Christmas Wishes

I absolutely love the new circle and seal stamps from Magenta.  They remind me of Christmas ornaments, and they can give a very elegant look to a card.  Here I embossed them with gold embossing powder and punched them out with circle punches.  Very simple and quick to do!  These would also look great on tags.  You need a 2" round punch for the Christmas Wishes Seal stamp; a 1.75" round punch for the Reindeer Seal; and a 1.25" round punch for the Ornamental Circles.

By Dianne Johnson

Stamps used -all from Magenta
42.169.H Christmas Wishes Seal 
42.164.H Reindeer Seal
42.176.F Ornamental Circle 1 
42.177.F Ornamental Circle 2
07.779.G Merry Christmas
Paper is Red canvas paper from Magenta
Other:  Gold embossing powder
Xmas Red Stickles

Monday, November 11, 2013

Christmas Spirit

I have a new post on the Magenta Blog with some of my cards using one of my favorite Christmas stamps from Magenta, Christmas Spirit 07.777.G.  I can imagine so many different cards using this stamp, paired with the Memory Box jar dies; it's a perfect pairing.


Magenta stamps used:
07.777.G Christmas Spirit
42.171.J Christmas Ornaments
42.180.O Christmas Song 
Other:
Memory Box die 98382 Tall Canning Jar
Memento Ink:  Bamboo Leaves; Love Letter; Desert Sand

I inked up the ornament stamp with both Bamboo Leaves and Love Letter inks from Memento, and stamped it onto some patterned paper that had a little shading.  I also added the Christmas Song image, that I inked lightly.  I die cut the stamped image using the canning jar die.  On all three cards, I also die cut the jar in acetate to cover the image.  It's hard to see in the photos, but in real life, it's a fun look.  The jar lids were die cut from some scrap silver paper.


Magenta stamps used:
07.777.G Christmas Spirit
412.169.H Christmas Wishes Seal
Other:
Memory Box Die 98382 Tall Canning Jar
Memento Ink: Danube Blue
Stardream Fuse Vista paper
Waterfall Stickles
Embossing Folder:  Couture Creations Co723278 Powder Puff

On the card above, I used the Christmas Wishes Seal stamp, but it was a little big to fit in the jar, so I taped off part of it when inking.  It's such a pretty snowflake image, and this is a good way to get more use from your stamps!


Magenta stamps used:


 07.777.G Christmas Spirit
42.173.O Decorative Christmas Tree

Other:
Memory Box Die 98383 Small Canning Jar
Memory Box Die 98420 Magic Flourish
Distress Stains:  Mowed Lawn; Festive Berries
Memento Ink: Danube Blue
Stardream Fuse Fairway paper
Embossing Folder: Couture Creations Co723603 Sugarplum Ball

On this last card, I had stamped the Decorative Christmas Tree and embossed in gold, and tried applying Distress Stains to the image, using the splat technique.  I ended up not liking how that turned out, so I instead used that image to die cut the small canning jar.  I love how the gold flourish in the tree, and the red and green Distress Stain colors are perfect to show Christmas spirit.  I also used the rest of the tree image to die cut with the Magic Flourish die, showing Christmas Spirit swirling up out of the opened jar.  Fun!


Friday, November 1, 2013

Magenta November 2013 Challenge


November 2013 - Magenta Challenge :
Fall Colors
Create a Card, a Layout or even an alterned object if you feel like it!
You simply have to follow the Fall Colors theme and use at least one Magenta product :
papers, stamps, embellishment, Peel Off's, chipboard and more...

You have until November 28th to participate in the Challenge


You could win this Magenta Prize :


You can enter the challenge on the Magenta blog here and be sure to check out the samples from the Design Team for inspiration.

Here is my card, based on the Fall Colors theme:


Magenta Stamps used:  Oak Leaf 0664.J; Maple Leaf 1 0665.K; Maple Leaf 2 0666.K;
                                       I am in Love With This Day! 07.730.H
Distress Inks used:  Barn Door; Rusty Hinge; Peeled Paint; Mustard Seed
Memento Inks used:  Lady Bug; Olive Grove; Rich Cocoa
Artquest Palette:  Metallic

I masked a panel of white card stock with post-it notes and used the Distress Inks with a blending tool to create the  Autumn colored strip.  I stamped the leaf stamps with the Memento Inks over the strip of color.

The sentiment stamp I used is all in one line, and I wanted a shorter, stacked sentiment, so I used a stamp positioner to create that look.  I taped over the second half of the sentiment, and inked it up; then I removed the tape, positioned the first line of text on the card and stamped.  I then taped over the first half of the sentiment, inked up the stamp; removed the tape; and positioned the second line of text and stamped.  I love how this technique turned out, and I love that you can get more use from your stamps this way.

I applied the Distress Inks onto another piece of white card stock, using the blending tool and stamped over the colors I had created with the Maple Leaf 2 stamp, and cut it out.  I mounted the cut-out stamped image onto the panel using the technique that we learned in Montreal from Mimi of Mimi a la Carte.  You apply several blobs of silicone caulk (that you can find at the hardware store) onto the spot on your card where you want to pop up your image.  Be sure to draw the blobs up to a point when applying.  Gently place your cut-out onto the silicone and only press down very gently if at all.  Allow the silicone to dry for several hours.

After the silicone had dried, I matted the panel with Stardream Flame and Magenta red Canvas paper, and mounted onto a card.  I used Artquest Metallic water color to splatter the card.

I want to encourage everyone to enter this challenge.  You just have to use a Fall color theme, use at least one Magenta product, and go to the Magenta blog to enter; you will have a chance to win a great prize!


Monday, October 28, 2013

Dreamweaver Pasted Images and Zentangle

We had such a wonderful time at the annual Christmas party at Art 'n Soul!  Thanks so much to everyone who attended, it was wonderful to see you all!  We had multiple demos to share with everyone, including our guest artist, Helene from Magenta, Susie, Debbie and Marj.  We also had many sample cards to provide inspiration, from myself, Susie, Debbie, Marj, Deb, Patti and Sue.

I sat at a demo table with Marj, who was demoing the paste technique with Dreamweaver Stencils.  Marj had also pre-pasted some cards, and I sat and demonstrated Zentangle on them.  I honestly had so much fun doing that!

I had previously Zentangled on this owl that Marj made for me, using Dreamweaver Gold embossing paste.  It was so smooth, that it was effortless to draw on.  I just used a Micron 01 black pen.

Pasted image by Marj Marion
Zentangled by Dianne Johnson
Dreamweaver Stencil LG 751 Open Owl
Dreamweaver Gold Embossing Paste

I completed the following two at the party on Sunday.  They are both beautiful cards that Marj made and then offered to let me Zentangle on the pasted images:

Card by Marj Marion
Zentangled by Dianne Johnson
Dreamweaver Stencil LG 674 Oval Ornament
Dreamweaver Gold Embossing Paste
Memory Box Die 98732 Winterberry Sprig


Card by Marj Marion
Zentangled by Dianne Johnson
Dreamweaver Stencil LJ 906 Maple Branch
Dreamweaver Glossy White Embossing Paste

This next one of the ornament is an image that Marj pasted for me to Zentangle onto, and I completed it at home

Image pasted by Marj Marion
Dreamweaver Stencil LG 674 Oval Ornament
Dreamweaver Glossy White Embossing Paste

I brought home a few more images that Marj pasted, and offered to me to add Zentangles, so I will post those as I get them finished.  I hope you like these!  If you are local to Art 'n Soul, I will have these on display at the shop.

Sunday, October 20, 2013

Class in Montreal at Mimi a la Carte

As many of you know, I got the opportunity to go to Montreal and visit Magenta Stamps, which was just an amazing trip.  While we were there, Susie and I got to take a class at Mimi a la Carte, at 3778 Masson, Montreal QC.  Helene of Magenta took us there; and it's such a fabulous shop, tucked away along the street.  When you enter, you are immediately inundated with the most beautiful cards you have ever seen.  Mimi welcomes you to take pictures of the amazing samples that line the shelves, and I admit that I tried to take pictures of them all!

Part of one wall at the entrance of Mimi a la Carte

Mimi is the owner (Micheline Jourdain) and she, along with her daughter Emilie (pronounced Emily) Jourdain Maher were so welcoming to us that we felt immediately at home.

Emile (left) and Mimi (right)

The class was held in the back at an intimate table, lined with everything that we would need to complete our project.  Behind, and around the table were other supplies, ready if needed.  We loved how they displayed their nesting dies on a bulletin board near the table where we worked.


The class was to learn the technique of using Tombow markers on watercolor paper, and using a brush and water to create a beautifully shaded image.  This is definitely a technique that takes some care and practice, but it was just so much fun to do.  Emilie conducted the class, and used it as an opportunity to practice her English on us.  She kept saying it was challenging to speak to us in English and teach to us at the same time, but honestly, she did so well, she made it look effortless.  She is a fantastic teacher, and her English is really very good.  Helene was there to help with any needed translations, but we found we could understand Emilie very well.

When we finished coloring our images, Emilie also showed us an additional technique of popping up one of the parts of the image.  They use clear silicone sealant that you can find at a hardware store!  You apply a blob of the sealant where you want your popped up image to be, and it's very important to draw the blob up to a point.  Then you gently lay your cut out piece on top of the point and don't press down very much.  Allow it to dry that way, which may take several hours or overnight.  We also used liquid appliqué (which puffs when heated) and glitter, and Stampendous chunky embossing enamel in a few places on the piece to simulate snow.  Here is the finished card I made.  It's hard to see in the picture, but the top part of the child in red is popped up.  This was colored completely with Tombow markers and a wet brush.

Magenta Stamps:  42.188.L Sledding Day; 07.780.G Joyeux Noel (small)

For those of you who are local to Art 'n Soul, we will have more samples of cards using this technique with Tombows.  We will also have the liquid appliqué and Stampendous embossing enamel in stock for our Christmas Party on October 27, from 1:00-4:00.

While we were there, many regular customers of the shop came in, and when they learned that Helene was in the back with American guests, they all came back to say hello.  Many of them spoke English to us, and welcomed us to the area and to Mimi a la Carte.  They were also thrilled to be able to greet Helene.  Magenta Stamps products are as popular there are they are at Art 'n Soul!

Before we left, Mimi kindly sat down and showed us an amazing technique for creating snow drifts, and stamping images in the snow she had created with ink.  She also showed how to make tree shadows in the snow, by stamping on a piece of plastic packaging and applying it to the image.  She mostly spoke in French, but somehow we could understand her, and with just a few translations from Helene.  We were bowled over by the beauty she created right in front of us with seemingly little effort.  She was very much in her element, and is so happy when she is creating!

Magenta stamp:  Small Deer Family 42.186.E
I did not get the information on the tree stamp, but the Magenta stamp Fir Tree 32.036.J would work well for  a picture like this.

Mimi gifted us with the sample that she created, and we will have it on display at our Christmas Party at the shop.  We are also very excited that Helene will be there at our party to show this technique to everyone who comes.  Having learned the technique from Mimi, Helene is also a master at it, and it will be such a treat to see her do it at Art 'n Soul.

Helene took this picture of the happy students and teachers before we left.

Emilie, Me, Susie, and Mimi


Thursday, October 17, 2013

Magenta Giveaway!

Magenta is having a giveaway!  You could be the lucky winner of a $50 gift certificate just by entering.


Magenta wants to say Thank You to all of its faithful followers!
Enter this special “Give Away” for a chance to win!

You could win a $50 gift certificate
applicable on your next order on our online store! *
* Certificate is valid only on our online store and shipping is not included

Simply follow Magenta on the Magenta Blog or Facebook and use the widget in this blogpost to enter!
You have until October 31st to enter!


Monday, October 14, 2013

Magenta Floral Elements Template

As promised, here are the two samples I created for the new Magenta October 2013 Supplement.  These samples will be on display at Art 'n Soul, and we have ordered a supply of these templates, as well as many of the new stamps from both of the new catalog supplements.

By Dianne Johnson
Magenta Template design by Ellie Knol - TM-39
Magenta Sentiment stamp:  07.700.G  Life is Art
Memento Ink:  Danube Blue; Grape Jelly; Rose Bud; Bamboo Leaves; Cottage Ivy

by Dianne Johnson
Magenta Template design by Ellie Knol - TM-39
Magenta Sentiment stamp: 07.691.G  Art Washes
Memento Colors:  Sweet Plum; Grape Jelly; Bamboo Leaves; Danube Blue
Wink of Stella purple glitter pen
These were so fun to do, and so effortless.  All that was needed was the template, sponge daubers or stencil brushes and ink pads.  A sentiment stamp is the final touch.

Friday, October 11, 2013

Sorry I've been absent for the blog for a bit, but September is a crazy busy month for me.  Also, at the end of September, and first week of October, I traveled to Montreal, and got to visit Magenta!  More on that later, but I wanted to let you know that Magenta has a new October 2013 release out that is fabulous.  You can check out the images here


When I was at Magenta, I was honored to be asked to create a sample for this October supplement using the new Magenta template.  The template is based on stamp designs by the talented Ellie Knoll.  My sample is on the last page of the supplement, so be sure to page through it to the end.  I actually did two samples using the new template, and I will share my pictures of both of them with you soon.


Tuesday, September 3, 2013

Zen Pumpkin

Last year I saw a video by Suzanne McNeill, CZT, where she Zentangled on a foam pumpkin.  She made it look so effortless and fun!  Well, I went out and bought foam pumpkins, but then I never did Zentangle on them.  Last night I decided it was time, so I got one out.  Suzanne used Sharpie paint pens, which contain an oil based paint.  Here are some pictures of my efforts.  It's really not as easy as it looked when Suzanne did it!

By Dianne Johnson

You can definitely see that the lines are far from perfect, but I didn't care - it was a lot of fun to do!  Drawing on a curved surface was a lot harder than drawing on a flat one!  Every once in a while, my pen would just go off on it's own and the lines would not be what I had planned.


By Dianne Johnson

Although the paint pen that I used is the smaller one that is available, it is still has a bullet point tip, which is much thicker than the Micron 01 that I'm used to.  With that being the case, some patterns are better than others to use.  


By Dianne Johnson

I ended up coloring in some lines where my pen just veered off!


By Dianne Johnson

Wherever the oil based paint dried, it acted like a "speed bump" to my pen.  The pen would hit it and come to a screeching halt and then jump over the painted place.


By Dianne Johnson

I even did the bottom, because you KNOW people are going to pick it up to look at it!

In spite of it being more difficult to do, there was such joy in doing this, and I actually love how it turned out.  You should definitely try it!  I chose a white pumpkin and a black pen to do first, but I also have a black pumpkin and white pen, and I'm going to do that next.

Sunday, September 1, 2013

September Magenta Challenge

We have a new Magenta Challenge!


Magenta Challenge - September 2013 :
Anything Goes!  Make a Card, a Layout, Mixed Media piece, ATC, anything you desire.


Use any color scheme you wish!  You just need to use some Magenta products for your creation.

You can win this fantastic Magenta prize!

To enter, go here and use linkz to enter your creation


Here's what I created

by Dianne Johnson
Magenta Stamps Used:  Samara Branch 42.184.J; Colors and Shapes 07.805.I
Magenta Paper:  Red Canvas sheet
Distress Stains: Aged Mahogany; Peeled Paint; Spiced Marmalade; Tea Dye;
Mustard Seed
Gold Detail Embossing Powder from Judikins
Jet Black StazOn Ink; Versamark
Hero Hues Pearls
Embossing Folder:  Branches with Leaves & Flowers Sizzix 657252


First, I stamped the Samara Branch onto Kraft cardstock with Versamark, and embossed with Gold Detail embossing powder.  

I love the Distress Stains from Ranger, which have a dauber top.  If you have a new bottle of Distress Stain, be sure to press in the dauber top once to open the valve.  Then you can turn the bottle upside down and press the top onto your paper while you squeeze the bottle lightly to apply as much stain as you like.  

I tested the colors I have onto a scrap piece of Kraft cardstock.  I'm glad I took this extra step, because some of the colors really soak into the Kraft, and some appear brighter.  They look completely different than they do on white cardstock.  And I..uh..might have contaminated some of my dauber tops with metallic Distress Stains on a previous project.  That's ok though, because these can be cleaned off.  Here's my test swatch:

Distress Stain samples on Kraft

I chose the fall colors I liked the best and went from there.  Oh, and if you do a test swatch like this, wear an apron and cover your table.  Some of the colors are juicier than others.  Just sayin'.

I ended up making a larger card than I normally do.  I was just experimenting with the Samara stamp and the stains, and I liked it so much I didn't want to cut it down.  I stamped the sentiment onto a piece of Vellum and mounted it in the middle with vellum adhesive.  I added a sprinkling of pearls from the top left to the bottom right.  

This card was so much fun to do!

Saturday, August 31, 2013

Zentangle Guru Update

At Art 'n Soul we have been hosting a trunk show from Dreamweaver Stencils.  Our good friends Lynell and Wayne Harlow of Dreamweavers came one Saturday recently, to demo fabulous techniques with their stencils.  They stayed all day, and everyone who attended had a fantastic time.  Wayne Harlow, who is a CZT (Certified Zentangle Teacher) showed us lots of his tips and techniques with Zentangling, especially doing tangles inside of the marvelous Dreamweaver Stencils.  Here's a picture of Wayne talking to Sherry Barello (our first ever Featured Artist) that day.

Wayne Harlow and Sherry Barello
While giving us lots of good info on Zentangling, Wayne shared a tangle with us that he invented himself, called Crusade.  Imagine how happy we were to see that Wayne's tangle made it onto the TanglePatterns website!  Here's the link for the step-outs to Wayne's first published tangle!  Congrats Wayne, we're so proud of you!

By the way, you can link to the Dreamweaver Stencils blog from my blog (See "Dream It Up" under "Blogs I Love to Visit" at the  bottom of this page).  There is also a link there to the TanglePatterns site.

By the way, we still have a lot of fabulous Dreamweaver Stencils in stock!  (We can't seem to bear to send any back yet, but we must soon).


Saturday, August 17, 2013

Inchie Art Squares Card

I came across this card that I haven't shared with you yet.  This is a technique invented by Lisa Lee of Inchie Arts, to use dies with Artsquares.

by Dianne Johnson

For this technique, you need masking paper, Artsquares, a die of your choice, pigment ink, and clear embossing powder.  I used 4- Inchie Plus Artsquares, and I pushed them together to work on them, but this is also a great technique for the 3" squares, or the ATC sized Artsquares.  The die is Memory Box Cheshire Branch Outline 98599, and the sentiment is Magenta "Thanks for Touching My Heart" 07.731.I

I applied temporary adhesive to the backs of the squares to adhere them to a scrap piece of card stock while I worked.  I covered the Artsquares with the masking paper, and put the die face down onto the masking paper.  You need to experiment with your sandwich when you run this through your machine, because the Artsquares are about 1/16" (or about 1.6 mm) thick.  You want it to go through firmly, but not so that it's hard to crank through.  The die will cut the masking paper, and emboss into the Artsquares.  You then peel up the masking paper selectively, for areas you want to color.  I did the background first, and applied pigment inks with sponge daubers.  I then peeled the masking paper from the petals, applied the purple pigment, and the last piece of masking paper was on the leaves, which I left white.

For the last step, you apply clear embossing powder over the whole image and heat emboss.  In order to get the shiny finish, I then applied Versamark clear sticky ink to the entire image, clear embossing powder again, and heat embossed.  I did this last step once more, until the finish was shiny and smooth.

I peeled the squares up off the scrap card stock, and mounted them onto a square of purple card stock with dimensional adhesive.  I then mounted the purple square onto my card and stamped the sentiment.

Lisa Lee of Inchie Arts is coming to Art 'n Soul on Saturday, September 21st from 1:00-3:00 to teach this technique, and students will make a number of beautiful cards, using different dies and colors.  If you are local, be sure to call or come by the shop and sign up for this great class!  Once you get the hang of this technique, you can make beautiful cards that look MUCH harder to make than they are!

Wednesday, August 14, 2013

Hero Arts Stamp Your Story

Oh my gosh everyone, check out the Hero Arts blog today!

http://heroarts.com/blogs/club/2013/08/14/art-n-soul/

They are featuring Art 'n Soul, and ahem, cards from yours truly.  There is a blurb about the shop and pics featuring Patti's beautifully arranged table with the Stamp Your Story stamps from Hero Arts, and cards from Marj and myself.  We are thrilled!

Leaf Fish

I've talked before about how when Helene was in Washington to teach, she challenged us to use our stamps in different ways.  This is one that she showed us - how to make these adorable fish with a leaf stamp.  Just draw a triangle for the tail, and add an eye.  I wanted to make a sample for our shop to remind everyone to look at their stamps differently.  The seaweed is a leafy branch stamp.  Try it, it's really fun!

by Dianne Johnson

Magenta Stamps used:  Bold Leaf 23.180.C;   Bold Branch 37.266.O;   Dots 23.114.C; 
There is Magic All Around Us 07.807.I
Memento Inks used:  Bamboo Garden; Rose Bud; Tangelo; Bahama Blue; Grape Jelly; Tuxedo Black
Other:  So Silk Blue cardstock; Embossing Folder - Tiny Bubbles - Cuttlebug 37-1229
Enamel Dots from My Mind's Eye

Saturday, August 10, 2013

Happy Birthday Charlotte Gail!

Dreamweavers has a few new stencils with chunky lettering.  I love them because they are perfect for adding tangles.


by Dianne Johnson


One of my closest friends, who has known me most of my life is almost exactly one month older than I am.  I sent her a card in the mail, but I also made this one to post on her birthday.  Happy Birthday Chez!  Thinking of you today, OLD friend! xoxoxo

Thursday, August 8, 2013

Zen Fan

I think that Dreamweaver Stencils and Magenta sentiment stamps make a dream team for simple, pretty Zentangled cards.  I have paired them up quite a bit.  Here's the latest

by Dianne Johnson
Dreamweaver Stencil: LM 189 Fan
Magenta Stamp:  07-804-F "I'm a fan of yours!"

This card didn't really want to get made.  I had this stencil from Dreamweaver for a while, and wanted to Zentangle with it on a card.  I didn't really have a good sentiment for it though, and Helene from Magenta kindly consented to make this one for me, which is just so perfect!  [this stamp can be obtained through Magenta - or for local Art 'n Soul readers, you can get it through the shop].  Once I got the stamp, then I couldn't find the stencil.  I looked for it for a while, and then decided to get another one; which would surely mean the first one would turn up. Yeah, that didn't happen.  In fact, the second one disappeared also.  Ok, I'm embarrassed to admit that this is the third one of these stencils I have purchased.  I decided to quickly make this card before this one joins the others.  Yes, I am doing some renovation in my studio, but why am I only losing this one stencil, over and over?  Some things just can't be explained.

Local Art 'n Soul readers, we are having a gigantic trunk show of Dreamweaver products at the shop for the next couple of weeks.  This Saturday the 10th, Lynell and Wayne Harlow of Dreamweaver Stencils will be in the shop to demo their products, all day from 11:00 - 4:00.  Lynell will demo molten paste and other techniques, and Wayne will be showing Zentangling inside Dreamweaver stencils!  I know I will be there!

I will also demo Zentangling using Dreamweaver stencils on Wednesday the 14th and Thursday the 15th.  Ok, actually, for those of you who know me, you know I will demo Zentangle pretty much any time anyone asks.  Or even if they don't ask.

Wednesday, August 7, 2013

Magic All Around

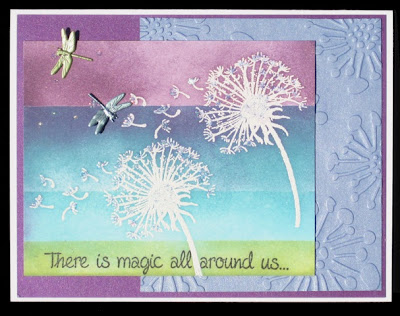
Just a short post today - I wanted to show a card I did for the Magenta blog.  I love the new Dandelion image from Magenta.  It says Summer and making wishes to me.  First, I stamped the Dandelion in Versamark ink, and embossed with white embossing powder.  Then I masked off areas and applied different colors of Distress Inks in layers.  I stamped the sentiment in Memento Tuxedo Black.  The card is matted with So Silk Purple cardstock.  I embossed a small piece of Stardream Fuse Vista cardstock with an embossing folder called "Blooming Season", and affixed it to the purple.  I mounted the Dandelion image on top, and applied Stickles and Dragonfly brads.

by Dianne Johnson

Magenta Stamps used:  Dandelion 42.181.L; There is Magic All Around Us 07.807.I
Distress Ink:  Shabby Shutters; Tumbled Glass; Broken China; Dusty Concord
Cardstock:  So Silk Purple; Stardream Fuse Vista
Embossing Folder:  Blooming Season, Craft Concepts 2011 CR900045
Other:  White embossing powder; Waterfall Stickles; Dragonfly brads

Friday, August 2, 2013

Zen Keyboard

First of all, three things to tell you:  One is that Art 'n Soul's first ever Featured Artist, Sherry Barello has started her own blog.  Please check it out, and visit often.  Her work is amazing!  Click here to visit, and be sure to bookmark.

Art 'n Soul customers, please be sure to visit us this weekend for our monthly Recycled Rubber event!  It will be the biggest one ever, and it will be super fun.  Lots and lots of fantastic bargains to be had, so come early!

Please check out the post I did yesterday about the August Magenta challenge.  Just do a project using one or more Magenta product, with the theme "Garden Party".  Click over to the Magenta blog to link to a picture of your project, and you have a chance to win a cool prize.  It's easy and fun!

OK, here is my newest Zentangled project:
I work a lot at my desk where my laptop usually resides, and since my laptop normally sits open, my work often ends up ON my laptop keyboard.  I'm constantly cleaning adhesive, inks, paint, etc. off my keyboard.  I remarked to my hubby that I really need something to protect my laptop keyboard, but I wanted to leave the trackpad open.  The next day, I found that he had cut this perfect piece of illustration board, and left it for me on top of my keyboard!  After thanking him profusely, the next thing I thought was "what a nice, large, open area, that really, really, needs to be Zentangled!"  Here is the keyboard in question.


 Here is the illustration board cover that my hubby cut for me.  the trackpad is showing so that I can still scroll and click, even when the cover is on.


Here is the progression.  I worked on it for 4 evenings, a few hours at a time.  I don't really time myself when I'm Zentangling; how long it takes seems so not the point.

Evening one

Evening two

Evening three
 I just had a little left to do for the last evening.  This project was SO much fun.  This is the finished piece.

Evening four

A few closeups

If you're thinking that now I need something to protect my Zentangled board, I'm all over it!  I can just flip it over!