Pages

Thursday, October 31, 2019

Magenta Pumpkin Trio: Happy Fall!

When the Fall weather starts to make the mornings crisp, I always think of pumpkins. I love the colors, the variety, and just everything about them. I begged Nathalie to design a new pumpkin image for us this year, and she certainly delivered! I love this beautiful little trio, and am excited to add it to my collection.


I cut a panel of dark blue cardstock with the Lawn Fawn LF768 Small Stitched Rectange Stackables. The large die of this set cuts a panel to 3.75" x 5". I stamped the Pumpkin Trio image and the Delicate Leaves image with Hero Arts White Unicorn ink, using a MISTI stamp platform. I then colored the leaves and pumpkins with prismacolor pencils.

Once I had finished coloring, I put the panel back into the MISTI and stamped the pumpkins again with Versamark ink. I also stamped the sentiment Happy Fall with Versamark. I embossed the images with gold embossing powder.

To finish the card, I added orange gems to the leaves, and matted the panel with Curious Metallics super gold cardstock.

Magenta Products used:

09.262.M Pumpkin Trio

0784.Q Delicate Leaves

07.1040.E Happy Fall

Other Products used:
Prismacolor pencils: PC912 Apple Green, 
PC1004 Yellow Chartreuse, PC1002 Yellowed Orange
PC1003 Spanish Orange, PC944 Terra Cotta
Hero Arts Unicorn White ink
Versamark ink
Ranger Gold embossing powder
The Super Cut Deep Blue cardstock
Curious Metallics Super Gold cardstock
Neenah Solar White 110# cardstock


Tuesday, October 29, 2019

Wishing you a Merry Christmas - The Quest for Fast but Beautiful Christmas Cards

Since I did not have the opportunity to make Christmas cards early this year, I am trying to come up with cards that can be made quickly, can be made in multiples, and yet are still beautiful.

I got this great "Merry" stamp at Impress this summer, and it was on a very simple card, so knowing that I would need stamps like that, I bought it. It was on a wood base, which I quickly fixed by turning it into a cling. I have done this with all of my wood stamps, and consider it a must if you are doing multiples of one card.


Granted, I could have made this easier if I only used one embossing powder. There was the added complication that only the "Merry" stamp was rubber, and the others were clear.

I cut panels from red cardstock using the stitched rectangle die from Die-Namics MFT-463 Blueprints 13 die set. That die cuts a panel that is 4" x 5.25", and has a nice stitched edge.

I set up two stamp positioners to make it easier to make these by assembly line. I first stamped and embossed the "Merry" stamp; then I stamped and embossed the other text. The "Christmas" is from a Concord & 9th set, and the sentiments "wishing you a" & "and happy new year" are from a Simon Says Stamp set. The poinsettia is from the same Concord & 9th set that the "Christmas" sentiment is from. Unfortunately, I had to wait and stamp the poinsettia last. This is because I decided that I wanted to color the leaves green. 

I initially stamped the poinsettia image with white ink and left the stamp in the positioner. I then quickly colored the leaves with Prismacolor pencils. Since the stamp was still in place, I was then able to stamp the Poinsettia image again, right over the colored image (always use a powder bag or some sort of anti-static embossing tool first) using Versamark ink. I then embossed the flower in gold.


The above photo was taken before embossing the flower in gold. After embossing, I colored the petals with a Wink of Stella clear glitter pen. Actually, I had wanted to bleach out the petals, but not all cardstock can be bleached, and Hopsack Red is one of those.

To keep it simple, I elected not to mat my panel and mounted it straight onto a base card.

While I had all of these materials out, I decided to make tags as well. The "Christmas" sentiment would not fit on the size tag I chose, so I found a suitable one in a clear set that I got at Impress.


The white embossing powder I used on these is JudiKins White Diamond, and these are so sparkly in real life!

I hope you enjoyed! I would encourage you to look through the stamps you have, and put together a simple card or tags with different stamp sets.

Products used:

Impress 5716E Striped Merry
Impress Modern Sentiment Holiday clear set (for tag)
Concord & 9th Christmas Florals Stamp set (for card)
Simon Says Stamp Holiday Greetings Mix 1 (for card)
Versamark ink
JudiKins White Diamond embossing powder
Ranger Gold embossing powder
Prismacolor Pencils: PC1005 Limepeel, PC907 Peacock Green
Wink of Stella Clear Glitter pen
Hero Arts DI 197 Infinity Nesting Tag dies
The Paper Cut Hopsack Red cardstock
Neenah Solar White 110# cardstock


Sunday, October 27, 2019

Magenta 2019 Fall/Winter Collection: Home for the Holidays

I'm kind of a sucker for birds and birdhouses, and so when Nathalie designed a birdhouse in the pines, I knew I had to have it.


I have a story about how this card was made. I had in my mind to try stencil stamping with this one, and there are some amazing Mandala stencils with this new collection. You can see other posts where I have done stencil stamping here, here and here. If you want to see others, you can search for stencil stamping on my blog; there are a lot of posts.

I have been doing this technique for some time, and lately I have seen others also doing this, and they may call it something different. It's a technique where you ink up a panel liberally with dye ink (I always use Distress ink because it's so highly reactive with water). You then take a stencil (preferably one that has about the same plastic or metal to open areas) and spray the stencil well with water (I use water that has Perfect Pearl powder added to it for a little extra shine).  You then place the wet stencil onto your inked cardstock, and cover it with a paper towel and press down. When you take off the paper towel and stencil, you have an image of your stencil in the ink.


To start, I used a piece of Neenah Solar White 80# cardstock, and brushed on Distress ink in Broken China and Shabby Shutters. The ink needs to be added pretty heavily, so I brushed on a lot. When I used to demo this technique at Art 'n Soul, I would use the mini inkpads and rub the ink on direct to paper. The more ink you put on your paper, the better the image will show up.

I wanted to experiment, so I decided to use a piece of Tim Holtz watercolor cardstock as well, just to see which one worked better.


The Neenah cardstock is on the right, and the watercolor cardstock is on the left. The thing about watercolor cardstock is that it isn't absorbent. It's supposed to be that way so that your watercolor will move around on the paper. It was hard to get a lot of color down, and then when I put the wet stencil on it, the color...well, moved around, as it's supposed to. This is a fun look, and the watercolor panel is the one I used for the card above with the birds and birdhouse.

The Neenah panel on the right turned out so pretty that I couldn't stamp over it. I just loved how perfectly the stencil image showed up on it.

So I made this card with the Neenah panel. I added a sentiment and some gems, and called it done.


The birdhouse image in the first card was stamped with Versamark ink. An important tip is to BE SURE your panel is dry before you try to put embossing powder on it. Since this was non-absorbent watercolor paper, the ink on it did not sink into the paper. It took some time for it to dry, using a heat tool. I kept testing whether it was dry by putting embossing powder on it (before I stamped the image). When the powder would stick, I brushed it off and kept drying it until no powder stuck to the card. Only then did I use a powder tool and then stamped the images with Versamark ink.

I love the Happy Holidays from our house to yours sentiment with the birds and birdhouse image. I used JudiKins Diamond White embossing powder for the stamping. Both cards were matted with Malmero Pearl Dark Blue cardstock.

Magenta Products used:

03.122.N Home for the Holidays

07.1015.H Happy Holidays

07.1022.I Wishing You a Merry Christmas

MC84 Mandala 5 Small

Other Products used:
Distress ink: Broken China, Shabby Shutters
Versamark ink
Perfect pearls powder
JudiKins White Diamond embossing powder
Tim Holtz watercolor cardstock
Neenah Solar White 80# & 110# cardstock
Malmero Pearl Dark Blue cardstock
Lawn Fawn LF768 Small Stitched Rectangle die set


Wednesday, October 23, 2019

Falling For Magenta

Magenta really does have some beautiful Fall leaf stamps out this year. This one is called Fall Leaf Twig.


This card was super simple. I sprinkled some Nuance onto a piece of watercolor cardstock, and spritzed. Once dry, I cut a panel 1 3/4" wide and 5" tall. I also cut a piece of white cardstock to 3 3/4" x 5" using the Lawn Fawn Small Stitched Rectangles (LF768).

I placed the Nuance panel 1/4" to the right of the left edge on the white panel and using the MISTI stamping tool, I stamped this beautiful leaf twig with Versamark. I removed the Nuance panel and stamped it again, and used gold embossing powder on each piece separately, to avoid any gaps.

I stamped the sentiment with two colors of Versaclair ink for an ombre effect. To finish the card, I matted it with a piece of red cardstock I had in my stash, and mounted it onto a base card.

Magenta Products used:

0798.M Fall Leaf Twig

07.1014.F Enjoy the beauty

MNU006 Orange Nuance

MNU008 Golden Yellow Nuance

MNU010 Scarlet Nuance

Other products used:
Versamark ink
Versafine Clair Summertime & Tulip Red
Tim Holtz watercolor cradstock
Ranger Gold embossing powder
Lawn Fawn LF768 Small Stitched Rectangle Stackables
Neenah Solar White cardstock 110#

Sunday, October 20, 2019

Christmas Tag from the Magenta 2019 Fall/Winter Collection

We had so much going on this year that I didn't get a chance to make Christmas cards and tags all year long like I did last year. Let's just say that the Holidays are coming like a freight train, and I have lots to do to catch up. Next year, I am definitely going to try to do them all during the year; that's a much better plan! I'm busy now making cards and tags, and I will be posting them all, so stay tuned.


This is a tag that I made from Neenah 110# cardstock and a couple of the new Magenta stamps. I cut the cardstock to 3.75" x 3.75",  and used the GinaK Designs wreath builder template to help position the stamping. 

I stamped the Berry Branch 8 times, and colored the berries with a red glitter pen. They are bright and shiny in real life. For the sentiment, I used the Hero Arts Infinity Circles dies and cut the top panel out of Neenah Solar White 110# cardstock; the red circle was cut from The Paper Cut Hopsack Red cardstock, and I also cut a piece of black craft foam to the same size circle as the top circle piece, to pop the sentiment up.

I stamped the Joyeux Noël sentiment from Magenta (which is also part of the new collection) onto the top panel, and it's the perfect size. At the end, I used a corner punch to round the corners, punched a hole in the top and threaded in some thin green ribbon.

Since I only used one stamp for this process (not counting the sentiment) I honestly believe I could have done this without the template. You could stamp the Berry Branch from Magenta at the top, bottom, and right and left; then stamp it again in between each one of those. I don't think it would be hard, especially since the place where the stamped images intersect in the middle are covered by the sentiment. In fact, I have used another stamp in a similar way, more than once.


It's been a while since I did these, but I still love them. You can see that post here. And these stamps are still available from Magenta.


You can see and purchase the new Magenta Fall/Winter collection at the Magenta online shop. The rubber stamps are here, and the stencils/masks are here. The stamps used in this post are linked below.

Magenta Products used:

02.323.F Berry Branch

07.1029.D Joyeux Noël

0661.H Leaf

07.730.H I am in love with this day!

07.665.I Congratulations

Other Products used:

For the tag:
Versafine Clair ink:  Green Oasis, Glamorous
Neenah Solar White 110# cardstock
The Paper Cut Hopsack Red cardstock
Black craft foam
Hero Arts Infinity Nesting Circles DI 199
GinaK Designs Wreath Builder template
Red Uniball Signo Sparkling Pen
Crop-A-Dile Corner Chomper

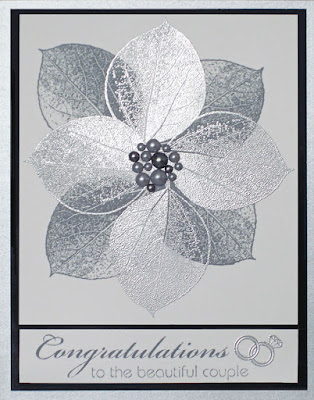
For the Leaf cards:
Purple card:
Memento inks: Grape Jelly, Lulu Lavender
So Silk Purple cardstock
Neenah Solar White 110# & 80# cardstock
Hero Hues pearls

Silver card:
Memento ink: Gray Flannel
Versafine ink
JudiKins Detail Silver embossing powder
Neenah Solar White 110# & 80# cardstock
So Silk Black cardstock
Hero Hues pearls


Wednesday, October 16, 2019

Magenta Delicate Leaves - Fall/Winter 2019 Collection

Hello everyone, here is another post using stamps from the new Magenta Fall and Winter 2019 Collection. This is one of their largest releases yet! There's something for everyone. You can look at all of the new stamps here; and the stencils/masks here.

I love the Delicate Leaves stamp because I think it can be used for almost any type of card, as well as an interesting background. I have two cards for you today, using this stamp.


These leaves look to me like they are trailing down along the side of a fence, so it adds background interest. Yes! The orange is all one stamp, isn't that cool?

I stamped it with some several orange Distress inks, then pulled out some of the color with a damp brush. 

I finished the card by using a stamp from Magenta's last collection: a beautiful calligraphy sentiment by Sally Penley. I added a few orange pearls and left it at that.

I went a completely different direction with my second card.


Look how you can make this stamp perfect for Christmas! The sentiment is from this new collection as well, and it also comes stacked vertically, so it's very useful, and I will be using that vertical stamp in a post very soon.

I used a Wink of Stella clear glitter marker on all of the leaves, but that is impossible to capture in a photo. It gives the card a pretty shimmer. The berries are some red pearls from my stash.

Magenta Products used:

0784.Q Delicate Leaves
07.984.E With Sympathy

07.1022.I Wishing you a Merry Christmas

Other Products used:
Distress inks: Wild Honey, 
Rusty Hinge, Carved Pumpkin
Versafine Onyx Black ink
So Silk Black cardstock
Orange pearls
Versafine Clair Green Oasis ink
Stardream Jupiter cardstock
Red pearls
Neenah Solar White 80# & 110# cardstock
Lawn Fawn die LF768
Small Stitched Rectangle Stackables


Friday, October 11, 2019

Magenta Super Saturday: New Collection Fall Leaves

Hi everyone, I'm over at the Magenta blog today with this post, and I'm so excited to tell you that the new Fall/Winter 2019 Collection is up in the store. You can look at the new stamps here, and the new stencils and masks here. This is my first post with the new stamps, and I will be posting more often between now and December. There is so much to show you!


There are a number of really beautiful leaf stamps in the new collection, and I thought I would start with these beauties. I did two cards, and both are stamped with Versamark ink and embossed with gold embossing powder. I thought I would try coloring with two different mediums. In the one above, I colored the leaves with Zig Clean Color Real Brush markers. 

This stamp really stamps like a dream. I honestly believe that anything you do with it will turn out well. I made a little chart of some Zig colors that I pulled out at random. I didn't use all of these, but it was useful to see the different choices.


When I was making the swatches, I remembered that these markers really work better on Bristol than regular watercolor cardstock, but I had no trouble moving the color around on the stamped images. It was a lot of fun!

I took an oblique angle picture of each of these cards to show how pretty the gold is in real life. It's very hard to photograph.


For the second card, I stamped it the same, but since I needed a Fall Birthday card, I changed the sentiment to Happy Birthday. Both of these sentiments I used are brand new, by the way. the Birthday stamp is one that I requested, because I am constantly needing a small Birthday stamp, and this one was done in my favorite font. I think it's elegant and just the right size.


I used Distress inks to color this card, and I honestly think that it's not that different from the first. What do you think?

I used quite a few colors of Distress, and swatched them as well. I then just squished the pads onto some acrylic blocks and picked up the colors with a brush. I thought the Peeled Paint was a little dark for what I wanted, and added Mowed Lawn instead; only using Peeled Paint sparingly, and lightening it with some Mustard Seed.


Here's the oblique angle on this one


These panels were cut to 5" x 3.75" from Tim Holtz watercolor cardstock using a Lawn Fawn die LF768, Small Stitched Rectangle Stackables. The largest die from this set is a perfect size for me, and I use it very often. I flicked Peerless Transparent liquid watercolor onto each card.

To finish the cards, I matted them with Stardream Copper cardstock, and mounted them onto a 110# Neenah Solar White base card. I added some enamel dots at the end.

I love, love this leaf stamp, and I guarantee that you will see more cards from me using it. Please be sure to check out the new Magenta collection. There are some beautiful stamps for Fall and Winter, including new Christmas images! To purchase the stamps I used in this post, you can click on the names of the stamps below and the links will take you to the Magenta store.

There will be a lot more posts on the Magenta Blog with the new products also. You can go to the blog here. The Design Team is just starting to get these fabulous stamps and stencils in their hands now. If you like the posts, please show the DT some love by commenting. We love that!


Magenta Products used:

0799.L Fall Ash Leaves

07.1040.E Happy Fall

07.1028.D Happy Birthday

Other Products used:

Zig Clean Color Markers: 053 Yellow Green; 041 Lt Green;
047 May Green; 050 Yellow; 052 Bight Yellow;
070 Orange; 260 Deep Red
Distress Ink: Mowed Lawn; Peeled Paint;
Twisted Citron; Mustard Seed; Carved Pumpkin;
Wild Honey; Rusty Hinge; Fired Brick; Aged Mahogany
Versamark Ink
Tim Holtz watercolor cardstock
Stardream Copper cardstock
Neenah Solar White 110# cardstock
Lawn Fawn die LF768 Small Stitched Recangle Stackables
Peerless Transparent watercolors: Gold & Copper
Ranger Gold embossing powder
Various enamel dots