Pages

Showing posts with label Hero Arts DI199 Infinity Nesting Circles. Show all posts

Friday, March 6, 2020

Super Saturday at Magenta: Watercoloring Embossed Leaves

Hi everyone! I'm on the Magenta blog today, and you can go to that post here.

One of my favorite collections from Magenta is the last Fall and Winter series. Many of the images in that collection can be used all year long. I chose the Leaf Branch Trio as a lovely image for a sympathy card. Sympathy cards are one of the hardest cards for me to make. I prefer to make some up in advance, and I like them to be simple and classic.


For this card I used Strathmore Tone Blue Mixed Media paper. This is a  nice heavy cardstock, and it comes in a variety of colors or tones. I stamped the leaf image in Versamark ink, and embossed it with JudiKins Silver Detail embossing powder.

To add some color, I used a Zig Clean Color Real Brush Marker in 038 Peacock Blue, and added color to the open areas of the leaves. I used a water brush to spread out the color in the leaves. The embossing resisted the color and added a nice contrast.

By the way, to find the right color, I swatched all of the darker blues that I had, and determined that the Peacock Blue would be the best color for my project. Here are the swatches, along with others that I have swatched in the past. The Peacock Blue surprised me, because I thought it would be more green, but holding it up to my paper, it was the clear winner. 030 Blue would have been the second choice. I'm really going to have to take the time to swatch all of these great markers at some point!


I cut the image out using Hero Arts Infinity Circle dies, and cut a piece of dark blue cardstock with the next larger size circle to mat it. I cut a rectangular piece of the Blue Tone paper using the Die-namics MFT-463 Blueprints 13 die set, and stamped and embossed the sentiment in the lower right corner. I mounted the panel it to a dark blue cardstock that was cut to 5.5" x 4.25". The entire panel was then mounted to a base card.

This was a very easy card to make, and could be accomplished with most any color of cardstock you may have, using this versatile stamp.

Magenta Products used:

0793.O Leaf Branch Trio

07.984.E With Sympathy

Other Products used:
Versafine ink
JudiKins Detail Silver embossing powder
Zig Clean Color Real Brush Marker:
038 Peacock Blue
Strathmore Toned Blue Mixed Media paper
PaperTrey Ink Dark Indigo cardstock
Die-namics MFT-463 Blueprints 13 die set
Hero Arts DI199 Infinity Circles die set


Sunday, October 20, 2019

Christmas Tag from the Magenta 2019 Fall/Winter Collection

We had so much going on this year that I didn't get a chance to make Christmas cards and tags all year long like I did last year. Let's just say that the Holidays are coming like a freight train, and I have lots to do to catch up. Next year, I am definitely going to try to do them all during the year; that's a much better plan! I'm busy now making cards and tags, and I will be posting them all, so stay tuned.


This is a tag that I made from Neenah 110# cardstock and a couple of the new Magenta stamps. I cut the cardstock to 3.75" x 3.75",  and used the GinaK Designs wreath builder template to help position the stamping. 

I stamped the Berry Branch 8 times, and colored the berries with a red glitter pen. They are bright and shiny in real life. For the sentiment, I used the Hero Arts Infinity Circles dies and cut the top panel out of Neenah Solar White 110# cardstock; the red circle was cut from The Paper Cut Hopsack Red cardstock, and I also cut a piece of black craft foam to the same size circle as the top circle piece, to pop the sentiment up.

I stamped the Joyeux Noël sentiment from Magenta (which is also part of the new collection) onto the top panel, and it's the perfect size. At the end, I used a corner punch to round the corners, punched a hole in the top and threaded in some thin green ribbon.

Since I only used one stamp for this process (not counting the sentiment) I honestly believe I could have done this without the template. You could stamp the Berry Branch from Magenta at the top, bottom, and right and left; then stamp it again in between each one of those. I don't think it would be hard, especially since the place where the stamped images intersect in the middle are covered by the sentiment. In fact, I have used another stamp in a similar way, more than once.


It's been a while since I did these, but I still love them. You can see that post here. And these stamps are still available from Magenta.


You can see and purchase the new Magenta Fall/Winter collection at the Magenta online shop. The rubber stamps are here, and the stencils/masks are here. The stamps used in this post are linked below.

Magenta Products used:

02.323.F Berry Branch

07.1029.D Joyeux Noël

0661.H Leaf

07.730.H I am in love with this day!

07.665.I Congratulations

Other Products used:

For the tag:
Versafine Clair ink:  Green Oasis, Glamorous
Neenah Solar White 110# cardstock
The Paper Cut Hopsack Red cardstock
Black craft foam
Hero Arts Infinity Nesting Circles DI 199
GinaK Designs Wreath Builder template
Red Uniball Signo Sparkling Pen
Crop-A-Dile Corner Chomper

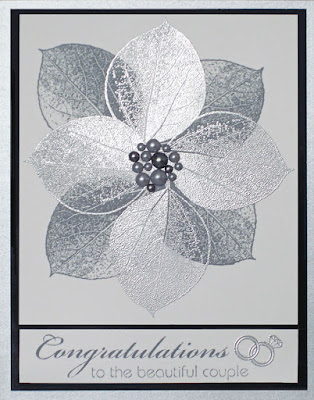
For the Leaf cards:
Purple card:
Memento inks: Grape Jelly, Lulu Lavender
So Silk Purple cardstock
Neenah Solar White 110# & 80# cardstock
Hero Hues pearls

Silver card:
Memento ink: Gray Flannel
Versafine ink
JudiKins Detail Silver embossing powder
Neenah Solar White 110# & 80# cardstock
So Silk Black cardstock
Hero Hues pearls


Friday, July 5, 2019

Magenta Super Saturday - Brushed Stencil Distress Ink

Hi everyone! I'm over at Magenta today, and you can see that post here.

I needed birthday cards for our 9 year old twin grandsons, and I wanted them to have bright happy colors. I used makeup brushes to blend Distress ink through a stencil, and if you really load them with ink, you can get bright jewel tone colors with very little effort. 


I used the Magenta stencil TM266 Floral Wheels. I love this stencil because it can be used for lots of things. I have found that the best way to load color onto the brushes is to use a circular motion when picking up ink off the pad. I then use a circular motion to blend the ink onto the paper. To get the intense colors, I pressed hard with the brushes.

I taped the white panel to the back of the stencil with painter's tape so it wouldn't move. I added color through the front of the stencil in rainbow order. I actually got all of the rainbow colors ranging over the two cards.


I've marked my brushes with Washi tape for now. I plan to use one brush for each color family. they really clean off easily by brushing them onto paper towel. I've also experimented with not pressing as hard and getting a softer, more muted result, and I will show that in an upcoming post.


I stamped the Happy Birthday sentiment onto a white circle die cut in a coordinating color of Distress Ink and popped it up onto the background. Both cards were matted in coordinating colors.

I hope you try making backgrounds with these brushes and a stencil. It's easy and the results are great!

Magenta Products Used:

TM266 Floral Wheels

07.305.G Happy Birthday

Other Products Used:

Distress Inks: Festive Berries,
Ripe Persimmon, Mustard Seed,
Mowed Lawn, Peacock Feathers,
Chipped Sapphire, Wilted Violet
Hero Arts DI199 Infinity Nesting Circles
Makeup Blending Brushes
Stardream Jupiter Cardstock
Blue Malmero Pearl Cardstock
Neenah Solar White 80# & 110# Cardstock