Pages

Showing posts with label Cards for charity. Show all posts

Monday, April 12, 2021

April Cards for Charity: Thank You - Distress Blending

 The second batch of cards I have done for my friend's Church's charity are Thank You cards. Once again I made 5 cards each of 3 different color combinations.  I used the Simon Says Stamp stencil ssst121467 Peony Bouquet. Trust me, pretty much whatever you do with this stencil will be beautiful.


I blended Distress inks through the stencil for the flowers and leaves using both large brushes and the small iCrafter brushes. 


These are all of the colors I used on the cards


The backgrounds using this stencil always turn out so beautifully. I die cut each panel using the Greetery Crimped Frame die, and I chose a coordinating color of cardstock for the card mat.


I cut out the sentiment for each using the same color as the mat. The Thank You sentiment die is from Simon Says Stamp CZD74.


Each of these panels will be mounted onto base cards that are printed with the charity information by church volunteers.

Products used:
Distress inks: Wild Honey, Crackling Campfire
Speckled Egg, Mustard Seed, 
Wilted Violet, Peacock Feathers,
Twisted Citron, Peeled Paint
Simon Says Stamp Stencil ssst121467
Simon Says Stamp Thank You die CZ074
The Greetery Crimped Frame die set
PTI Terracotta Tile cardstock
So Silk Fairly Blue cardstock
So Silk Glamour Green cardstock


Thursday, April 8, 2021

April Cards for Charity: Happy Birthday Distress Blending

 Once again I have made some cards for my friend Pam's Church's charities. The request this time was for Some Birthday cards and some Thank You cards. I did the Birthday cards first. Since they prefer to get 15 of each design, I try to keep them fairly simple. It still took me a lot of time to make 15!


I elected to make 5 each of 3 different color schemes. Those buying the cards are told that since these are handmade cards, there will be some variances.


For each of these panels, I used the Simon Says Stamp Geo Leaves stencil ssst121473, and three colors of Distress inks. I used brushes to apply the inks through the stencil, trying to blend them as I went along.


I like this stencil for Birthday cards, because it looks celebratory to me; sort of like leaf confetti.


I like using the small Make Art metal platform when I use stencils. The magnets hold my project in place very well.


This blend is one of my favorite Distress blends of all time: Twisted Citron, Peacock Feathers, and Wilted Violet.


Making these backgrounds was fun, easy and relaxing. I think backgrounds like this could be used for a variety of purposes.


I chose a color of mat for each blended panel and die cut the sentiment out of the same cardstock. The purple and blue sentiments are from So Silk cardstock, so they are shiny on their own. The orange one is from PTI cardstock, and looks very matte. Since this is a Birthday card, I wanted it to have a bit of a sparkle, so I colored over the sentiment with a Wink of Stella clear glitter pen.

Products Used
Distress Inks: Speckled Egg, Mustard Seed,
Twisted Citron, Abandoned Coral,
Wild Honey, Peacock Feathers, 
Wilted Violet
ssst121473 Geo Leaves Stencil
sssd112116 Happy Birthday Brush Script die
The Greetery Crimped Frame die
So Silk Fair Blue Cardstock
PTI Terracotta Tile Cardstock
So Silk Passion Purple Cardstock
Wink of Stella clear glitter pen

Sunday, February 7, 2021

Cards for Charity: Sympathy cards with Gelli Plate Backgrounds

I have been creating cards to give to my friend Pam for her church charity sales. They sell them for $5 each and the money goes to really good charities, like blankets for the homeless. She recently said they needed more Happy Birthday and Sympathy cards. I showed you the Birthday cards in my last post here. We are now making 15 of each design so that they can put them on their blog. You can see the blog here, and if you are local, you can order. They are not able to send orders out, so you would have to pick your cards up if you order any.


 The backgrounds of these cards were made one day when I was playing with my gelli plate (mono printing). I wasn't even using any images or stencils, but I used brayers and cardstocks with different textures. The medium was Distress Oxide inks, which I loved using. Cleanup was easy and there is a huge variety of colors. I was inspired by Jennifer McGuire, and you can see her post here.


When I'm making multiple cards, I make a prototype first, then I like to prep all the pieces and sit and listen to audio books or podcasts while I'm putting them together. I was able to cut the gelli plate panels in half and get two cards out of each one.


This was my prototype. I like how the Distress colors in the gelli plate panels are soft and not too bold for a sympathy card. The die for the flowers and leaves is from Poppy Stamps, 2319 Leafy Garden Border. I added a strip of the blue cardstock I used for the mat under the border. The sentiment die and stamp are from Avery Elle, ST and D-17-16 Sentimental Too Stamps and dies.


I have really enjoyed making cards for this worthy charity. It keeps me busy doing what I love.

Products Used:
5" x 7" Gelli Plate
Various Distress Oxide Inks
Various brayers and textured cardstock
Poppy Stamps 2319 Leafy Garden Border
Avery Elle ST-17-16 Sentimental Too Stamps
Avery Elle D-17-16 Sentimental Too Dies
Malmero Blue cardstock
Neenah Solar White 80# cardstock

By the way, I have been using a glue that I really do love. It's called Bearly Art Precision Craft Glue, and I've been using it for awhile. I used it on this project to stick down all of those leaves. I usually use Elizabeth Craft Be Creative tape for my card panels, but when I need glue, I use this one.

The set I bought has a bottle of glue, with another larger bottle for refilling, and also a little jar with these pieces


The green cap acts as a stopper. To use the glue, you take it out and put in one of the black nozzles. I have never used the larger one. The smaller one is perfect for me -it's really tiny, and I can apply small amounts of glue in small spaces. I use the pin as a stopper if I'm leaving the glue open for long periods while I'm working. When I'm finished, I take off the black nozzle and put the green stopper back on. I clean out the black nozzle every time, and when I want to use it again it works perfectly with no clogging issues. This is the best glue I have found. You can get it directly from the company here, or at Amazon. I receive nothing from the company for this recommendation, it's just a product that I think works really well.

Wednesday, February 3, 2021

Cards for Charity: Happy Birthday with Distress Blending

 I received a call that more cards were needed at my friend Pam's church charity card sales; especially Birthday cards and Sympathy cards. We're making 15 of each design of cards now, so it's quite a production.


I made Birthday cards first, and the goal is to choose a design that can be easily duplicated. Church members will mount my cards onto base cards that are stamped with their charity's information, so I only needed to make the tops.


Since I have been in a creative funk lately, I had been passing the time by blending Distress ink through stencils. It's fun to try out different color combinations.


 This is my favorite method of sparking creativity. I'm playing with my art supplies, and creating very fun backgrounds by just blending beautiful colors. What could be more satisfying?


I made 5 each of 3 different colored backgrounds. People who buy these cards are told that since they are handmade, there will be variations.


I made a prototype card, and once I was happy with it, I started making all the parts, starting with the stenciled blends. 


I started with my favorite Distress trio to blend, Twisted Citron, Peacock Feathers, and Wilted Violet. The stencil is Ornamental Fans from Gina K Designs, and is hands down one of my favorites. In the above photo (nothing is stuck down at that point) you can see that I cut the panels with the Greetery Crimped Frame die (the middle size) and I put a strip of the mat cardstock on it as I was cutting it so that it matches up with the crimps on the panel.


I decided to cut out ovals of vellum to go behind the sentiment so that it didn't get lost in the busy backgrounds, and it took two ovals for each card to look the best. This great birthday sentiment is a die from Elizabeth Craft  Designs. There is a thin mat of black behind each stenciled panel, and a larger mat of a coordinating color.

Once I cut out all of the pieces for the 15 cards, I sat at my desk and listened to an audio book while I put them together. The time went by so fast when I was making these, that they were done before I knew it.


Once I lined all 15 cards up, I was so happy with them! I loved making these, and I might make more to send out myself.

Products Used:
Gina K Designs Ornamental Fans Art Stencil
Distress Inks: Twisted Citron, Peacock Feathers, Wilted Violet;
Speckled Egg; Candied Apple, Spiced Marmalade, Mustard Seed
Elizabeth Craft 1439 Happy Birthday Small die
The Greetery GD-M-016 Crimped Frame Die
Hero Arts DI337 Nesting Oval Infinity Dies
Hero Arts DI198 Infinity Nesting Rectangle Dies
Translucent Vellum
PTI True Black cardstock
PTI Tropical Teal cardstock
Stardream Fuse Fairway cardstock
Stampin Up Cajun Craze cardstock


Monday, April 13, 2020

April Cards for Charity: Hello From the Inside

Ha! A little quarantine humor. But seriously, I am finding that I have more time these days to catch up on projects. I seem to work in little spurts of dedication, interspersed with long periods of sleeping and reading escape fiction. How about you? My friend Pam is enjoying doing her Spring gardening in her beautiful yard. As for me, I did go out once today, to the front yard. It was bright, and I came back in. I'm not going to judge myself too harshly right now. I think we need to be good to ourselves.


I am making 10 cards each month to donate to my friends' church. They have a sale every February and sell cards to buy blankets for the homeless and for accident victims. 

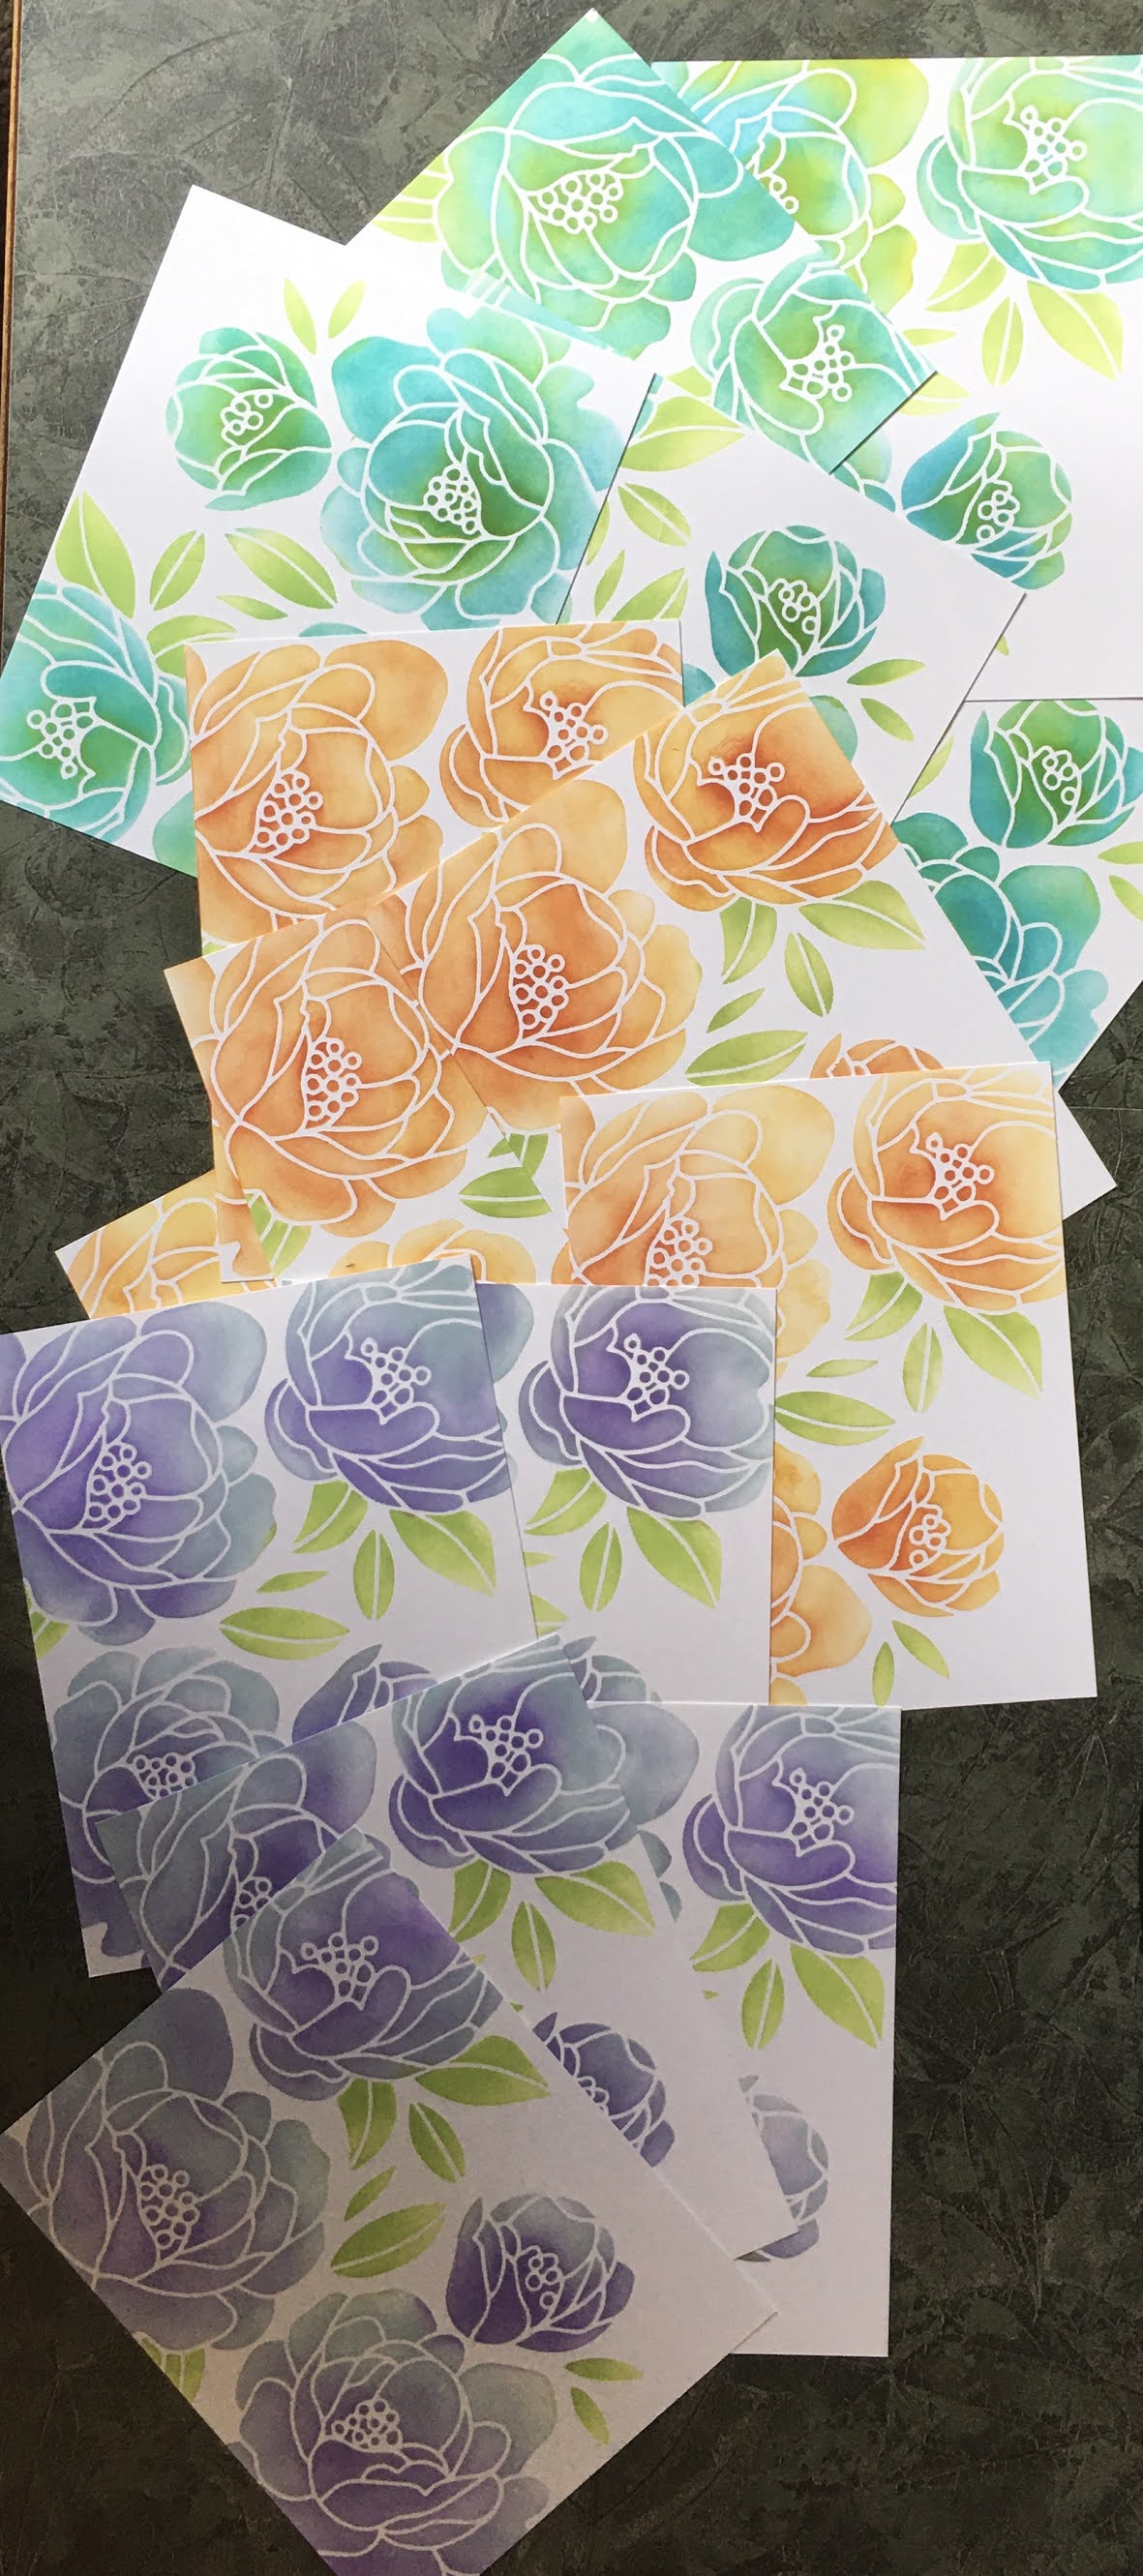
My April cards for this charity came together very quickly. the front panels of most of these were something I got from a packet that was bequeathed to me by my dear friend Marj. She had these in her stash and left them to me. I'm sorry I don't know where they came from, it was an open packet of 11 pieces. I thought this was the perfect way to use them. They are embossed and have a circle cut-out and some flower cut-outs. I cut them down a little and went to find some already made backgrounds to adhere them to.


These are mostly glossy cardstock with different mediums added. Most of then have Nuance (powdered color from Magenta) with Perfect Pearls Powder added; some have alcohol inks, and some of them are not glossy, but watercolor cardstock. They are just pieces that I was playing with putting some color down in the past, and I grabbed them out of my stash.


I would say that I was not super happy with some of these backgrounds at the time I made them; but this project is perfect for that, since the background only partially shows through the circle cut-out, the flower cut-outs and around the edges of the card. This is a good reason to save everything, even if you don't love it at first.


I pulled out a background for each panel, and cut out a "hello" from coordinating cardstock. I got this super cute "hello" die free from Poppy Stamps during one of their promotions. It's 1690 Scribble Hello, and is the perfect size for inside the circles.

When I was searching for backgrounds, I pulled out 2 too many, and rather than put them back, I thought I would try to make up 2 additional and similar front panels. I don't have an emboss and cut die that would do this all in one step (do they still make those?), but I got out an embossing folder, a circle die and a little leaf punch.


What do you think? This is one of the cards I made the front panel for. I'm pretty happy with it. Did you notice that the close up above is this same card and a little different than the others?

At the end, I added different sizes of silver/gold glitter dots from Elizabeth Craft. These are nice and flat, so they won't make the card overly bulky, but they still add something.

Okay, here they all are, and I think they will be great "generic" cards for the church to sell. Can you spot the two that I made the front panels for?


The front panels are unknown provenance, but you can
make some yourself with white cardstock (textured or not);
 a 2" circle die; an embossing folder with some blank space
in the design; and a small die or punch to allow more of the
background to show through. The front panels are cut to 3 3/4" x 5".
The background panels are cut to 4" x 5.25" using the Lawn Fawn LF768 die.
The cute hello die from Poppy Stamps is only 1.5" long and less than 1" tall


I hope you enjoyed this project. Take care of yourselves, be kind to yourselves, and please stay healthy everyone!

Magenta Products used:

Other Products used:
 Poppy Stamps die 1690 Scribble Hello
Lawn Fawn LF768 die Small Stitched Rectangle Stackables
Perfect Pearls powder
Glossy cardstock
Tim Holtz watercolor cardstock
Various colored cardstock for die cut sentiment


Tuesday, April 7, 2020

March Cards for Charity: Distress Oxide Backgrounds

I have finished the 10 cards for March for the charity at my friend's church. They have a sale every February, and sell cards to buy blankets for the homeless and for accident victims. It's my goal to make 10 cards per month for a year to donate to this cause. You can see my other posts like this here and here.

For March I decided to make lots of Distress Oxide blended backgrounds. I started blending with just blending tools and ink pads (those will be in another post). It was taking me a long time to make each, so I decided to switch it up and use Distress Oxide sprays.


I absolutely love this die from Impression Obsession (Die365-W Good Wishes Word Block). It was always good, but it fits in so well with what's going on in the world today. I decided to just cut it out of white cardstock.

So about the Oxide sprays. There are some pros and cons to them, and this is just my opinion and my experience. The pros: They are FAST to use. They create a background very quickly. They are FUN to use also. It's really hard to stop. Just spray another color! Occasionally I would stop and sop up extra color onto another piece of cardstock and then spray some more. I also like the blends I get with these, in that they are all jumbled up. I like some of the splotchiness I got.


I had to spray these in a box, but that's not so bad. The main thing I didn't like is that I didn't think the colors were as bright as I wanted. Maybe I need more experience with them, but I did spend some time making these. Also, I sprinkled drops of water on them and the water splotches didn't show up as much as they do with the ink pad ink.


I did end up adding color from the Oxide ink pads using blending tools and brushes, just to brighten them up. The sprays were still a huge time saver though. I don't think I had to touch them up all that much.


Once I added ink pad ink, the splotches of water showed up nicely.


I cut everything out that I needed and stacked them up so that I could just sit at my desk and listen to podcasts while I put them together. One of the ones I'm listening to right now is The Daily from the New York Times.

Here are the finished pieces (photographed in sunlight)


We are staying home and only getting groceries about once every 2 weeks. So far we are doing fine and just trying to keep busy at home. I hope you all are also doing well! 

I was just thinking what if someone links back to this post from somewhere a few years in the future and wonders what I'm talking about. Future people, this is the middle (?) of the Covid-19 Pandemic, and I'm so glad you made it through ok. Treasure your freedom to travel around, future people! Oh how I do hope we will get back to that! Stay well everyone!


Products Used:
Distress Oxide Sprays and Oxide pads - various colors
(experiment with what you have)
Impression Obsession Die365-W Good Wishes Word Block
Various colored cardstock for mats
Elizabeth Craft glitter dots silver/gold