Pages

Thursday, January 30, 2014

New Magenta Collection Sneak Peek

I've been saying for a while that the new Magenta collection is coming, and it is coming very soon!  I'm super excited about these new images, and I know you all are going to love them as much as I do.    Helene Metivier of Magenta has kindly allowed me to put a sneak peek of some of the new images on my blog.  If you are on Facebook, you can also see these, plus one of the new templates on the Magenta page.  Be sure to "Like!"  Keep checking back here for the announcement that the new collection is out.  For my local readers, the Magenta catalog is open at Art 'n Soul, and as soon as the new collection is out, be sure to get your orders in for your favorites.  You are going to love these new images and templates!

Cards by Valerie Dumais


Wednesday, January 29, 2014

Magenta Retailer of the Year!

In case you all missed this on the Magenta blog, please check out the link here.

Dianne Johnson and Susie Tracy

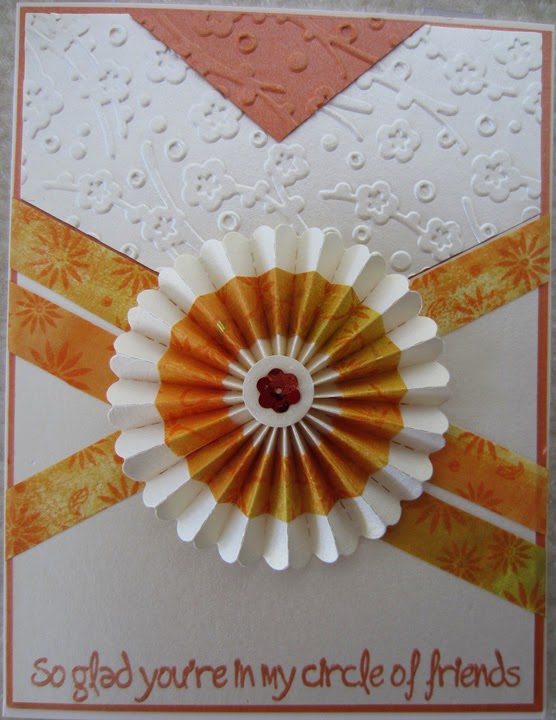
Art 'n Soul received an award for the Magenta Retailer of the Year, for the fourth year in a row, and I was pleased to be asked to present the award to Susie Tracy, our shop owner.  We were so happy and honored to get this award again.  This means that for the year 2013, we bought more Magenta products than any other store in the U.S (actually, for the years 2010 through 2013).  There's a reason that we buy a lot of Magenta products, and that is because we simply believe that they are one of the best stamp companies around.  Our customers agree with us and come to us to purchase these classy and elegant stamps.  I'll leave you with a picture of a card that I made for a class that I co-taught with Marj Marion, (mentor and teacher extraordinaire), on making your own washi tape.

Magenta sentiment stamp:  Circle of Friends 2  07.673.I


Sorry the picture quality is not that good, but the sentiment is wonderful.  I'm so glad you all are in MY circle of friends!

Monday, January 20, 2014

Zen Birthday Wishes

Sorry I have been so absent from the blog in the last month!  Those of you who know me know I have a lot going on in my life right now - good things!  One thing that I'm excited about is that Magenta will have a new collection coming out very soon, so watch these pages or their blog for that announcement.  I have been seeing some sneak peeks and it will be fabulous!!

I recently took a little time and made a birthday card for a friend.  I didn't take a picture of the outside, but here is the inside of the card, opened up.  You can see I left a little space to write a Happy Birthday greeting.


I masked a space off with a heart shape that I die cut out of masking paper.  This gave me a clear space to stamp a message.  The tangles were done with a brown Micron 01 pen on Kraft card stock, and the stamping was done with Memento Rhubarb Stalk ink.  The tangle at the top is Por Fin - a new one that I recently learned. I prefer drawing it on a curve, rather than straight.

I like the effect of masking a space for stamping and then drawing all around it; I will definitely use this technique more!  I'm also liking the brown Micron on the Kraft.

Saturday, December 21, 2013

Two More Tags

As promised, here are two more tags I have made for our Twelve Tags of Christmas at Art 'n Soul.  These two are up on the Magenta blog today!


Magenta Christmas Stocking and Tag stamp 02.303.N
Sizzix Tag Super Scallop die 38-0946
Tombow Markers 565, 245, 815, 847
Versamark Ink
JudikinsGold Embossing powder
Speckled with Artquest mica watercolor in Metallic

I cut the tag out of watercolor paper, stamped the image in Versamark ink, and heat embossed with gold embossing powder.  All coloring was done with Tombow markers and blended with a wet brush.  The leaves were colored with Tombow 245; the berries with Tombow 815; the bow with Tombow 847; and the stocking with Tombow 565.  Apply the color in the areas you want to be darker, and pull the color over to lighter areas with a lightly wet brush, shading well.  The stocking was done by coloring every other row of diamond shapes and drawing the color to the next row with a brush.  The tag was lightly shaded using some of the stocking color.  At the end, a small amount of mica watercolor was flicked on the entire tag.


Magenta Cedar stamp 0654.I
Magenta Merry Christmas and Happy New Year stamp 07.798.G
Sizzix Tag Super Scallop die 38-0946
Faded Jeans Distress Ink with Ranger ink blending tool and finger dauber
Memento Nautical Blue ink
Memento Tuxedo Black ink
Elizabeth Craft Cool Highlights microfine glitter
Blue fuzzy twine
3/4" circle punch
Stampendous White Embossing Enamel


I die cut the tag from white card stock, and stamped the sentiment at the top of the tag with Tuxedo Black Ink.  I punched a 3/4" circle out of tape sheet and applied it to the tag to mask the moon area, and put down Faded Jeans distress ink all around the tag with an ink blending tool.  I cut a piece of tape sheet for the bottom of the tag in a curved shape simulating a snow drift, and applied it to the bottom of the tag.  I left the release paper on the tape to use as a mask, inked the Cedar tree stamp with Memento Nautical Blue ink, and stamped twice without reinking.  I inked the stamp again and stamped twice more.  When stamping, I moved the stamp up and down on the tag to make different sized trees.  I removed the release paper from the moon and snow drift, and added some Cool Highlights glitter, burnishing well with my finger.  I used a finger dauber and more Faded Jeans distress ink to add more shadowing, including on the moon.  I used the release paper from the tape sheet snow drift as a mask to add the hill behind the trees, applying ink very lightly with a finger dauber.  As a last step, the white embossing enamel was sprinkled on, and heated from underneath to simulate snow falling.  Happy Solstice everyone,  Happy Holidays, and a Very Merry Christmas!

Friday, December 20, 2013

Christmas Tags

We have been doing 12 tags of Christmas at Art 'n Soul, and I made these two for today, day 9.  If you are local, I will have these available for make and takes, today only, along with a free Washi tape demonstration by Marj Marion, with lots of tips and inspiration.


Magenta stamp 02.307.L  Holly and Berry Flourish
Memory Box stamp B1953  Merry Christmas Flourish
Versamark Ink
Judikins Gold Embossing Powder
Gold washi tape
Cuttlebug Holly Ribbons Embossing folder 37-1927

For the first tag, I just used a shipping tag, available at any office supply store.  I stamped the Holly and Berry Flourish and the Merry Christmas Flourish in Versamark, and embossed with Judikins Gold Detail embossing powder.  I added a piece of gold washi tape, and embossed just the bottom with the Cuttlebug Holly Ribbons embossing folder.  I added a small piece of gold ribbon.  I wish you could see how shiny and glittery this is in real life.  My photo doesn't do it justice.


For this one I used:
Magenta stamp 02.307.L  Holly and Berry Flourish
Versamark Ink
Judikins Gold Embossing Powder
Tombow marker 245 (for the green); Tombow marker 847 (for the red)
Red Wink of Stella Brush pen
Gold washi tape, and Christmas washi tape
Elizabeth Craft peel-offs (red glitter dots)
Fiskars Holly Punch
Sizzix Super Scallop Tag Die 38-0946

I stamped the Holly and Berry Flourish with Versamark Ink and embossed it with Judikins gold embossing powder.  The holly was colored with Tombow marker 245, and the berries with Tombow marker 847.  I went over the berries with a red Wink of Stella brush pen.  I added washi tape, and punched out the holly.  I glued the gold holly leaves back onto the tag and added some red glitter peel off dots from Elizabeth Craft for the berries.

These tags were easy and fun to do, and I plan to make a lot more for my family's presents.  I have a couple more tags to share with you, and I will post them in the next day or two.

Wednesday, December 4, 2013

December 2013 Magenta Challenge


December 2013 Magenta Challenge:  Simply Christmas

Create a card, a layout, or even an altered object.  Just make it Christmassy, and use at least one Magenta product - papers, stamps, peel off, embellishment, chipboard, etc.
Since the Holidays are such a busy time, you have until January 15th to enter!

You could win this Magenta prize:


Just click here, and use the link at the bottom of the post to enter.

Here's my card:


This is a one layer card, and was not hard to create.  I used two pieces of card stock, and on the first one, I embossed an oval, using Sizzix ovals dies.  On the second, I cut the oval out and used it as a mask over the embossed piece (later discarding the mask).  I taped both pieces down, with the mask on top, and cut a piece of scrap paper to create the snow hills.  Masking off with the scrap paper, I used a blending tool to add the blue in the sky.  Continuing with the scrap paper mask, I used a finger sponge dauber to create shadows to simulate snow drifts.  I then stamped the tree with the bird, and stamped the deer family.  I made the star in the sky using a white Gelly Roll pen, and I colored over the bird with a red Wink of Stella pen.  The sentiment was stamped last, using a stamp positioner.  I matted the card with red mirracard.

Magenta stamps used:  
Spruce Tree & Bird 0653.P; Small Deer Family 1 42.186.E; Merry Christmas 07.779.G
Other materials used:  
Distress Inks:  Faded Jeans & Stormy Sky
Memento Inks:  Bamboo Leaves & Rich Cocoa
Sizzix Framelits Ovals Dies 657563
Wink of Stella glitter pen - red; Sakura White Gelly Roll

You definitely should enter the challenge - just use any Magenta product.  You can send your creation to some special person afterwards!


Wednesday, November 27, 2013

Decorative Christmas Tree

Here's my latest post for Magenta, and you can see it on the Magenta blog today also.  I really like how this card turned out.  I seem to gravitate toward blues this time of year.  This lovely Decorative Christmas Tree stamp from Magenta makes such an effortless and beautiful card; it does all the work for you!


I inked the background with distress inks, using a blending tool, and dried it with a heat tool.  The tree and sentiment were both stamped with Versamark, and embossed with White Diamond embossing powder from Judikins.  After mixing some Perfect Pearl powder with water, I flicked that onto the card to simulate snow.  I used some Waterfall Stickles in a few areas to add even more sparkle.  In my photo, I could not really capture how sparkly this card is in real life.

Stamps all by Magenta:  Decorative Christmas Tree 42.170.O; Joyeux Noel 07.780.G (English version of Merry Christmas is available, and would also work here 07.779.G)


Other Materials used:
Versamark Ink
White Diamond embossing powder by Judikins
Distress Inks:  Chipped Sapphire; Faded Jeans; Stormy Sky
Perfect Pearls - Pearl
Waterfall Stickles

Enjoy, and Happy Thanksgiving to all of my American readers!!

Friday, November 15, 2013

Christmas Wishes

I absolutely love the new circle and seal stamps from Magenta.  They remind me of Christmas ornaments, and they can give a very elegant look to a card.  Here I embossed them with gold embossing powder and punched them out with circle punches.  Very simple and quick to do!  These would also look great on tags.  You need a 2" round punch for the Christmas Wishes Seal stamp; a 1.75" round punch for the Reindeer Seal; and a 1.25" round punch for the Ornamental Circles.

By Dianne Johnson

Stamps used -all from Magenta
42.169.H Christmas Wishes Seal 
42.164.H Reindeer Seal
42.176.F Ornamental Circle 1 
42.177.F Ornamental Circle 2
07.779.G Merry Christmas
Paper is Red canvas paper from Magenta
Other:  Gold embossing powder
Xmas Red Stickles

Monday, November 11, 2013

Christmas Spirit

I have a new post on the Magenta Blog with some of my cards using one of my favorite Christmas stamps from Magenta, Christmas Spirit 07.777.G.  I can imagine so many different cards using this stamp, paired with the Memory Box jar dies; it's a perfect pairing.


Magenta stamps used:
07.777.G Christmas Spirit
42.171.J Christmas Ornaments
42.180.O Christmas Song 
Other:
Memory Box die 98382 Tall Canning Jar
Memento Ink:  Bamboo Leaves; Love Letter; Desert Sand

I inked up the ornament stamp with both Bamboo Leaves and Love Letter inks from Memento, and stamped it onto some patterned paper that had a little shading.  I also added the Christmas Song image, that I inked lightly.  I die cut the stamped image using the canning jar die.  On all three cards, I also die cut the jar in acetate to cover the image.  It's hard to see in the photos, but in real life, it's a fun look.  The jar lids were die cut from some scrap silver paper.


Magenta stamps used:
07.777.G Christmas Spirit
412.169.H Christmas Wishes Seal
Other:
Memory Box Die 98382 Tall Canning Jar
Memento Ink: Danube Blue
Stardream Fuse Vista paper
Waterfall Stickles
Embossing Folder:  Couture Creations Co723278 Powder Puff

On the card above, I used the Christmas Wishes Seal stamp, but it was a little big to fit in the jar, so I taped off part of it when inking.  It's such a pretty snowflake image, and this is a good way to get more use from your stamps!


Magenta stamps used:


 07.777.G Christmas Spirit
42.173.O Decorative Christmas Tree

Other:
Memory Box Die 98383 Small Canning Jar
Memory Box Die 98420 Magic Flourish
Distress Stains:  Mowed Lawn; Festive Berries
Memento Ink: Danube Blue
Stardream Fuse Fairway paper
Embossing Folder: Couture Creations Co723603 Sugarplum Ball

On this last card, I had stamped the Decorative Christmas Tree and embossed in gold, and tried applying Distress Stains to the image, using the splat technique.  I ended up not liking how that turned out, so I instead used that image to die cut the small canning jar.  I love how the gold flourish in the tree, and the red and green Distress Stain colors are perfect to show Christmas spirit.  I also used the rest of the tree image to die cut with the Magic Flourish die, showing Christmas Spirit swirling up out of the opened jar.  Fun!


Friday, November 1, 2013

Magenta November 2013 Challenge


November 2013 - Magenta Challenge :
Fall Colors
Create a Card, a Layout or even an alterned object if you feel like it!
You simply have to follow the Fall Colors theme and use at least one Magenta product :
papers, stamps, embellishment, Peel Off's, chipboard and more...

You have until November 28th to participate in the Challenge


You could win this Magenta Prize :


You can enter the challenge on the Magenta blog here and be sure to check out the samples from the Design Team for inspiration.

Here is my card, based on the Fall Colors theme:


Magenta Stamps used:  Oak Leaf 0664.J; Maple Leaf 1 0665.K; Maple Leaf 2 0666.K;
                                       I am in Love With This Day! 07.730.H
Distress Inks used:  Barn Door; Rusty Hinge; Peeled Paint; Mustard Seed
Memento Inks used:  Lady Bug; Olive Grove; Rich Cocoa
Artquest Palette:  Metallic

I masked a panel of white card stock with post-it notes and used the Distress Inks with a blending tool to create the  Autumn colored strip.  I stamped the leaf stamps with the Memento Inks over the strip of color.

The sentiment stamp I used is all in one line, and I wanted a shorter, stacked sentiment, so I used a stamp positioner to create that look.  I taped over the second half of the sentiment, and inked it up; then I removed the tape, positioned the first line of text on the card and stamped.  I then taped over the first half of the sentiment, inked up the stamp; removed the tape; and positioned the second line of text and stamped.  I love how this technique turned out, and I love that you can get more use from your stamps this way.

I applied the Distress Inks onto another piece of white card stock, using the blending tool and stamped over the colors I had created with the Maple Leaf 2 stamp, and cut it out.  I mounted the cut-out stamped image onto the panel using the technique that we learned in Montreal from Mimi of Mimi a la Carte.  You apply several blobs of silicone caulk (that you can find at the hardware store) onto the spot on your card where you want to pop up your image.  Be sure to draw the blobs up to a point when applying.  Gently place your cut-out onto the silicone and only press down very gently if at all.  Allow the silicone to dry for several hours.

After the silicone had dried, I matted the panel with Stardream Flame and Magenta red Canvas paper, and mounted onto a card.  I used Artquest Metallic water color to splatter the card.

I want to encourage everyone to enter this challenge.  You just have to use a Fall color theme, use at least one Magenta product, and go to the Magenta blog to enter; you will have a chance to win a great prize!