Pages

Tuesday, April 14, 2015

Inspiration Station April


Those of you who know me, know that I work at a wonderful stamp store, local to the Olympia Washington area (actually in Lacey), named Art ‘n Soul.  We are introducing something new at Art ‘n Soul beginning this month.  We love that our customers come to us for inspiration, and we are going to turn that up a notch, and challenge ourselves to do more.  Every month, the staff at Art ‘n Soul will pick a favorite item, and we will each make a card or cards using that item.  Local customers will be able to come in and view samples made by the staff that will show each of our unique perspectives.  

Inspiration Station projects will be on display at the shop around the middle of each month.  I will post my projects here on my blog, and if you are local, please come in to see these cards, and to see what everyone on the staff has made.  For those not able to come in to look at all of the cards, there will be posts nearly every day on the Bella Carta at Art ‘n Soul blog here, showing all of the beautiful projects created by the fabulous Art ‘n Soul staff members.  

For our first Inspiration Station, it was a no-brainer to use Magenta products.  Art 'n Soul has been the Magenta Retailer of the Year for 5 years in a row; which means that our small store has sold more Magenta products than any other store in the country.  For FIVE YEARS!  We love Magenta stamps and products because they are absolutely some of the highest quality products that we have ever seen or used.  For April, we chose Magenta TM27, Floral Background Trio Templates.  This is a trio of beautiful floral motif stencils.  We also chose the Magenta stamp 07.730.H "I am in love with this day!" to go with our projects.


Magenta TM27 Floral Background Trio

Magenta 07.730.H

The very first thing I wanted to do with these stencils is to use them with stencil paste on Inchie Art Squares.  I made two samples with these, and I love how they turned out.


For both of these cards, I used 1.5" Inchie Arts Black Art Squares.  I'm sort of in love with black Art Squares, and find myself reaching for them often for my projects.  I used temporary adhesive to adhere three of them onto a scrap piece of card stock.  I placed them right next to each other, and used some cutting boards on either side of the squares that were the same thickness as the art board.  This gave me a wider level surface for pasting.

For this first card, I used black glossy embossing paste by Dreamweaver Stencils.  Once the paste had dried,  I put the stencil back over the squares, and dabbed glue over all the pasted areas using a sponge dauber and the Essential Glue Pad.  I then used stencil brushes to apply Dreamweaver F/X powders onto all of the glued areas.  Since these powders have mica in them, there is a beautiful metallic sheen to the design.

I adhered the squares, with a slight space between each one, onto a strip of patterned purple paper that I found in my stash.  This was all mounted onto a white base card.  I then stamped the sentiment with Versamark ink, and embossed it with Ranger Black Sparkle embossing powder.


The second card was done pretty much the same way, except instead of glossy paste and F/X powders, I simply used gold stencil paste.  This gives the squares a beautiful gold metallic shine in real life.  The squares were mounted onto a piece of gold paper from my stash, then onto a white base card.  The sentiment stamp was embossed in Ranger Black Sparkle embossing powder.

Magenta materials used:
TM27 Floral Background Trio
07.730.H  "I am in love with this day!"
Other Materials:
Inchie Arts black Art Squares 1.5 "
Dreamweaver pastes: Black Glossy and Gold
Essential Glue Pad
Dreamweaver F/X powders: Purple Satin, Kiwi, Goldfinch
Versamark Ink
Vellum paper
Ranger Black Sparkle embossing powder

I love these cards, and could have stopped there, but I really wanted to try the stencil stamping technique with these Magenta Stencils.  They turned out to be absolutely perfect for stencil stamping.  You can view a tutorial on my blog using this technique here.

I pretty much used the same process for each of these cards, and I made a bunch of these backgrounds in a short time.  I used Tim Holtz watercolor paper, and inked them up heavily with different colors of Distress Ink.  In each case, I sprayed the stencil with a mixture of water and Perfect Pearls powder (1/4 tsp of Perfect Pearls Pearl in 2 oz of water makes a great mixture, and I have not had a clogged sprayer yet).

After spraying the stencil, I laid it carefully onto the inked watercolor paper, and pressed it down.  After a few seconds, I lifted the stencil up, and each time I had a beautiful image that only got better as the surface dried.  I left each one to dry on its own, since it didn't take that long.  It was hard to capture the sparkle and shimmer in these with a photograph, but I tried taking a photo at an angle with lots of light on them.  This is a pile that I didn't use for the Inspiration Station samples, and they are just waiting to be turned into other cards.  One is missing because it already became a birthday card for a friend.


I absolutely love the shine that the Perfect Pearls powder gives to these, and I love the images that show up from the stencils.  You never get the same thing twice.  I cut each one down, using the largest die in the Memory Box 30009 Stitched Rectangles die.  

For the Inspiration Station cards, I stamped the sentiment onto vellum using Versamark Ink, and then embossed each one with Ranger Sparkle Black embossing powder.  The vellum strip was wrapped around the panel, and adhered to the back.  

To mount each panel, I cut out a piece of white fun foam with the next size down of the stitched rectangle dies.  I adhered the fun foam to the back of the panel, and stuck it to a piece of colored card stock, using scor tape to ensure it would stay stuck down.  The entire piece was mounted onto a white base card.

For every one of these samples, the Magenta materials were the same.  Also the same were:
Perfect Pearls Pearl
Versamark Ink
Ranger Black Sparkle embossing powder
Memory Box 30009 Stitched Rectangles
Tim Holtz Watercolor paper
vellum
White Fun Foam

One of the things I love about the choice of these templates from Magenta is that we got 3 stencils to play with!  This is one of them.


I also used a Hasty Lace template on this one to frame the sentiment.  Since I was stamping on vellum, I couldn't help myself.  Other than the materials listed above that were used on each card, I will list other materials that were unique to each card.

Hasty Lace template HQ3
Distress Inks used:
Cracked Pistachio
Abandoned Coral
Mermaid Lagoon


Distress Inks used:
Mowed Lawn
Peeled Paint
Rusty Hinge
Peacock Feathers
Stardream Flame paper


Distress Inks used:
Picked Raspberry
Mustard Seed
Peacock Feathers
So Silk Beauty Pink paper

I hope you enjoyed all of these, and that you will come by the shop to see them in person and/or check out the Bella Carta at Art 'n Soul blog each day to view these and all of the other creations!

Friday, April 3, 2015

Technique of the Week: Make a Shaker Card Using Die Cut Openings

Art ‘n Soul just had a really fun shaker card play day, and we made some cards using the Impression Obsession shaker pouches. This is the easiest way to make a shaker card, and it’s lots of fun too.


We also had some cards on display that were shakers made without the use of shaker pouches, and using various dies to cut the shaped openings. I wanted to write down step by step instructions for making this type of shaker card, but I will be the first to admit that it’s hard to describe without showing you an example. I decided that the best thing to do would be a pictorial step by step. This method of making shaker cards is more complicated, but yields really beautiful results.

 You can see the shaker cards I made with pouches, and the ones I made with dies in my post here.  Here is the card I'm going to show you.


1. Make or choose an image for the background that will show behind the shaker.
This can be anything you wish, even a sentiment.  It can be a stamped or inked or watercolored background – anything you like. This is usually my first step in making a shaker card, because it will determine the color palette I will use. I have a lot of pieces that I have made in the past that did not work out for the project I was working on at the time. I have found that this stash is a great source for shaker card backgrounds.


This is just a small sampling of my "stash"!


In this case I used a piece that I had previously inked with Distress Ink, and stamped with a great Magenta Image “Birds Postcard” 05.230.L.


I was trying to do an ink lifting technique with these panels, and I just could not make it work out to my satisfaction with the images I was trying to use.  I could not bear to throw them away.  You can see the dies i chose for this project (see step 2) in this picture.  The Woodland Oval die cut was helpful to determine how the background would look in the finished card.


2. Choose a die or dies for your shaker card opening or openings (yes, you can have multiple openings in the same card).
Your die or dies can be anything large enough to actually see beads and sequins through.  Keep in mind that the more detailed or ornate the die opening is, the more challenging it will be to make a shaker from it.  This shouldn’t deter you, because the more detailed ones can be really beautiful.

 For this example I chose Poppy 1168 Oval Frame Background for the opening, and Poppy 1125 Woodland Oval for the decorative surround. A decorative surround is not necessary for this technique.


3. Choose your cardstock for the front panel of your card, and choose and make your base card
The front panel and base card can be whatever colors fit into your chosen color palette, but make them of sturdy weight; especially the base card should be at least 100# cardstock. The front panel will form your shaker pouch, and will eventually be mounted on your base card. For the front panel, I chose Stardream Fairway cardstock, and for the base card I used Stardream Opal. I also cut the Woodland Oval surround out of the Stardream Opal. In addition, you will need a piece of acetate that will be larger than the diecut opening.


4. Cut the opening in your front panel, and cover the back of the panel with acetate
The entire opening should be covered with acetate on the back. I used scor tape to stick the acetate down. This will not show, but the acetate is what keeps your shaker material in, and you will see your image through it.


5. If you want to stamp a sentiment on the front of your panel, now is the time.  
I used the Magenta stamp “Find your song and sing it” 07.834.F, and stamped with Onyx Black ink and embossed with clear detail embossing powder. If you stamp onto Stardream paper, you should probably emboss it, because it does not dry readily.


The reason there are scraps of foam tape all around is because I forgot to stamp my sentiment before I put foam tape all over the back, and so I had to peel them off so that I could stamp! I know you all have never done this.

6. With the front side of your panel down on your work surface, and the acetate side of your panel up, completely surround your die opening with foam tape.  Also apply foam tape to the rest of the back of your panel
This is probably the hardest part, but it’s really not that hard. Just be sure that each piece of foam tape around the opening is jammed up against the one next to it so that there are no openings for your shaker material to escape. 


To clarify, this is being done on top of the acetate. Leave the release paper on your foam tape for now. 


7. Add your shaker material on top of the acetate in the well you created with your foam tape.
The shaker material can be anything that is small, sparkly, and will shake around after your card is constructed. I use small beads, spangles, coarse glitter and sequins of various shapes. I have been collecting these things for a while, so I have a lot of it to choose from.

 You can also use your tiny dies to cut great shaker material from shimmer sheetz or shiny cardstock.  Just make sure the pieces are pretty on both sides. Choose shaker material that coordinates with your color palette.


8. Carefully remove the release paper from your foam tape.
I use a fine pointed tweezers to do this, while I’m carefully holding the card down.  Your shaker material will want to jump up onto the sticky side of the foam tape, but just remove any that do.  You don’t want anything that will interfere with the seal you will be making to keep the shaker material in.


9. Place your background image front side down onto the foam tape.
Try to position your piece so that the image that you want shows through the front window of the acetate. Press your background piece firmly down and made sure it is well adhered to the foam tape. This is what forms your shaker pouch and seals in your shaker material.


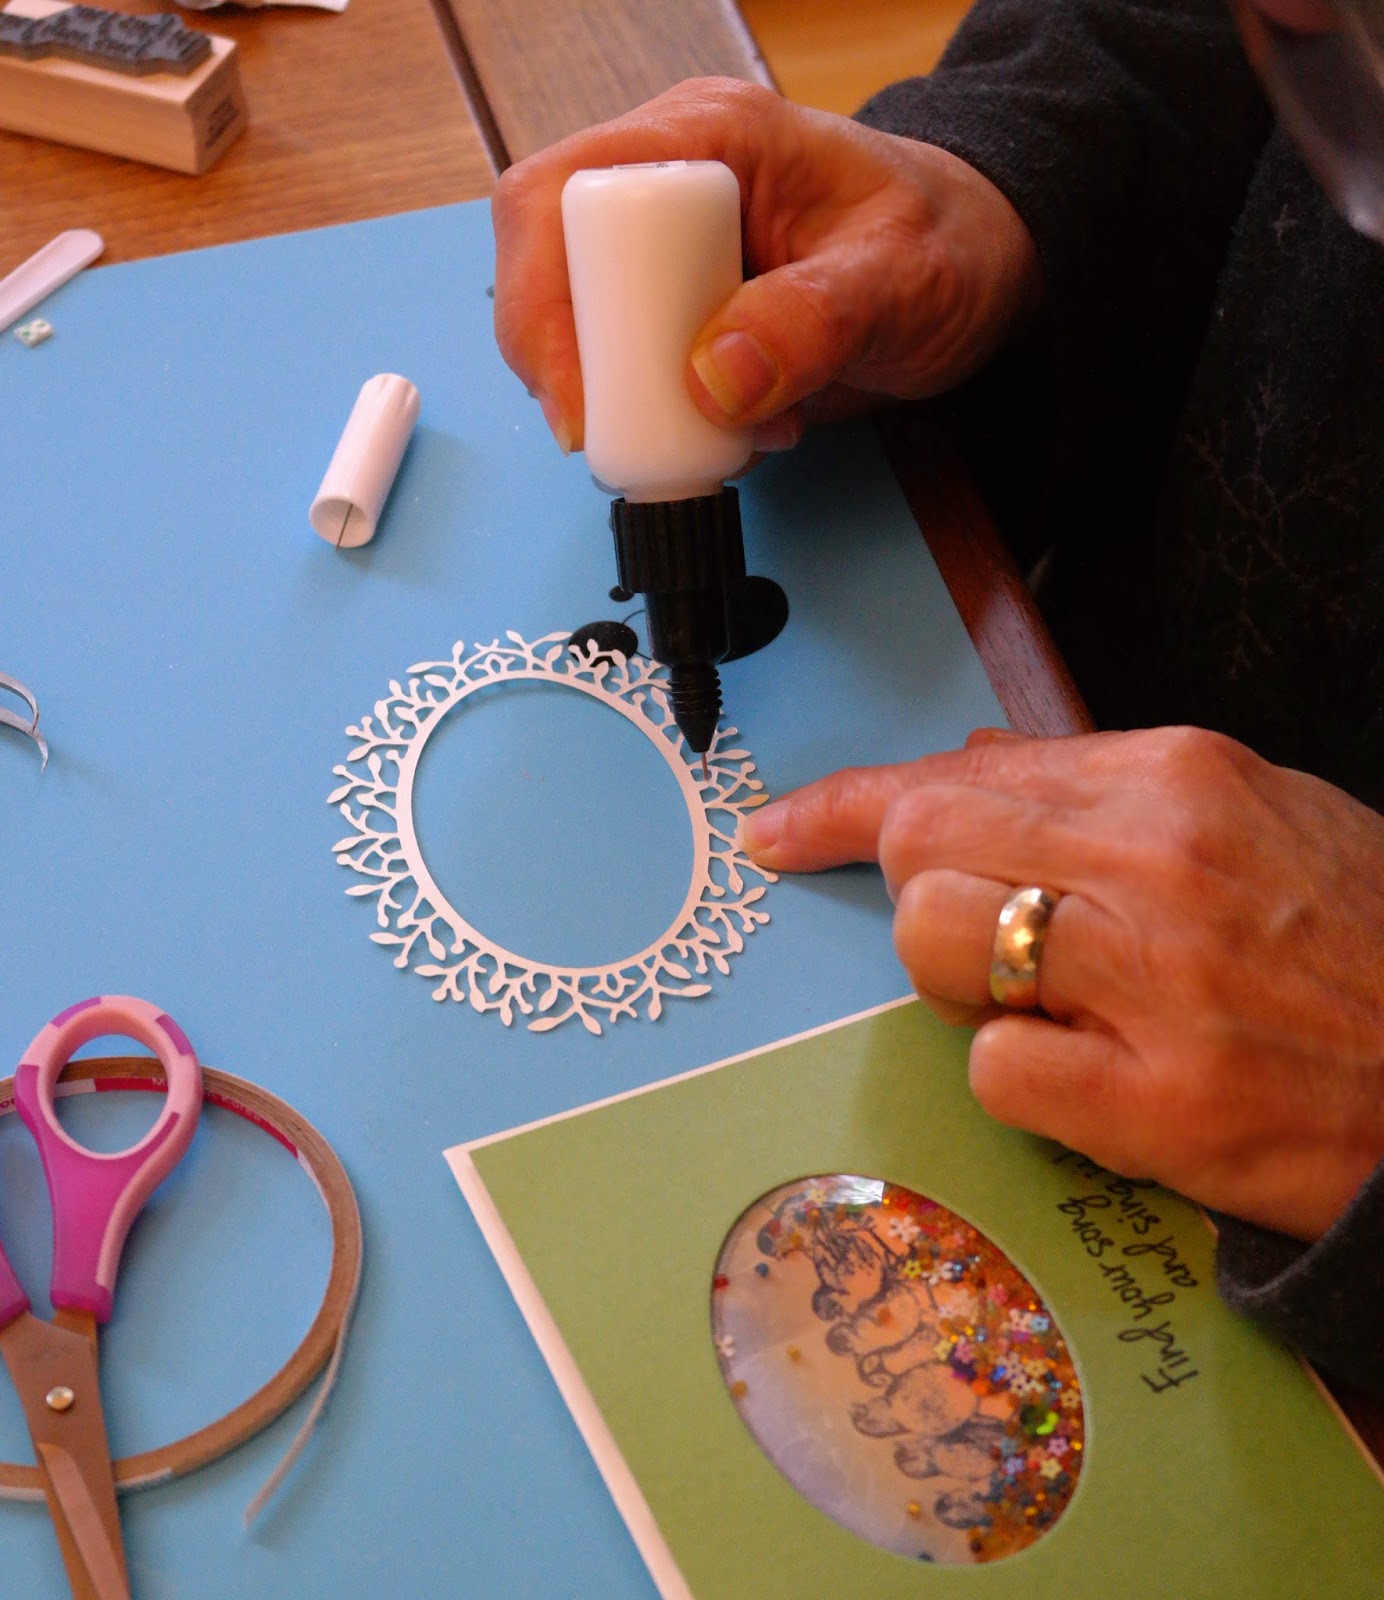
I also added the decorative surround (Woodland Oval) to the front of the panel at this time. 


I realized too late that I had not left enough room for the surround when I stamped my sentiment, and I had to cut some leaves off the branches at the bottom. 


It still drapes a little onto the sentiment, but I think it’s readable anyway. 


I was originally planning to use my stamp positioner to stamp the sentiment as one line, rather than stacked, but then I didn’t. I should have gone with my first instinct!

10. Adhere your panel to your base card with strong adhesive.
I used scor tape to adhere my panel to the base card.


Thanks so much for hanging in there with me for this tutorial, and I hope you try making cards using this process. It’s well worth the trouble!

Oh, one more picture.  My wonderful husband Jim takes most of the pictures for my blog tutorials for me.  For those who are curious about how he gets good light on some of the pictures (especially on our many gray days), he sent this one along.  He has a ginormous light pad that he often uses, along with other strategically placed lights.


Magenta Stamps used:

Birds Postcard 95.230.L

Find Your Song and Sing it!  07.834.F

Other materials used:

Poppy dies: 1168 Oval Frame Background & 1125 Woodland Oval
Distress Ink:  Faded Jeans & Rusty Hinge
Versafine Black Onyx
Clear Detail embossing powder from Judikins
Stardream papers: Fairway & Opal
Acetate
Foam tape & Scor tape
Various beads, spangles & sequins
Ranger Matte Multi Medium
Pico embellisher bottle
Elizabeth Craft Detail Scissors


Wednesday, April 1, 2015

Magenta Challenge - April 2015


March 2015 - Magenta Challenge :
Nature

Create a Card, a Layout or even an altered object, if you feel like it,
follow the theme and use at least one Magenta product :
papers, stamps, embellishment, Peel Off's, chipboard and more...

You have until April 28th to enter!

You could win this Magenta Prize :


Here's my card:


I started with the beautiful stamp Thee Flowers 14.639.P, and stamped it with Versamark Ink onto watercolor card stock, then embossed with white embossing powder.  I brushed water onto the panel and painted it with colors from Artquest Palette Metallic (using Super Copper, True Blue and Spring Green)  With the panel being wet already, I did not take particular care to stay within the embossed lines, preferring the colors to run and blur just a little.  At the end I flicked some dots of True Blue paint onto the whole panel.  

Taking a piece of Neenah Solar White card stock, I cut out an oval using Sizzix Framelits Ovals.  I took the Magenta stamp Rest & Renewal 07.843.G, and using a stamp positioner, stamped the first line of the sentiment at the top and the second line at the bottom of my card.  A tutorial on this technique can be found on my blog here.  (Scroll down for the bonus tutorial using a stamp positioner).

The oval panel was adhered to the watercolored flowers, and the whole thing was adhered to a base card made from Stardream Fair Blue paper.

Now it's your turn!

Make your own creation on the theme of Nature, using at least one Magenta product.  Go to the Magenta blog here to see what the Design Team has created, and to enter your creation.

Please use In linkz to submit your page
One entry per person only


Stamps used in my project:

Three Flowers 14.639.P

Rest & Renewal 07.843.G

Other Materials Used:
Artquest Palette - Metallic
Versamark Ink
Versafine Black Onyx Ink
White Opaque embossing powder by JudiKins
Tim Holtz Watercolor paper
Stardream Fair Blue card stock
Various pearl embellishments
Stamp-a-ma-jig stamp positioner