Pages

Showing posts with label Magenta 07.975.I Happy Birthday Large. Show all posts

Friday, May 14, 2021

Magenta Super Saturday: Happy Birthday with Shimmer Watercolor

 Time to make a guy birthday card and I decided to use my shimmer watercolors from Iuile at Etsy. I am posting this on Magenta today, and you can see that post here.


I wish that I could photograph this properly to show how gorgeous the glittery shine is with these watercolors.


I first stamped the Magenta Floral Snowflake image in gold Delicata ink. Because there is some texture on this dark blue cardstock, it didn't stamp completely solid, so I put some of the gold ink onto a block and with a wet brush I spread the ink out to cover the image better.

I then painted in parts of the image using the Christmas Set of Iuile watercolors. Since these watercolors have so much mica in them, they are opaque


I added some dots of gold Sakura Poster Color paint using a stylus

I stamped the Magenta Sally Penley calligraphy Happy Birthday and embossed it with gold embossing powder. I was afraid that if I stamped it with the Delicata on the textured paper it wouldn't show up well enough. I matted the panel with So Silk Fair Blue cardstock and mounted it onto a base card.

Magenta Products used:

Other Products used:
The Greetery Crimped Frame die
Delicata Gold ink from Tsukineko
Iuile Christmas Set watercolor
Versamark ink
Ranger Gold embossing powder
Papercut Deep Blue cardstock
So Silk Fair Blue cardstock
Neenah Solar White 110# cardstock


Friday, March 12, 2021

Magenta Super Saturday: Distress Blending on Slimline Card

 Hi everyone! I'm over at the Magenta blog today, and you can see that post here.

I wanted to try doing a slimline card today. I seem to be collecting lots of things to use on slimline cards, and for today's card, I used none of them! So I'm quite sure you will be seeing lots of them in coming posts.


I have to say that this card did not turn out how I imagine it would. I think in my head the colors were lighter, but it turned out bright and happy.

I started with a panel that is 8.5" x 3.5" and I started masking off areas of 1" each, leaving 1/4" in between. I chose rainbow colors to do Distress blending in each of the 1" areas.


I thought I would do a sort of rainbow pattern.


My brushes are so seasoned that probably if I wanted to do a lighter blend I would need to just not ink them!

I made sure the inks were dry, and stamped and embossed the beautiful Clematis Vine from Magenta, and the gorgeous Happy Birthday by Sally Penley for Magenta. The embossing was done in gold. I matted the panel with red cardstock cut at 8.75" x 3.75", and mounted it to a base card that measures 9" x 4" Cut your base card to 9" x 8" and score at 4"), which fit perfectly into a #10 business size envelope.

Magenta Products Used:
Other Products Used:
Distress Ink: Picked Raspberry,
Spiced Marmalade, Mustard Seed,
Twisted Citron, Peacock Feathers,
Wilted Violet
Versamark Ink
Ranger Gold Embossing Powder
Post-it 2" Removable Labeling Tape
PTI Pure Poppy cardstock
Neenah Solar White 80# & 110# cardstock

Friday, April 10, 2020

Two Cards: One Die and Distress Oxides

I recently got a great die from Poppy Stamps called Berry Square Frame (2234). I got a couple of other square frames too, that I will use in future cards. I needed some birthday cards, so I got out the Oxide backgrounds out that I recently made.


This background is part of a panel that I made and used in this post that I did for Magenta. It turned out to be the perfect size for this card.

I cut the Berry Square Frame from white cardstock, and also cut it out of the Oxide background panel. I fit the white cut-out into this panel, piecing the Oxide colored pieces back in.

I stamped the Happy Birthday sentiment with a great Magenta stamp designed by Sally Penley as part of her calligraphy series. I love this stamp and use it as much as I can. The ink I used is Versafine Clair Paradise.

I lined both sides of the panel with strips of So Silk Glamor Green cardstock and mounted the entire panel on a 110# white base card.


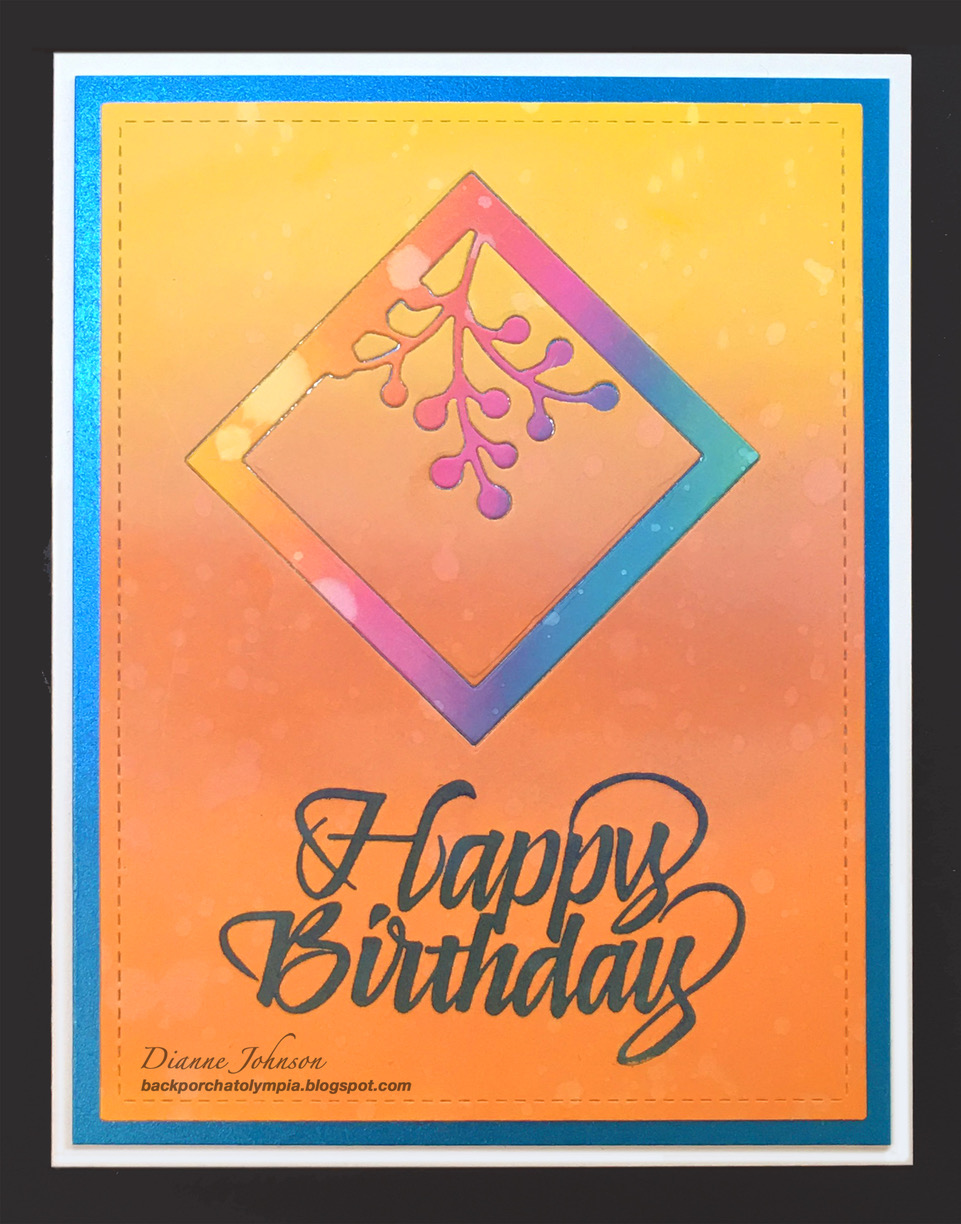
For the second card, I chose an Oxide background from yellows and oranges. I wanted something more homogenous with a smooth blend so that I could use the frame piece from the previous card. I cut the die out of the background in a diamond shape this time, and I fit the die cut from the first card into the space, piecing the orange blend background in around it.  I also stamped this one with the same Magenta sentiment, and the same ink. It looks so different on this color Oxide background.

I still have the piece I cut out of this panel to use in another card


Here's the pile of oxide backgrounds I chose these from


I made these backgrounds just using a blending tool with Oxide inks, and I splattered them with water when they were dry.


Above are the colors for the first card


And these are the colors for the second card

I hope you liked these, and I hope you will consider buying dies from Poppy Stamps. They are a local Washington company, and have long been a favorite. You can buy from them directly on their site. Their parent company, Memory Box, is also a favorite of mine. You can get Memory Box dies and stamps from Impress Cards and Crafts, also a local Washington company. Impress also has online sales of lots of fabulous things for cardmaking, so please support them.

Don't forget Magenta as well. You can get Sally Penley's entire line of Calligraphy stamps at Magenta here scroll through to see them all.

Stay well, everyone!

Magenta Products used:

07.975.I Happy Birthday

Other Products used:
Poppy Stamps Berry Square Frame 2324
Distress Oxide inks: Mustard Seed,
Peacock Feathers, Twisted Citron, 
Picked Raspberry, Rusty Hinge,
Carved Pumpkin
Versafine Clair ink: Paradise
Neenah Solar White 80# & 110#
So Silk Glamor Green cardstock
Lawn Fawn die LF768 
Small Stitched Rectangle Stackables


Sunday, February 24, 2019

Fast and Fun Birthday Cards Part 2

This is the second post showing cards I made using a new die set I acquired, Tim Holtz Multi-Media #5 dies by Sizzix (662688). I used two of the dies in the set. Dies like this make fast and easy cards if you're like me and love making lots of different backgrounds that you keep in your stash.


This second die looks more like a cherry blossom branch, and not only is it a lovely die, it shows the colors of the panel behind it very nicely.

I made 5 more cards - 4 Birthday cards and 1 Thank You card thrown in.


These are the panels I used for this set of cards. Some of them look familiar because they are like other background panels that I used in Part 1 of this 2-part series. Please go here for Part 1 of you did not see it. I give links to posts using the techniques for the different panels. All of the background panels above except one were made using stencil stamping. The top center panel was made using Nuance powdered color.

The background panels were cut to 4" x 5.25", and the white die-cut panels were cut to 3.75" x 5", with a stitched edge, using Lawn Fawn LF768 Small Stitched Rectangle Stackables.


Here are all of the die-cut panels on top of the backgrounds. I really think that almost any background would look great with these dies. The Thank You card happened because this is the perfect size stamp to stamp beside the die-cut image. I love how this stamp fits horizontally next to an image that takes up 2/3 of the rest of the panel.


Here are 4 of the finished cards. One had already been sent away before I photographed all of them together. I will be using these dies a lot in the future! I can quickly make a whole set of cards for a gift.

Magenta Products used:


07.975.I Happy Birthday Large

07.969.F have a Beautiful day!

07.882.I Thank You Multilingual

Other Products Used:
Tim Holtz Multi-Media #5 dies by Sizzix 662688
Lawn Fawn LF768 Small Stitched Rectangle die set
Versafine Onyx Black ink

For links to the techniques used on the background pieces for these cards, please go to Part 1 here


Friday, January 18, 2019

Magenta Super Saturday: Happy Birthday Dear Friends!

This post appears on the Magenta blog today. To see it there, please click here.
I wanted to make a couple of birthday cards for some dear friends, and my plan was to make them with a stamp I designed for Magenta. I wanted to make them look really nice, so I decided on my favorite color pencil technique using Prismacolors. You can find other cards I made with this technique here, here, here, and here.


The Floral stamp was designed by me and the beautiful Happy Birthday stamp is by Sally Penley. This is the technique where I stamp in the corner and leave the stamp in the stamp positioner. Once I finish coloring, I come back and stamp again with Versamark and emboss. I stamp and emboss the sentiment in this step also. I know it looks white in the above picture, but this embossing was done with silver embossing powder.


For this second one, I embossed around the flowers in silver, but the sentiment is stamped and embossed in Mermaid Lagoon Distress Oxide.

I'm super happy with how the colors turned out, and I hope the recipients like them! Believe it or not, I used the same pencil colors for both cards!

Magenta Products Used:
(The links below will take you directly to the Magenta online shop)
44.024.Q Zen Bouquet

07.975.I Happy Birthday Large

Other Products Used:

Prismacolor Pencils: 
PC992 Light Aqua; PC905 Aquamarine; PC105 Cobalt Turquoise; 
PC956 Lilac; PC1008 Parma Violet PC931 Dark Purple; 
PC911 Olive Green; PC912 Apple Green; PC1005 Limepeel; 
PC1004 Yellow Chartreuse; PC1011 Deco Yellow; 
PC921 Pale Vermillion; PC1001 Salmon Pink

JudiKins Silver Detail Embossing Powder
JudiKins Clear Detail Embossing Powder
Hero Arts Unicorn White ink
Versafine Smokey Gray ink
Versamark ink
Ranger Mermaid Lagoon Distress Oxide ink
Die-namics MFT-463 Blueprints 13 Die set
Deep Blue cardstock from The Paper Cut
Strathmore Mixed Media Gray Tone paper
So Silk Passion Purple cardstock
So Silk Glamour Green cardstock
Neenah Solar White 110# cardstock