Pages

Showing posts with label Magenta 48.011.L Clover Silhouette. Show all posts

Friday, April 16, 2021

Magenta Card Exchange April - The Netherlands

This month I got to send a card to the Netherlands again. I have such fond memories of visiting that beautiful country, and would love to go back someday.


For this card I used a rectangular stencil and brushed Distress ink in Wild Honey from the lower left corner to the upper right, allowing the color to fade out at the upper right. I splattered the Distress ink with water to create some spots.


Once my panel had dried, I stamped the beautiful Clover Silhouette stamp in black. This stamp was designed by Elie Knoll, one of Magenta's talented Dutch Design Team members. Then also in black, I stamped the hello! sentiment, which is one of my favorites of the calligraphy stamps designed by the amazing Sally Penley for Magenta. Last, I stamped the  Zen Butterfly, which is a stamp I designed for Magenta. The butterfly was stamped with Versamark ink and embossed in gold.


I spattered some gold paint onto the panel, and I took an oblique photo of the card to show how shiny the gold is in real life. I die cut the panel using The Greetery Crimped Edge die, and matted it with gold cardstock, and then onto a base card.


This is the sneak peek shot I posted onto the Magenta Passion Studio. It shows how really gold and shiny the card is.


Magenta Products used:


07.976.G hello!

Other Products used:
Distress ink: Wild Honey
Versafine Onyx Black ink
Versamark ink
Sakura Gold Poster Color
Ranger gold embossing powder
The Greetery Crimped Frame die
Curious Metallics Super Gold cardstock
Neenah Solar White 80# & 110# cardstock

Friday, July 10, 2020

Super Saturday at Magenta: Thinking of You

Hi! I'm over at the Magenta Blog today, and you can see that post here.

During this time of isolation, I have been enjoying making blended Distress backgrounds using blending brushes and stencils.


Magenta has a series of square and rectangle silhouette stencils developed by Nathalie that are perfect for adding a blended shape to your card. I especially like this square TM277 because it's a good size for blending several colors.

I placed the stencil onto a white panel, and taped it down with Post-it tape. I made sure that the tape covered the panel around the stencil.


This is the panel after I finished blending the colors. I then used GinaK Amalgam Jet Black ink to stamp the beautiful Clover Silhouette stamp, by Ellie Knol, and the also beautiful Thinking of You calligraphy stamp by Sally Penley.

I've made a number of backgrounds using the square stencils from Magenta, and I plan to use them in the coming weeks.


Magenta Products used:

TM277 Square Silhouette

48.011.L Clover Silhouette

07.982.E Thinking of you small

Other Products used:
Distress Inks: Candied Apple,
Carved Pumpkin, Mustard Seed,
Twisted Citron, Speckled Egg
Blending brushes
GinaK Amalgam Jet Black ink
PTI Terracotta Tile cardstock
Neenah Solar White 80# & 110# cardstock

Friday, March 22, 2019

Magenta Super Saturday - Brushed Distress Oxide Backgrounds

Hi I'm over at the Magenta blog today, and you can see my post here.
For some time I have been wanting to play with the cool deckle edged rectangle and square stencils designed by Nathalie Métivier. I liked this one so much I intend to use more of them in the near future.


I taped my panel (cut to 3.75" x 5" using Lawn Fawn LF768 die) to the Magenta stencil TM276, positioning it so that I would use only 2 of the 3 rectangles on the stencil. I masked the edges off with post-it tape.  I used a makeup brush to add Tea Dye Distress Oxide, brushing from the sides toward the center of each rectangle.

I stamped the dotted texture stamp inside the shaded area, and then inked the Clover Silhouette stamp (designed by Magenta DT member Ellie Knol) up with Mowed Lawn Distress Oxide and stamped it. Since I was using a MISTI stamp platform, I was able to add some Dried Marigold Distress Oxide ink in a few places on the stamp and stamp it again.

I added the Sympathy sentiment last. This is one of Sally Penley's beautiful calligraphy stamps, and I stamped it with Versafine Onyx Black ink.


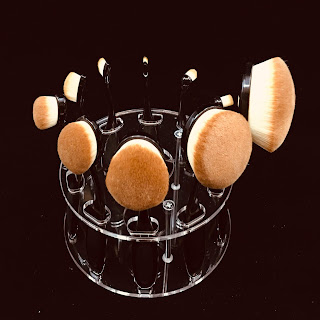
These are the brushes I used, and I really like them. I know that Picket Fence sells a set like this but I got mine on Amazon. They're really soft, and I didn't think that the color would be that intense, but it surprised me. I felt like I barely brushed it on, and the shading has such a smooth appearance. For this card I did shading, but I also plan to use them to do some blending inside of some of Nathalie's square and rectangular stencils and I'll share those in the future.

Magenta Products Used:

TM276 Three Rectangle Silhouettes

H.0259 Dotted Texture

48.011.L Clover Silhouette

07.984.E With Sympathy

Other Products Used:
Distress Oxide inks: Tea Dye, Mowed Lawn,
Dried Marigold
Versafine Onyx Black ink
Makeup Brushes
Lawn Fawn LF768 Small Stitched Rectangle Stackables dies
Post-It Tape
Stardream Flame cardstock
Neenah Solar White cardstock 80# & 110#


Sunday, March 25, 2018

Distress Oxides: Heartfelt Sympathy

I have had to make a number of sympathy cards recently, and I always find them hard to make. It's easier to have some made in advance, but I never seem to. This card is another blended panel that I had already made and had in my stash.


The original panel was made by blending a lot of colors of Distress Oxides. Once the colors were blended, I stamped this lovely Magenta Clover Silhouette image in Faded Jeans Distress Oxide. I think this stamp is really one of my very favorite stamps; it was designed by Magenta DT member Ellie Knoll. I really think that no matter what you do with it, it will look beautiful.

After stamping, I spritzed the entire panel with water and then speckled it with a little of the darker ink that I had put on my craft mat with some added water. I think that the water drops give it a more ethereal look.

I cut the panel out with the Die-namics MFT 846 Inside/Outside Stitched Ovals. I adhered the oval to the top center of a white textured cardstock that was cut using the Die-namics MFT 463 Blueprints 13 stitched rectangle die that cuts the panel to 5.25" x 4"

I stamped the Impression Obsession sentiment onto the bottom of the white panel with Versafine Onyx Black ink, and the panel was matted with Stardream Blue Steele cardstock. I adhered the panel to a base card of 110# Neenah Solar White cardstock.

I love how this card turned out, and I almost always feel that way when I use this Clover Silhouette stamp! If you have not yet looked at my Distress Oxide Overview post, you can see it here. If you wish to purchase the Clover Silhouette, you can click on the link below. Both Magenta and Impression Obsession offer all of their stamps in wood or cling rubber versions.

Products Used:
Magenta 48.011.L Clover Silhouette
Impression Obsession C13521 Heartfelt Sympathy
Distress Oxide inks: Wilted Violet, Broken China, Spiced Marmalade, 
Peeled Paint, Cracked Pistachio, Fossilized Amber, Faded Jeans
Die-namics MFT-463 Blueprints 13
Die-namics MFT-846 Inside/Outside Stitched Ovals
Versafine Onyx Black ink
Stardream Blue Steele cardstock
Core'dinations 80# White Canvas cardstock
Neenah Solar White 110# cardstock


Monday, March 19, 2018

Distress Oxides: Making the Most of Your Inked Panels

I have three cards for you today, and I made them all from one Distress Oxide inked panel. I had been experimenting with blending different colors together, and went in rainbow order so I wouldn't get mud. (The panel on one of these cards is mounted upside down from how it was on the full piece, but you get the idea).

I sprinkled some water drops onto the panel and then when that had dried, I sprayed the entire panel with Imagine Crafts' Sheer Shimmer Spritz. This spray does not alter the colors, but puts a fine sparkle all over the panel. You can't really see it in the photo, but it's beautiful in real life.


I cut these strip panels out using Die-namics MFT-470 Horizontal Stitched Strips. The set comes with several dies, and I chose the larger one that cut strips that are 4" x 1.75"


To get the images to stamp correctly and not get any line where the Distress piece is adhered, I used a stamping tool. I temporarily adhered the Distress Oxide panel to the white cardstock. I played with positioning up or down depending on the stamp.

I inked the stamp with Versafine Onyx Black ink and stamped it several times, until I was happy with the darkness of the ink on the Oxide panel. I removed the Oxide panel and inked and stamped it a couple more times until I was happy with it. I then permanently adhered the Oxide panel in the correct place, and stamped the sentiments afterwards.


I love how black, solid or semi-solid images look on a highly colored background. I also love the look these stamps get when stamped on the textured paper. The white textured cardstock was cut to 5.25" x 4" using the stitched rectangle die from the Die-namics MFT-463 Blueprints 13 die.

Each card was mounted onto a piece of colored cardstock to mat them, and then adhered to a base card of 110# Neenah Solar White cardstock.

These cards are so easy and fast to make! Go through your stamps for some vertical images that have a lot of solid surface to them. If you like these Magenta images, you can link to them at the Magenta online store using the links below. If you have not already seen my Distress Oxide Overview post, you can see it here.

Products Used:

Card #1
Magenta 48.011.L Clover Silhouette
Penny Black 30-286 Heartfelt
Die-namics MFT-470 Horizontal Stitched Strips
Die-namics MFT-463 Blueprints 13
Distress Oxide inks: Cracked Pistachio; Peeled Paint; Broken China; Wilted Violet
Versafine Onyx Black ink
Imagine Crafts Sheer Shimmer Spritz spray
Core'dinations 80# White Canvas cardstock
So Silk Passion Purple cardstock
Neenah Solar White 110# cardstock

Card #2
Magenta 0672.L Wild Branch
Magenta 07.971.F Sending hugs
Die-namics MFT-470 Horizontal Stitched Strips
Die-namics MFT-463 Blueprints 13
Distress Oxide inks: Peeled Paint; Spiced Marmalade; Fossilized Amber; Worn Lipstick
Versafine Onyx Black ink
Imagine Crafts Sheer Shimmer Spritz spray
Core'dinations 80# White Canvas cardstock
Stardream Fairway cardstock
Neenah Solar White 110# cardstock

Card #3
Magenta 14.634.O Wildflowers - Umbells
Die-namics MFT-470 Horizontal Stitched Strips
Die-namics MFT-463 Blueprints 13
Distress Oxide inks: Worn Lipstick; Fired Brick
Versafine Onyx Black ink
Imagine Crafts Sheer Shimmer Spritz spray
Core'dinations 80# White Canvas cardstock
So Silk Fashion Black cardstock
Neenah Solar White 110# cardstock

Monday, July 10, 2017

Thinking About Summer

For this card I used one of my favorite Magenta stamps: Clover Silhouette, designed by Magenta DT member Ellie Knol. This post is also on the Magenta Blog today.


On watercolor cardstock I sprinkled some Nuance powder in the general areas that I planned to stamp. I inked the stamp with Memento Gray Flannel ink and spritzed it with water, then stamped it in the areas where the Nuance had been sprinkled. I stamped it twice, spritzing the stamp once more in between stamping. I lightly spritzed some water to activate the rest of the powder on the card. I added some circles with Memento Teal Zeal ink, using a finger dauber and the Bubble Path Duo stencil.

I added the sentiment by stamping onto a strip of vellum with Distress Oxide Broken China ink. I embossed the sentiment with JudiKins Iridescent Sparkle embossing powder. I wrapped the vellum strip around the back of the watercolor panel and taped it down. I also put dots of Ranger Multi Medium Matte adhesive behind the sentiment to stick it down without showing from the front.

Magenta Products Used:
(If you are local, please look for products at Art 'n Soul. If you are not local and wish to find Magenta products, you can click on the link in the stamp or product name below each image, or you can visit the Magenta online store here).

48.011.L Clover Silhouette
07.954.G Think about you often
TM179 Bubble Path Duo
MNU001 Turquoise
MNU007 Raspberry

Other Products used:
Memento ink: Gray Flannel; Teal Zeal
Distress Oxide: Broken China
JudiKins Iridescent Sparkle embossing powder
Die-namics MFT-463 Blueprints 13
So Silk Glamour Green cardstock
various sequins

Thursday, March 30, 2017

Technique of the Week: Painting Your Stamps with Nuance

This post is in conjunction with the Art 'n Soul Newsletter  article, "Technique of the Week". This card and technique is also featured on the Magenta blog right now.


The stamp I chose was the beautiful Clover Silhouette designed by the talented Ellie Knoll. You could use any stamp that has a lot of solid surface, rather than outlines. I also chose to use some of the newest colors of Nuance, but really any colors of Nuance would also look great.

   
I used the MC27 Round Shape Mask for this technique. You get two pieces with this template: the outside of the circle, which covers your card and leaves the circle open to work in; and the circle itself.

I taped down my card panel and taped down the outer piece of the stencil over it, leaving the circle open to stamp in. 


I put Nuance powder onto my craft mat in little piles. I inked the stamp with Versamark ink (clear, sticky ink) to help the colors stick. Then, using a damp brush, I picked up Nuance powder from my mat and painted it onto the solid areas of the stamp.


I spritzed the stamp to activate the color, and stamped it onto a piece of watercolor cardstock. I stamped off onto a second piece of cardstock, and then repeated the process to have a second image on my card.

The template masked off the area around the stamping. 

The panel that I stamped off onto will make a second card, but the image will be a little lighter.


Once I had stamped the image twice, I removed the template and dried the image carefully. I placed the inside of the template (the circle) over the stamped images to mask them. I then tapped Nuance powder all around the circular mask, and spritzed the powder with water.


You could also do the outside of the circle first; it works either way.


To define the circle around the main image further, I first dried the background, and then placed the template with the open circle back on the panel, and drew around the circle with a green Micron pen.


I sprayed water onto the rest of the Nuance on my mat, and picked up some with a brush and flicked spots onto the background image. Last, I added a sentiment and mounted it to a card.

At the end, not wanting to waste the wet Nuance that was left on my mat, I dragged another piece of watercolor cardstock through it, and created a background for another card.


This technique was really fun, and was not hard to do. Try it out on any stamps you may have with a lot of solid surface.

Magenta Products Used:
(If you are local, please look for products at Art 'n Soul. If you are not local and wish to find Magenta products, you can click on the link in the stamp or product name below each image, or you can visit the Magenta online store here).


48.011.L Clover Silhouette

07.952.F Sending you Sunshine

MC27 Round Shape Mask

MNU026 Old Rose

MNU027 Chartreuse

MNU028 Bright Green

MNU029 Lagoon

MNU030 Anthracite
Other Products Used:
Distress Inks: Mowed Lawn & Peacock Feathers (for stamping sentiment)
Green Micron 01 Pen
Perfect Pearls powder (mixed into water)
Watercolor cardstock
Painter's tape and Post-it tape for masking