Pages

Monday, November 23, 2020

Merry Christmas - Gledileg Jól

 I have really been enjoying listening to audio books and podcasts and coloring in the evenings, and I decided this would be a great way to get some of my Christmas cards done. It doesn't matter that it takes 2 hours to do one because I'm just enjoying myself.


This card was made with a new stamp by Simon Says Stamp, Center Cut Holiday Floral. I didn't use the center of the stamp so that I could put other sentiments there. Five of the ten cards I made will go to my relatives in Iceland. I was able to do this sentiment by cutting up a Magenta stamp, Multilingual Merry Christmas. (I have three of these stamps in cling, so I don't mind cutting one up; it makes them more versatile).


I started by stamping 10 panels of Neenah Solar White 80# cardstock with Memento London Fog ink, which is a light grey/green ink. I started coloring the images with Prismacolor pencils.


These are the colors of pencils I used, and I use a hand sharpener, so that I can regulate the pencil sharpness that I want.


There are a lot of layers of color on these, and the first one took 3 hours to color. At the end, I did the last two in just 3 hours, so I found that as I did more of these, I figured out how much of each color should go down in all the places. Again, I was listening to audio books and podcasts during this time, so the time was going to pass regardless. I might as well be doing something fun at the same time.


Once they were all colored, I went back and stamped them with Versamark ink. I had left the stamp in my MISTI, so the stamping was in the exact right place. I then embossed them with gold embossing powder, which brought a sparkle and shine that I love.


Here are some of the different versions that I made. I cut the inner circles with a Die-Namics Pierced Circle Stax die. That circle was matted with gold using a die from the Hero Arts Infinity Nesting Circles. I couldn't decide on a color for the sentiment, but in the end, I think I liked red the best. I used Distress Oxides in Festive Berries and Mowed Lawn, and embossed in clear. For the gold one I stamped in Versamark and embossed in gold.

The Merry Christmas sentiment is from The Greetery. I love their Sentiment Suite Christmas set. At the end, I cut the panels with The Greetery's Crimped Edge die, and matted them with the same gold that the circle is matted with.

I worked one of my pencils down to practically a nub. I use extenders on them to make them last as long as possible. I love this!


I hope the recipients will enjoy these cards as much as I enjoyed making them.

Products Used:
Simon Says Stamp Center Cut Holiday Floral SSS 102178
Magenta Multilingual Merry Christmas 07.883.K
The Greetery Sentiment Suite: Christmas 
Die-Namics MFT Pierced Circle Stax
Hero Arts Infinity Nesting Circle Dies DI199
Prismacolor Pencils: PC928 Blush Pink,
PC926 Carmine Red, PC924 Crimson Red
PC1029 Mahogany Red, PC942 Yellow Ocre,
PC1032 Pumpkin Orange, PC1034 Goldenrod
PC1004 Yellow Chartreuse, PC1005 Limepeel,
PC912 Apple Green, PC911 Olive Green,
PC1006 Parrot Green
Versamark ink
Memento London Fog ink
Distress Oxide ink: Festive Berries, Mowed Lawn
Ranger Gold embossing powder
JudiKins detail clear embossing powder
Curious Metallics Super Gold cardstock
Neenah Solar White 80# & 110# cardstock



Tuesday, November 17, 2020

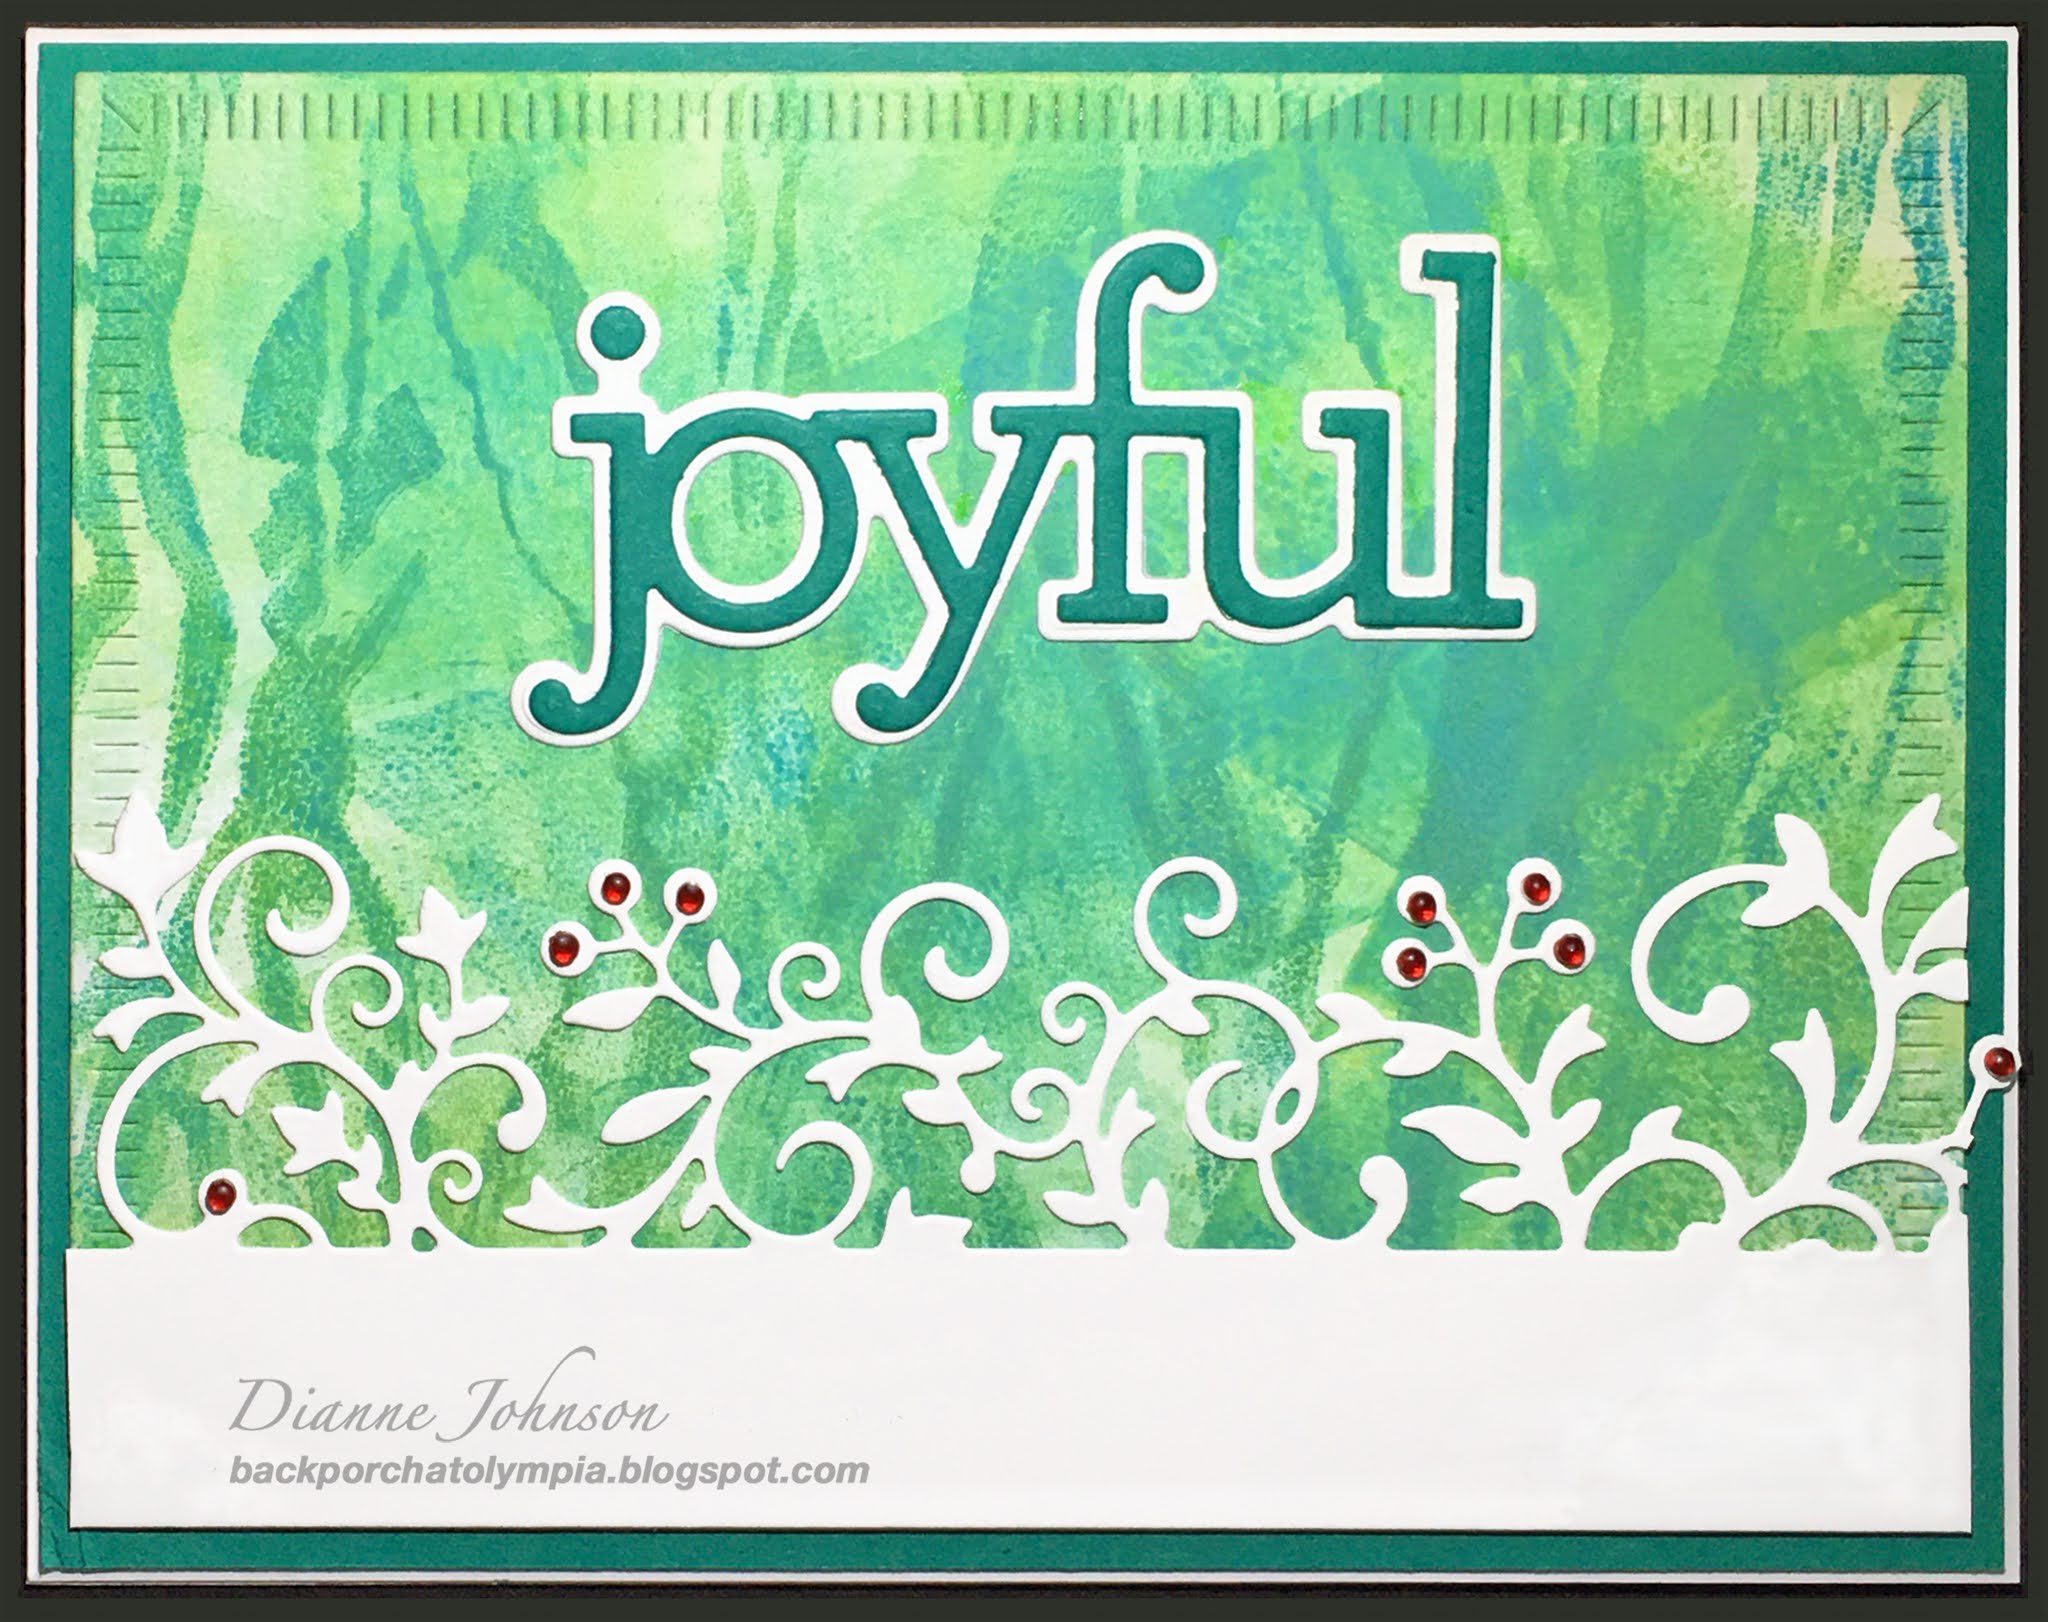
Die Cut Christmas: Joyful

 I got this "joyful" die from Simon Says Stamp a while back. I really like it, but didn't have a chance to use it last Christmas. Although I'm not sure how joyful this year has been for many of us, I am trying to find the joy in things, and to remain grateful.


I like that the "joyful" die has a background piece as well, so that it can be set apart from the background and it shows up better. I paired it with a great Hero Arts die called "Holiday Greenery Edge." There is also a snowflake version of this Hero Arts edger die and I will try to use it for my Christmas cards this year as well.

The background was made during a session with my Gelli Plate and Distress Oxide inks, when I made lots of great backgrounds in different colors, and with different textures. This one was made using a brayer that came with a rubber band texture. You can do the same thing by putting rubber bands on your regular brayer. When I first took this off the plate I wasn't sure I would find something to use it for; however, I think in this card the darker shapes look a bit like streamers.

I die cut the panel using The Greetery Crimped Frame die, and added the Hero Arts die that was cut from white at the bottom with some gems. The "joyful" die was cut from teal cardstock, and its background from white.

I will definitely use these dies more, hopefully this year!

Products Used:
Simon Says Stamp CZD72 Joyful
Hero Arts DI532 Holiday Greenery Edge
The Greetery Crimped Frame die
PTI Tropical Teal cardstock
Neenah Solar White 80# & 110# cardstock


Sunday, November 15, 2020

Die Cut Christmas: Let it Snow

Some of the Christmas cards I've made this year have been done almost exclusively with die cuts, and the latest ones were made with the Let It Snow Frame die from Poppy Stamps. This is one of those dies that you can mix and match the inside pieces and outside pieces. I'll show you a few cards I made with this die. I also think it would be pretty with a photo of a nice snow scene in it.


This one might be my favorite of the three. I cut the Let It Snow die out of one of my panels made with shaving cream and inkers. You can see that technique here, here, here and here. This is a perfect background for this die. All of the panels were cut out with The Greetery Crimped Frame die, and then the Let It Snow die was cut by centering it in those panels. 

I cut a square of dark blue cardstock to go behind the sentiment. I used a die from Simon Says Stamp (Sparkling Snowflakes Breeze) on the dark blue panel, and put silver glitter paper behind the openings in the die. That only covered from the lower left to the upper right of the square, so I cut lots of circles (and even a couple of stars) out of the glitter paper with some punches, and glued them all down. I also added some white dots with a gel pen. 

In the next two cards, I made use of all of the pieces.


In these two cards, I used the dark blue square as the center of one and the Oxide glaze piece as center in the other. The squares are actually inlaid into the cards

The inked panel was made with Distress Oxides, using the Oxide Glaze technique on glossy caardstock. You can see this technique here, here, here and here.

On the above card, I used The Greetery Snowflake Corners dies for the corners and the snowflake. I added glitter dots from Elizabeth Craft.


In the card above, I added snowflakes cut from white cardstock and blue mirror cardstock. I used snowflake dies from Elizabeth Craft, Impression Obsession and The Greetery.

Yes, I used a lot of dies for these cards, but if you read my blog post here, where I was contemplating all of the dies I have not used, I am trying to see how well they all can be used together. I admit that my favorite cards are a combination of stamping with coloring or painting and a die cut or two; but in going through all of my dies and trying them out, I put together quite a few cards that have no stamping or coloring. They do however have interesting techniques done in the backgrounds, so if you have not seen those posts, please check them out using the links provided.

There will be more of these die cut Christmas cards coming, so please keep following. I hope you like them!

Products Used

All 3 cards:
Poppy Stamps Let It Snow Frame die 1880
The Greetery Crimped Frame die
PTI Enchanted Evening cardstock
Neenah Solar White cardstock 110#

Card #1:
Simon Says Stamp S528 Sparkling Snowflakes Breeze die
Silver glitter paper
Hole punches: 1/8", 1/4", Fiskars star punch
White gel pen
Background panel made with shaving cream and
Distress inkers: Broken China,
Faded Jeans and Speckled Egg 
(see links above for directions)

Card #2:
The Greetery Frosty Corners Dies GD-M-027
Elizabeth Craft glitter dots
For the background panel, please see above
links for directions

Card #3
Elizabeth Craft 1409 Ornate Snowflakes
Elizabeth Craft glitter dots
Elizabeth Craft silver snowflake peel-offs
Impression Obsession die 100-F Small Snowflake Set
Memory Box blue mirror cardstock


Wednesday, November 11, 2020

Watercoloring With Distress Christmas Poinsettia

 I often watercolor with Distress Inks. I think I go to them because I know what I'm going to get. I want to get as familiar with my many kinds of watercolors as I am with Distress, but that will probably happen in a quieter time than right now.


I started with a stamp that has been in my collection for awhile, but I had not used before, the beautiful Poinsettia Sketch stamp from Impression Obsession. Since this is a large stamp, and my card panels are not larger than 4.25" x 5.5", part of the design is lost.


This is how I store my large stamps, most of which are backgrounds. I stamp it onto chipboard so that I can see the entire image stamped out. The stamp is behind the chipboard, standing up in a basket. This method makes it easy to see what I have, and also easy to pull them out and use them.


I also stamp a white tag and that gives me a good idea of what the stamp would look like on a smaller panel.


To make this card, I first selected the red mat color, and then the Distress colors I would use. I like using Distress stains, because they are undiluted ink and easy to use for watercoloring. Unfortunately, these dauber versions of the Distress stains are no longer being made, although there are spray versions.


I stamped 10 panels of Neenah Solar White 110# cardstock, and embossed them with gold embossing powder. Although I planned to watercolor on them,  I did not plan to get them very wet. I used the wet on wet technique, and worked with one petal or leaf at a time. When I was finished with the painting, I let them all dry and then flicked gold paint on them. I die cut them with the Penny Black Antique Frame die set to give them a deckled edge.


The gold embossing is very hard to highlight in a photo, but it adds a lot to the cards in real life.


This is one of the panels before I stuck anything down. I tested out several colors of red cardstock before I settled on the one to use for the mat and sentiment. The sentiment is the lovely small Merry Christmas die from Elizabeth Craft.

I hope you like it!

Products Used:
Impression Obsession Poinsettia Sketch CC220
Penny Black Antique Frame die PB51-397
Elizabeth Craft 1599 Merry Christmas Small die
Distress Stain: Candied Apple,
Mowed Lawn, Twisted Citron
Versamark Ink
Ranger Gold Embossing Powder
Neenah Solar White 110# cardstock
PTI Pure Poppy cardstock

Friday, November 6, 2020

Super Saturday at Magenta: Distress Blending & Masked Sentiment

Hi everyone! I'm over at the Magenta blog today, and you can see that post here. It's that time of year again to say Happy Birthday to my friend Fred from The Netherlands. Unfortunately I only have one stamp that says Happy Birthday in Dutch, so I pull it out every year, but I'm sure he doesn't mind. At least the card is always different.

To make this card, first I made a sample on a piece of typing paper cut to the size of the card I planned to make. I sometimes either do sketches, or actually stamp it out to see if my layout will work. I decided to stamp this one because I was using just 2 stamps, one large and one small for this project, and had to stamp and emboss them multiple times.


Masking off a space for the sentiment, I used my MISTI to help plan where the stamps would go. My plan was to use this as a map to help lay out the images on my card.

To prepare my panel, I first die cut it with the Greetery's Crimped Frame die. I then masked off a 1/2" strip, and blended Distress Ink in blues and purple onto the panel. I flicked a little water on the blending to make speckles.


Once the blending was done and dried, I put my panel into my MISTI and placed the sample paper over it. I then one by one put the stamps onto  the image on the paper, picked them up with the MISTI, and stamped them onto my cardstock with Versamark Ink. I did this with each image, stamping with Versamark ink each time. I had to place a little extra piece of paper in a couple of places where I didn't want stamping, to get the look I wanted. I also had to remove part of the mask to get stamping into the white area on either side of the sentiment. 

I embossed the images with gold embossing powder. Last, I removed the rest of the mask and stamped the sentiment. Honestly, in my mind it was much easier than it actually turned out to be, but it was well worth the trouble. Happy Birthday Fred! I hope you like your card!!

Magenta Products Used:

07.907.L Multilingual Happy Birthday

Other Products Used:
Distress Ink: Speckled Egg,
Salty Ocean, Wilted Violet
Versamark Ink
Ranger Gold Embossing Powder
The Greetery Crimped Frame die
Super Gold Curious Metallics cardstock
Neenah Solar White 80# & 110# cardstock
1/2" masking tape

Tuesday, November 3, 2020

Gelli Plate and Die Cuts Merry Christmas

 I'm still playing with my Christmas/Winter die cuts, and using them with various backgrounds that I have had a lot of fun making.


For this card, the background was made with a Gelli Plate and Distress Inks. I had always used my Gelli Plate with acrylic paint in the past. I got the idea to use Distress Inks from Jennifer McGuire, and you can see her post here. She calls it Gell Press, but it's basically the same tool. Using dye based inks such as Distress so SO much easier than using acrylic paint.

I made a lot of backgrounds when I was playing around. I mainly just used a brayer to add ink onto the plate and pressed panels of cardstock down onto the wet ink. I also brayered the excess ink onto additional panels directly. Some of the panels were textured and some smooth, and I got a lot of different looks.

On this particular card, I used Distress Ink in Peacock Feathers, Wilted Violet, and Faded Jeans. The cardstock was smooth and I love the texture I got. 

I added the Snowflake Edge die cut from Hero Arts, and the Merry Christmas Text die from Paper Rose. The Paper Rose die came with a second die that allows you to add a background around the sentiment, and I cut that out of vellum. 

At the end, I added some glitter dots from Elizabeth Craft. I really like these for added sparkle. I am sending my cards all over the world, and I don't want to have bulky embellishments on them.

Products Used:
Hero Arts DI533 Snowflake Edge
Paper Rose 17823 Merry Christmas Text
The Greetery Crimped Frame die
Gelli Plate
Distress Ink: Peacock Feathers,
Wilted Violet, Faded Jeans
PTI Enchanted Evening Cardstock
Vellum
Neenah Solar White 80# & 110# cardstock
Elizabeth Craft glitter dots

Monday, November 2, 2020

Shaving Cream and Die Cuts Merry Christmas

 Here is another card using the shaving cream technique that you can see here, here and here. This time I'm using panels that I made using red Distress inkers.


The inker I used for these panels is Festive Berries Distress Ink. I noticed that the longer I worked with the inker infused shaving cream, the lighter it got, and the more pink it became.


I just love this technique for making a lot of interesting panels to work with.

For this card, I cut the panel out with the Greetery's Crimped Frame die. I die cut the sentiment using the Elizabeth Craft 1056 Merry Christmas die, from Stardream Jupiter cardstock. The mat for this card was cut from the same. I mounted the panel on a base card and it was done. Super easy fast and festive.

I made more of this card, but to make it more sparkly, I die cut the sentiment from red glitter cardstock, and the mat is Hopsack Red cardstock from The Paper Cut.


I kind of like the glittery one; which one do you like?

Products Used:
Elizabeth Craft die 1056 Merry Christmas
The Greetery Crimped Edge die
Festive Berries Distress inker
Stardream Jupiter cardstock
Simon Says Stamp Red Glitter cardstock
Hopsack Red cardstock from The Paper Cut
Neenah Solar White cardstock 80# and 110#
Shaving Cream (any will do, but not gel)


Saturday, October 31, 2020

Holiday Greenery with Prismacolor

Another set of Christmas cards done! I love to color or paint, especially when I'm listening to podcasts or audio books. These cards were a lot of fun. I made 5 with gold and 5 with red.


I stamped the image using the MISTI stamping tool first, with green ink, and left the stamp in the MISTI.


After coloring, I replaced the panel in the MISTI and stamped it again with Versamark ink and then embossed with gold embossing powder.


After embossing, I flicked gold paint all over the panels


I couldn't decide between the green and the gold sentiments and mats, so I went with both. Which one do you like best? The sentiment is from Penny Black. I love this one because the waste piece between the upper part of the "s" and the "t" in Christmas is shaped like a heart. I like to use it for the dot over the "i". I added a couple of peel-off glitter dots from Elizabeth Craft in the center of the greenery. I hope you like these; more Christmas cards to come.

Products Used:
Memory Box CL5244 Holiday Greenery
Penny Black die 51-248 Merry Christmas
The Greetery Crimped Edge Frame die
Prismacolor Pencils: PC928 Blush Pink,
PC926 Carmine Red, PC924 Crimson Red,
PC1004 Yellow Chartreuse, PC1005 Limepeel,
PC912 Apple Green, PC909 Grass Green
Memento Bamboo Leaves Ink
Versamark Ink
Ranger Gold embossing powder
Finetec Gold watercolor
Curious Metallics Super Gold cardstock
PTI Poppy cardstock
MISTI stamping tool
Bearly Art Precision Craft Glue
Elizabeth Craft Be Creative Tape 


Wednesday, October 28, 2020

Die Cut Merry Christmas

 I've been so busy that I had not had time to start doing Christmas cards until recently. I got out all of my Christmas dies because I suspected that I had not even used quite a few of them. I kind of thought that the reason for that is I couldn't quite envision how they would look on a card. I decided to just start die cutting them out of white paper to see how they look. 


As I was die cutting, I started putting things together and ended up with some Christmas cards that were all die cuts and no stamping at all. As the days go by, I will be posting these cards.

This one is placed over a panel I made using the shaving cream technique that you can see here and here. I made a huge stack of shaving cream panels in blue - some using stencils and some without.


The ones without stencils make a really pretty snow background. You will probably be seeing the ones using stencils on future cards.

I die cut the Hero Arts Snowflake Medallion die out of white cardstock and stuck it down onto the shaving cream panel. I added the sentiment and snowflakes that I die cut using some Impression Obsession dies and Memory Box glitter cardstock. Super simple, and it will be easy to make a lot.

Products Used:
Hero Arts DI789 Snowflake Medallion
Impression Obsession DIE330-R Merry Christmas
Impression Obsession DIE100-F Small Snowflake Set
Distress inkers: Broken China,
Faded Jeans, Speckled Egg
Memory Box Jewel Glitter cardstock
Neenah Solar White 80# & 110# cardstock
So Silk Glamour Green cartstock


Saturday, October 17, 2020

Magenta Card Exchange October: Distress Blends and Mandala Dreams

 This is the third card exchange sponsored by Magenta in which I have participated, and it's so much fun. This month, I coincidentally got the name of the person who got my name last month. So I'm getting a chance to send her a card this time.

The front panel of this card was blended using brushes and Distress inks, with Picked Raspberry, Abandoned Coral and Worn Lipstick. I stamped Mandala Dreams and Sending Hugs with Versamark ink and embossed with gold embossing powder. It was mounted onto a mat of Super Gold cardstock from Curious Metallics, and then onto a white card base. I'm super happy with how it turned out. I stamped Mandala dreams on the inside and also the envelope, and enclosed a couple of extra panels from stamps I designed.

I did the same design as a birthday card for a family member overseas. I think it works as a guy card too.


On this card, the only difference is that I used Distress Inks in Faded Jeans, Cracked Pistachio and Wilted Violet. Instead of just flicking water onto this one, I also put some of the Wilted Violet on my palette, wet it, and flicked that onto the panel as well.

Shaving Cream technique update:

The above cards were originally going to be done on a couple of my shaving cream background cards. When I tried to gold emboss on those though, part of the embossed areas turned dark.


They also had what I considered excessive pitting or bumpiness in the gold embossing. I even tried two types of powder to be sure it wasn't just the powder, and I tried embossing twice, which only made certain areas too thick and did not solve the darkness problem. The problem was immediately solved when I moved to using blended Distress Ink panels as my substrate.

In talking to Pam, who first brought the shaving cream technique to my attention (see my previous shaving cream card posts here and here), it seems that I missed the step of wiping off the panel with a cloth after scraping off the shaving cream. I didn't do that, and there was probably some shaving cream or sort of a soapy reside left on these cards. At this point, since they are all dry, the only solution I can think of is to spray them with a fixative, and I may try that, and let you know. I can also use them for die cutting and for putting die cuts onto.

Magenta Products used:

Other Products used:
Distress Ink: Picked Raspberry, 
Abandoned Coral, Worn Lipstick,
Faded Jeans, Cracked Pistachio,
Wilted Violet
Ranger gold embossing powder
Versamark ink
The Greetery Crimped Frame die
Super Gold Curious Metallics cardstock
Neenah Solar White 80# & 110# cardstock